In this tutorial, we will walk you through the steps to get started with Bluetooth Low Energy (BLE) development using the BleuIO USB dongle and the Go programming language. BleuIO is a versatile and user-friendly BLE USB dongle that simplifies BLE application development with its easy-to-use AT Commands. We will show you how to set up your environment, write a simple Go program to interact with the BLE dongle, and explore some of the key features of BleuIO.
Introduction to Go
Go, also known as Golang, is an open-source programming language developed by Google. It is designed for simplicity, efficiency, and reliability, making it an excellent choice for system programming and large-scale software development. Go’s strong concurrency support, fast compilation, and robust standard library make it a popular language for network programming, cloud services, and, of course, BLE applications.
Introduction to BleuIO
BleuIO is a Bluetooth Low Energy USB dongle that can be used to create new BLE applications quickly and easily. With its built-in AT Commands, developers can interact with the BLE dongle without needing deep knowledge of BLE protocols or complex configurations. BleuIO supports various operating systems, making it a versatile tool for any development environment.
Key features of BleuIO include:
Easy-to-use AT Commands for faster development
Compatibility with any programming language
Support for Windows, macOS, and Linux
Setting Up Your Development Environment
Step 1: Install Go
First, ensure that you have Go installed on your system. You can download the latest version of Go from the official website: https://golang.org/dl/. Follow the installation instructions for your operating system.
Step 2: Initialize a New Go Module
Create a directory and open a terminal . Run the following command to initialize a new Go module:
go mod init bleuio-example
Step 3: Install the Serial Package
Install the go.bug.st/serial package, which provides a simple API for serial communication in Go:
go get go.bug.st/serial
Writing Your First Go Program with BleuIO
Step 4: Write the Program
Create a new file named main.go in your project directory and add the following code:
package main

import (
	"fmt"
	"log"
	"time"

	"go.bug.st/serial"
)

func main() {
	// Open the serial port
	mode := &serial.Mode{
		BaudRate: 9600,
	}
	port, err := serial.Open("/dev/cu.usbmodem4048FDE52CF21", mode)
	if err != nil {
		log.Fatalf("Failed to open port: %v", err)
	}
	defer port.Close()

	// Write "AT+CENTRAL" to the serial port
	_, err = port.Write([]byte("AT+CENTRAL\r"))
	if err != nil {
		log.Fatalf("Failed to write AT+CENTRAL to port: %v", err)
	}
	fmt.Println("Command sent: AT+CENTRAL")

	// Wait for a short moment to ensure the command is processed
	time.Sleep(2 * time.Second)

	// Read the response for the AT+CENTRAL command
	buf := make([]byte, 100)
	n, err := port.Read(buf)
	if err != nil {
		log.Fatalf("Failed to read from port: %v", err)
	}
	fmt.Printf("Response from AT+CENTRAL:\n%s\n", string(buf[:n]))

	// Write "AT+GAPSCAN=5" to the serial port
	_, err = port.Write([]byte("AT+GAPSCAN=5\r"))
	if err != nil {
		log.Fatalf("Failed to write AT+GAPSCAN=5 to port: %v", err)
	}
	fmt.Println("Command sent: AT+GAPSCAN=5")

	// Wait for the scan to complete (5 seconds in this case)
	time.Sleep(6 * time.Second) // Adding a bit more time to ensure the response is received

	// Read the response for the AT+GAPSCAN=5 command
	buf = make([]byte, 1000)
	n, err = port.Read(buf)
	if err != nil {
		log.Fatalf("Failed to read from port: %v", err)
	}

	// Print the response
	fmt.Printf("Response from AT+GAPSCAN=5:\n%s\n", string(buf[:n]))
}
Step 5: Run the Program
Ensure your BleuIO USB dongle is connected and configured correctly. Then, run the program using the following command in the terminal:
go run main.go
Explanation of the Program
Opening the Serial Port: The program opens the serial port where the BleuIO dongle is connected. Adjust the serial port path (/dev/cu.usbmodem4048FDE52CF21) according to your system (e.g., COM3 on Windows). To get the location of connected BleuIO on macOS, run this command on terminal ls /dev/cu.*
Setting the Central Role: The program sends the AT+CENTRAL command to set the BLE dongle in central role mode. Similarly we can try sending AT+FINDSCANDATA=5B07=3 which will look for advertised data from BLE devices whose manufacturing id is 5B07.
Reading the Response: It waits for 2 seconds to ensure the command is processed and reads the response from the serial port.
Scanning for BLE Devices: The program sends the AT+GAPSCAN=5 command to scan for nearby BLE devices for 5 seconds.
Printing the Scan Results: After waiting for the scan to complete, the program reads and prints the response from the serial port.
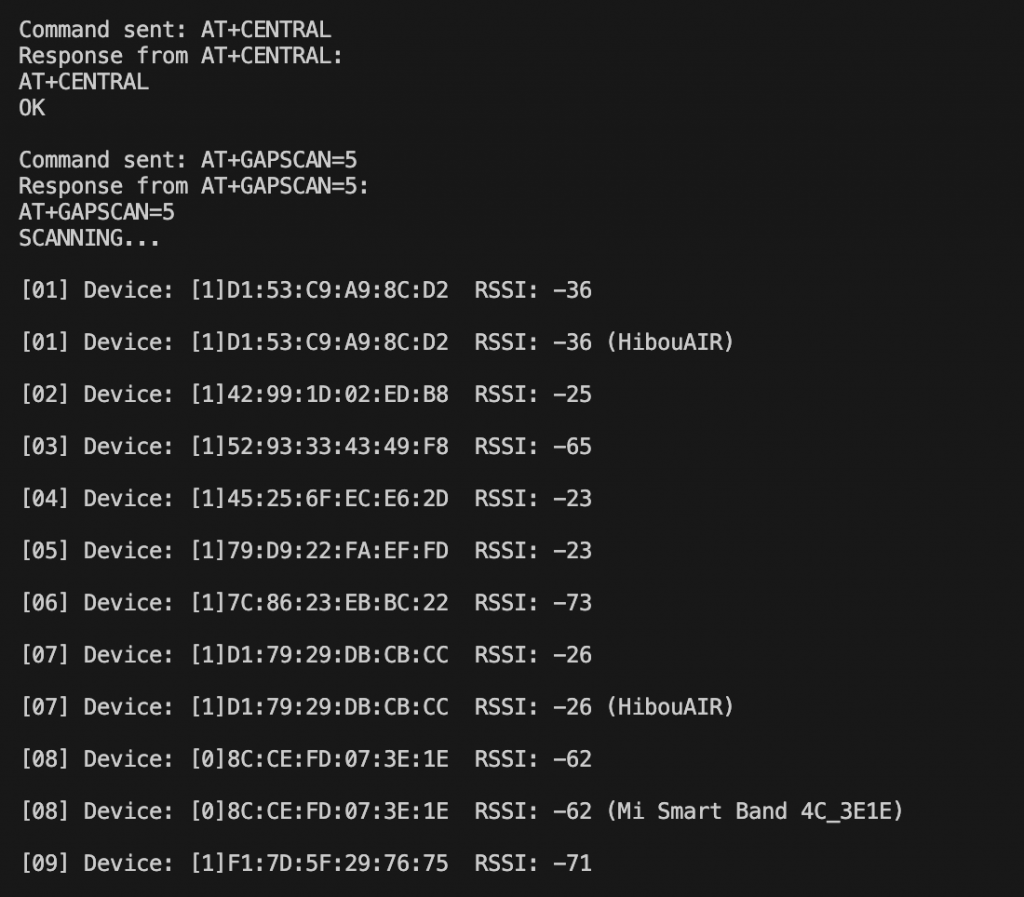
Output
This tutorial demonstrated how to get started with BLE development using the BleuIO USB dongle and the Go programming language. BleuIO simplifies BLE application development with its straightforward AT Commands, making it accessible for developers using any programming language. With Go’s efficiency and robust standard library, you can quickly develop powerful BLE applications.
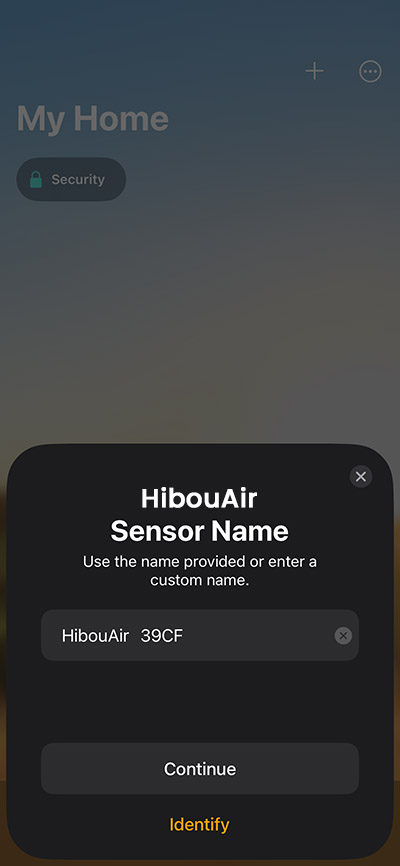
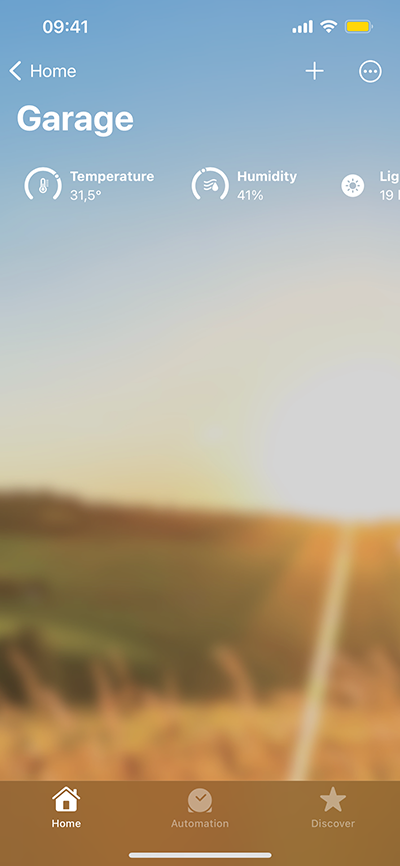
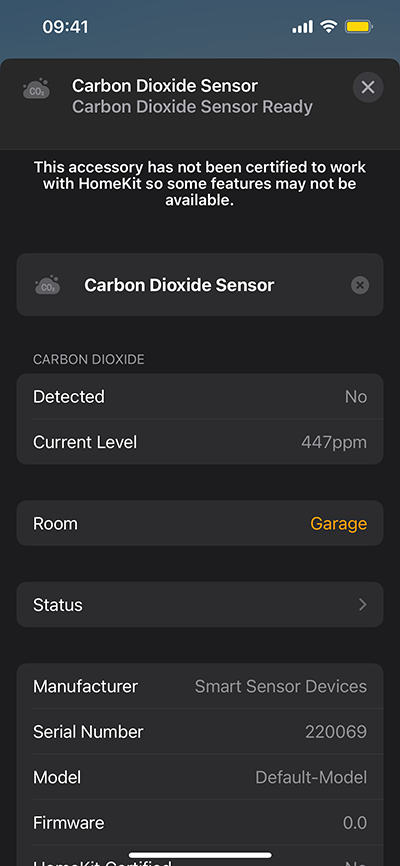
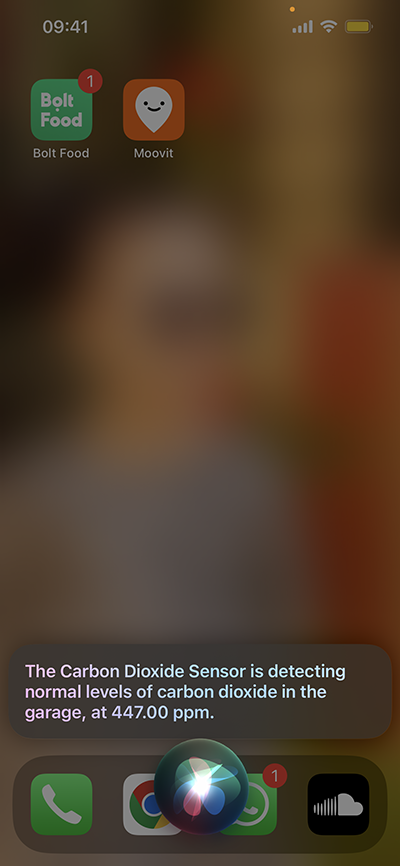
In this tutorial, we’ll walk you through the process of creating your own Apple HomeKit accessory that monitor and manage air quality data from a BLE device, specifically the HibouAir air quality monitoring device. By the end of this tutorial, you’ll have a functional BLE application that integrates with Apple’s HomeKit, demonstrating how easily you can develop BLE applications with the BleuIO dongle.
Overview of the Project
In this project, our goal is to create a BLE application that communicates with the HibouAir device, which provides air quality data. The application will:
Connect to a BleuIO USB dongle to communicate with BLE devices.
Scan for the HibouAir device using AT commands.
Decode the air quality data from the HibouAir device.
Integrate with HomeKit to display and manage the data in a smart home environment.
Update the accessory information and continuously monitor the air quality data.
What is HomeKit?
HomeKit is Apple’s framework for home automation that allows users to control smart home devices using their Apple devices. With HomeKit, you can control a wide range of devices like lights, thermostats, locks, and sensors through the Apple Home app, Siri voice commands, and other Apple devices.
The key features of HomeKit include:
Secure Communication: HomeKit uses end-to-end encryption to ensure that data transmitted between your devices and the Home app remains private and secure.
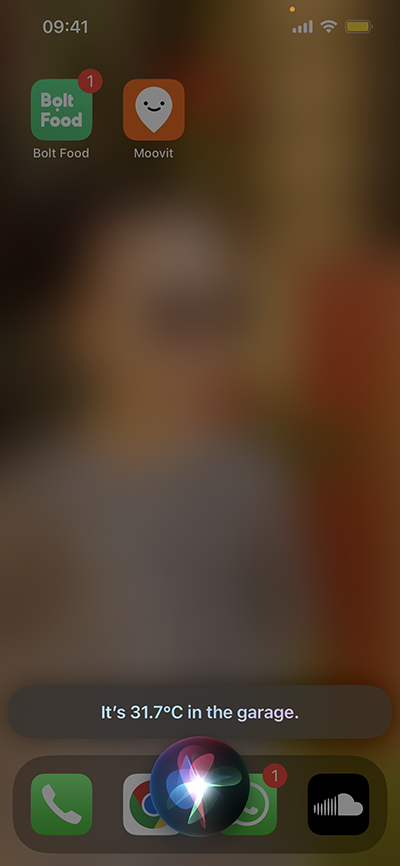
Integration with Siri: HomeKit-enabled devices can be controlled using Siri voice commands, enabling hands-free control of your smart home.
Automation: Users can create automated routines and scenes that trigger actions based on time, location, or device status. For example, you can set up a “Good Night” scene that turns off the lights and locks the door when you say goodnight to Siri.
What is HAP-NodeJS?
HAP-NodeJS is an open-source implementation of the HomeKit Accessory Protocol (HAP) written in Node.js. It allows developers to create HomeKit-compatible accessories and bridge devices that can be controlled through Apple’s HomeKit ecosystem.
Devices Required
To follow this tutorial, you will need:
BleuIO USB Dongle: A Bluetooth Low Energy USB dongle used to interface with BLE devices.
HibouAir Device: A BLE air quality monitoring device that provides air quality metrics such as temperature, CO2 levels, humidity, and light levels.
A Computer: Running Windows, macOS, or Linux , Raspberry Pi or any other platform that can run Node.js.
Connecting to BleuIO
To connect to the BleuIO dongle, we’ll use Node.js and the serialport package to communicate with the BLE device. The BleuIO dongle interfaces with your computer over a serial port, which allows you to send AT commands and receive data from BLE devices.
Decoding the Data
Once we receive the data from the HibouAir device, we need to decode it. The data is encoded in a specific format that we will parse and extract the relevant air quality metrics. We use a function to decode the advertisement data, which includes temperature, CO2 levels, humidity, and light levels.
Setting Up HomeKit Environment Data
We will use the hap-nodejs library to integrate our application with HomeKit. This will allow us to create HomeKit accessories that represent our air quality metrics. We set up services for temperature, CO2 levels, humidity, and light, and update these services with real-time data from the HibouAir device.
Running the Script
Here’s a step-by-step guide on how to set up and run the script:
Install Required Packages First, make sure you have Node.js installed on your computer. Then, install the required npm packages by running npm install hap-nodejs serialport
Create the Script Save the following code as hibouair.js or clone it from https://github.com/smart-sensor-devices-ab/bleuio-hibouair-homekit-integration
const hap = require('hap-nodejs');
const { SerialPort } = require('serialport');

const Accessory = hap.Accessory;
const Characteristic = hap.Characteristic;
const CharacteristicEventTypes = hap.CharacteristicEventTypes;
const Service = hap.Service;

// Get the device ID from the command-line arguments
const deviceId = process.argv[2];

if (!deviceId) {
  console.error(
    'Device ID not present. Please provide the device ID as follows:'
  );
  console.error('node hibouair.js <device_id>');
  process.exit(1);
}

// Define the manufacturer name you're looking for
const targetManufacturer = 'Smart Sensor Devices';

// Buffers to hold the incoming data
let buffer = '';
let scanningDetected = false;
let responseFound = false;
let port; // Variable to hold the SerialPort instance

// Initialize HomeKit accessories globally
let temperature, co2, humidity, light;

async function connectAndSendCommands() {
  try {
    // Get a list of all serial ports
    const ports = await SerialPort.list();

    // Find the port with the specified manufacturer
    const targetPort = ports.find(
      (port) => port.manufacturer === targetManufacturer
    );

    if (!targetPort) {
      console.log(`No port found with manufacturer: ${targetManufacturer}`);
      return;
    }

    // Log the selected port
    console.log(`Connecting to port: ${targetPort.path}`);

    // Create a new SerialPort instance for the selected port
    port = new SerialPort({
      path: targetPort.path,
      baudRate: 9600, // Adjust the baud rate as needed
    });

    // Event handler for when the port opens
    port.on('open', () => {
      console.log(
        `Port ${targetPort.path} is open and ready for communication.`
      );

      // Write the initial command
      port.write('AT+CENTRAL\r\n', (err) => {
        if (err) {
          console.error('Error writing initial command:', err.message);
        } else {
          console.log('Initial command sent: AT+CENTRAL');
        }
      });

      // Start the periodic scanning for BLE data
      setInterval(() => {
        port.write(`AT+FINDSCANDATA=${deviceId}=5\r\n`, (err) => {
          if (err) {
            console.error('Error writing scan command:', err.message);
          } else {
            console.log(`Scan command sent: AT+FINDSCANDATA=${deviceId}=5`);
          }
        });
      }, 20000); // 20000 milliseconds = 20 seconds
    });

    // Event handler for when data is received on the port
    port.on('data', (data) => {
      buffer += data.toString();
      processBuffer();
    });

    // Event handler for when there is an error
    port.on('error', (err) => {
      console.error('Error:', err.message);
      if (port) {
        port.close(() => {
          console.log('Port closed due to error.');
        });
      }
    });
  } catch (err) {
    console.error('Error listing or connecting to serial ports:', err);
    if (port) {
      port.close(() => {
        console.log('Port closed due to error.');
      });
    }
  }

  function processBuffer() {
    // Split the buffer into lines
    const lines = buffer.split('\r\n');

    for (let i = 0; i < lines.length; i++) {
      const line = lines[i].trim();

      if (line === 'SCANNING...') {
        scanningDetected = true;
      } else if (line === 'SCAN COMPLETE') {
        scanningDetected = false;
      } else if (scanningDetected && line.length > 0) {
        // Extract the data from the line
        const dataMatch = line.match(/^\[.*?\] Device Data \[ADV\]: (.+)$/);
        if (dataMatch && dataMatch[1]) {
          const extractedData = dataMatch[1].trim();
          console.log('Extracted data:', extractedData);

          // Decode the data
          const decodedData = advDataDecode(extractedData);
          console.log('Decoded data:', decodedData);

          responseFound = true;
          buffer = ''; // Clear the buffer after finding the response

          if (!temperature || !co2 || !humidity || !light) {
            setupAccessory(decodedData); // Setup accessory if not already done
          } else {
            updateAccessory(decodedData); // Update accessory with decoded data
          }

          return;
        }
      }
    }

    // Keep the remaining buffer if no relevant line was found
    buffer = lines[lines.length - 1]; // Retain the last part of the buffer
  }

  // Function to decode the advertisement data
  function advDataDecode(adv) {
    let pos = adv.indexOf('5B0705');
    let dt = new Date();
    let currentTs =
      dt.getFullYear() +
      '/' +
      (dt.getMonth() + 1).toString().padStart(2, '0') +
      '/' +
      dt.getDate().toString().padStart(2, '0') +
      ' ' +
      dt.getHours().toString().padStart(2, '0') +
      ':' +
      dt.getMinutes().toString().padStart(2, '0') +
      ':' +
      dt.getSeconds().toString().padStart(2, '0');
    let tempHex = parseInt(
      '0x' +
        adv
          .substr(pos + 22, 4)
          .match(/../g)
          .reverse()
          .join('')
    );
    if (adv) dataShowing = true;
    if (tempHex > 1000) tempHex = (tempHex - (65535 + 1)) / 10;
    else tempHex = tempHex / 10;
    return {
      boardID: adv.substr(pos + 8, 6),
      type: adv.substr(pos + 6, 2),
      light: parseInt(
        '0x' +
          adv
            .substr(pos + 14, 4)
            .match(/../g)
            .reverse()
            .join('')
      ),
      pressure:
        parseInt(
          '0x' +
            adv
              .substr(pos + 18, 4)
              .match(/../g)
              .reverse()
              .join('')
        ) / 10,
      temp: tempHex,
      hum:
        parseInt(
          '0x' +
            adv
              .substr(pos + 26, 4)
              .match(/../g)
              .reverse()
              .join('')
        ) / 10,
      voc: parseInt(
        '0x' +
          adv
            .substr(pos + 30, 4)
            .match(/../g)
            .reverse()
            .join('')
      ),
      pm1:
        parseInt(
          '0x' +
            adv
              .substr(pos + 34, 4)
              .match(/../g)
              .reverse()
              .join('')
        ) / 10,
      pm25:
        parseInt(
          '0x' +
            adv
              .substr(pos + 38, 4)
              .match(/../g)
              .reverse()
              .join('')
        ) / 10,
      pm10:
        parseInt(
          '0x' +
            adv
              .substr(pos + 42, 4)
              .match(/../g)
              .reverse()
              .join('')
        ) / 10,
      co2: parseInt('0x' + adv.substr(pos + 46, 4)),
      vocType: parseInt('0x' + adv.substr(pos + 50, 2)),
      ts: currentTs,
    };
  }
}

// Function to setup HomeKit accessory
function setupAccessory(data) {
  const accessoryUuid = hap.uuid.generate('hap.hibouair.sensor');
  const accessory = new Accessory('HibouAir', accessoryUuid);

  // Create a function to initialize services
  function initializeService(
    serviceType,
    serviceName,
    initialValue,
    characteristicType
  ) {
    const service = new serviceType(serviceName);

    const characteristic = service.getCharacteristic(characteristicType);

    characteristic.on(CharacteristicEventTypes.GET, (callback) => {
      console.log(`Queried current ${serviceName}: ${initialValue}`);
      callback(undefined, initialValue);
    });

    accessory.addService(service);

    return {
      service,
      characteristic,
      initialValue,
    };
  }

  // Initialize temperature, CO2, humidity, and light services
  temperature = initializeService(
    Service.TemperatureSensor,
    'Temperature Sensor',
    data.temp,
    Characteristic.CurrentTemperature
  );

  co2 = initializeService(
    Service.CarbonDioxideSensor,
    'CO2 Sensor',
    data.co2,
    Characteristic.CarbonDioxideLevel
  );

  humidity = initializeService(
    Service.HumiditySensor,
    'Humidity Sensor',
    data.hum,
    Characteristic.CurrentRelativeHumidity
  );

  light = initializeService(
    Service.LightSensor,
    'Light Sensor',
    data.light,
    Characteristic.CurrentAmbientLightLevel
  );

  // Set accessory information
  accessory
    .getService(Service.AccessoryInformation)
    .setCharacteristic(Characteristic.Manufacturer, 'Smart Sensor Devices')
    .setCharacteristic(Characteristic.SerialNumber, deviceId);

  // Publish the accessory
  accessory.publish({
    username: '17:51:07:F4:BC:8B',
    pincode: '123-45-678',
    port: 47129,
    category: hap.Categories.SENSOR, // value here defines the symbol shown in the pairing screen
  });

  console.log('Accessory setup finished!');
}

// Function to update HomeKit accessory with new data
function updateAccessory(data) {
  temperature.initialValue = data.temp;
  co2.initialValue = data.co2;
  humidity.initialValue = data.hum;
  light.initialValue = data.light;

  console.log(`Updated current temperature: ${temperature.initialValue}`);
  console.log(`Updated current CO2 level: ${co2.initialValue}`);
  console.log(`Updated current Humidity level: ${humidity.initialValue}`);
  console.log(`Updated current light level: ${light.initialValue}`);

  // Update the characteristic values
  temperature.service.setCharacteristic(
    Characteristic.CurrentTemperature,
    temperature.initialValue
  );
  co2.service.setCharacteristic(
    Characteristic.CarbonDioxideLevel,
    co2.initialValue
  );
  humidity.service.setCharacteristic(
    Characteristic.CurrentRelativeHumidity,
    humidity.initialValue
  );
  light.service.setCharacteristic(
    Characteristic.CurrentAmbientLightLevel,
    light.initialValue
  );
}

// Call the function to connect and send commands
connectAndSendCommands();
Run the Script
Execute the script from your terminal by providing the device ID as an argument:
node hibouair.js 220069
This command will start the script, connect to the BleuIO dongle, scan for the HibouAir device, decode the data, and set up the HomeKit accessories with the real-time data from the device.
Output
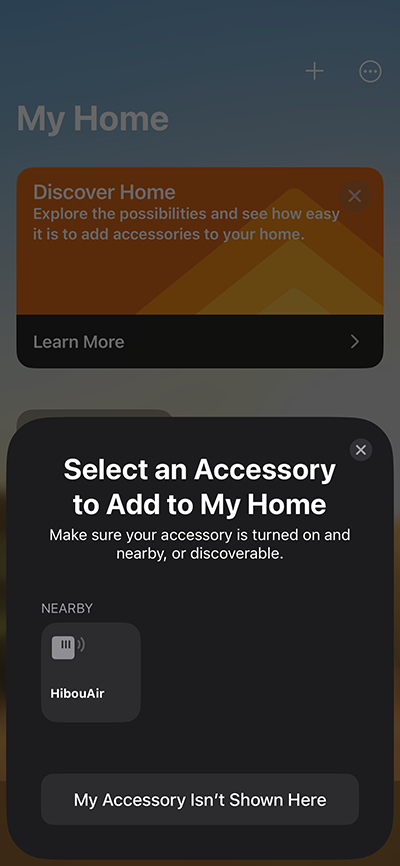
Screenshot
This tutorial demonstrates how easy it is to develop BLE applications using BleuIO and integrate them with HomeKit. By following these steps, you can create real-time monitoring solutions for a variety of BLE-enabled devices, enhancing the functionality of your smart home environment.
This example is going to showcase how to connect a PDM MEMS Microphone to a Adafruit Feather RP2040, together with a BlueIO to create a background noise sensor that measures and advertisises the current sound level in decibel (dB). This example is very similar to Integrating BleuIO with Adafruit Feather RP2040 for Seamless BLE Applications Part 2 but instead of reading sensor data over SPI every few seconds, we’re using the arduino PDM interface to continuously fill a buffer with data then everytime the buffer is full we’re going to translate the data into the current sound level in dB. The buffer size of 8000 bytes (2 bytes per sample) and the sample rate of 16kHz means we record 250ms each time we fill the buffer.
Connect four wires from the PDM Microphone (3V, GND, DAT, CLK) to the following pins on the Feather Board:
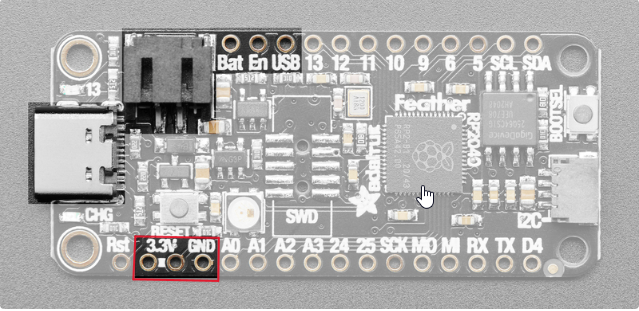
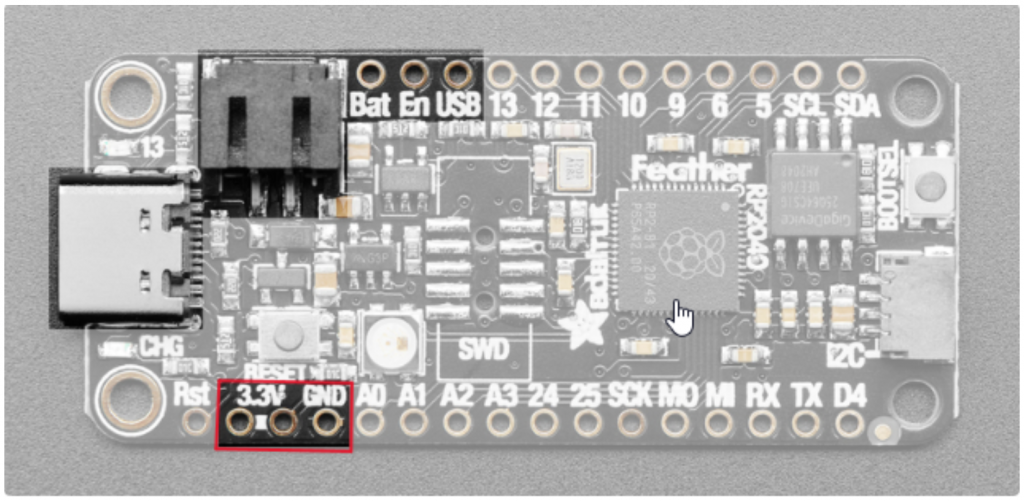
3V to 3.3V to power the device, then GND to GND.
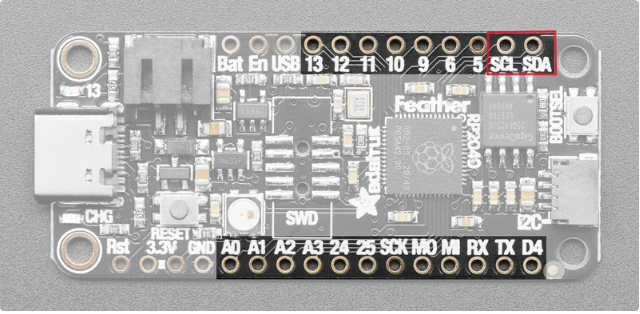
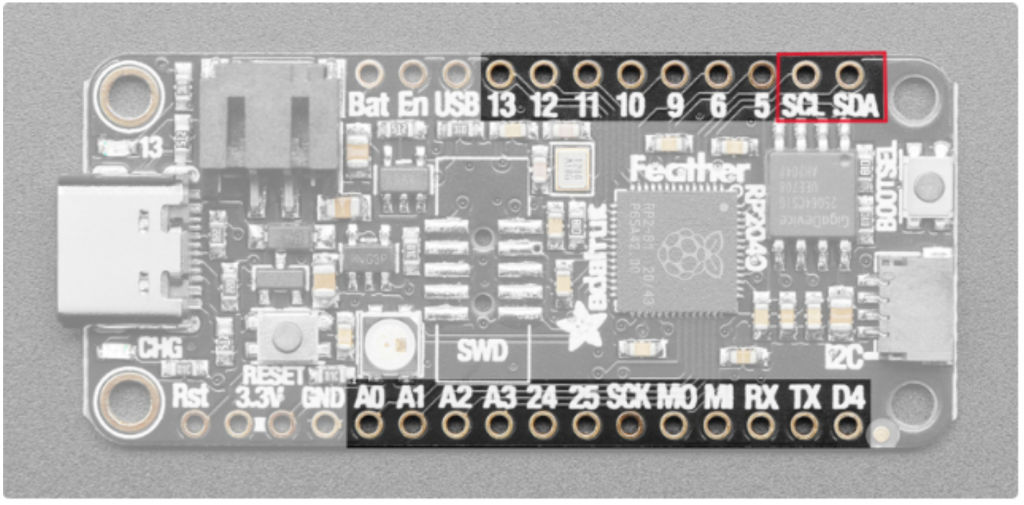
And CLK to SCL, and DAT to SDA.
Running the example
Make sure the BleuIO Dongle is connected to the Feather RP2040 Board.
Connect the Feather RP2040 Board to your computer using the USB cable.
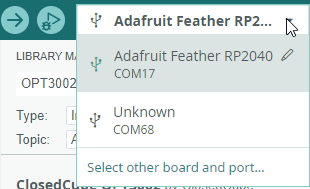
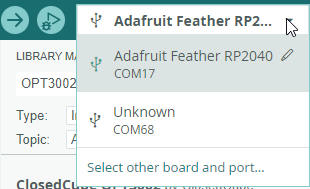
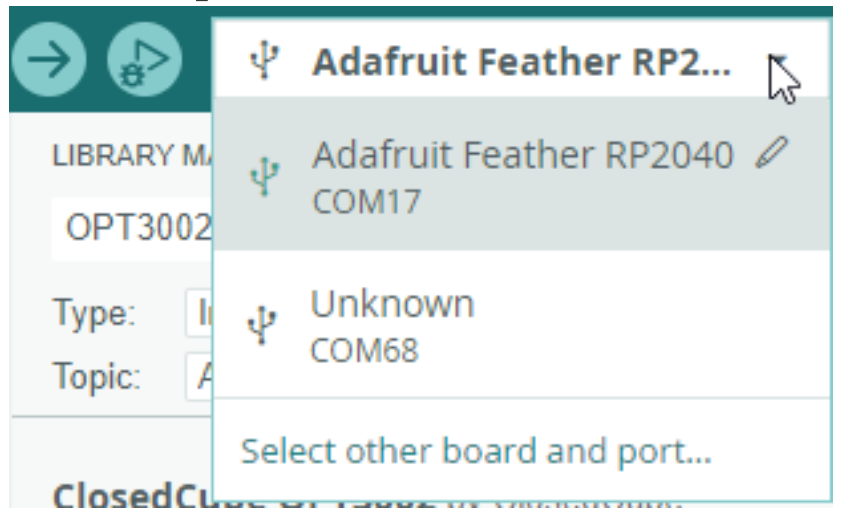
Make sure the Feather RP2040 Board is selected as well as the correct COM port in the drop-down menu.
(Optional) Change the frequency the advertising message is updated with the dB value, in the code // How often we update the advertising message (in seconds) #define READ_UPDATE_FREQUENCY 1
Click the Upload button.
Done! The dongle should now be advertising the sensor values. (If you just plugged in the Feather it may take about 10 seconds before advertising starts as the BleuIO bootloader opens and closes)
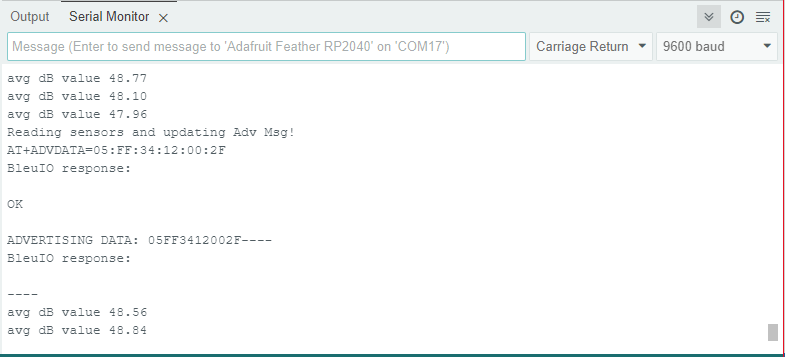
(Optional) Open Serial Monitor. You can open the Serial Monitor from the menu: Tools>Serial Monitor You should now see the output from the project.
Scanning the results
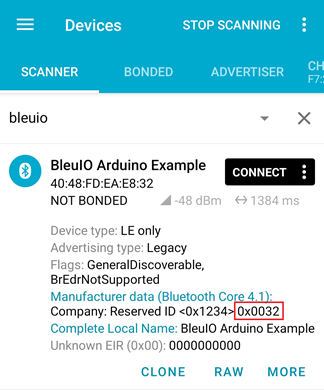
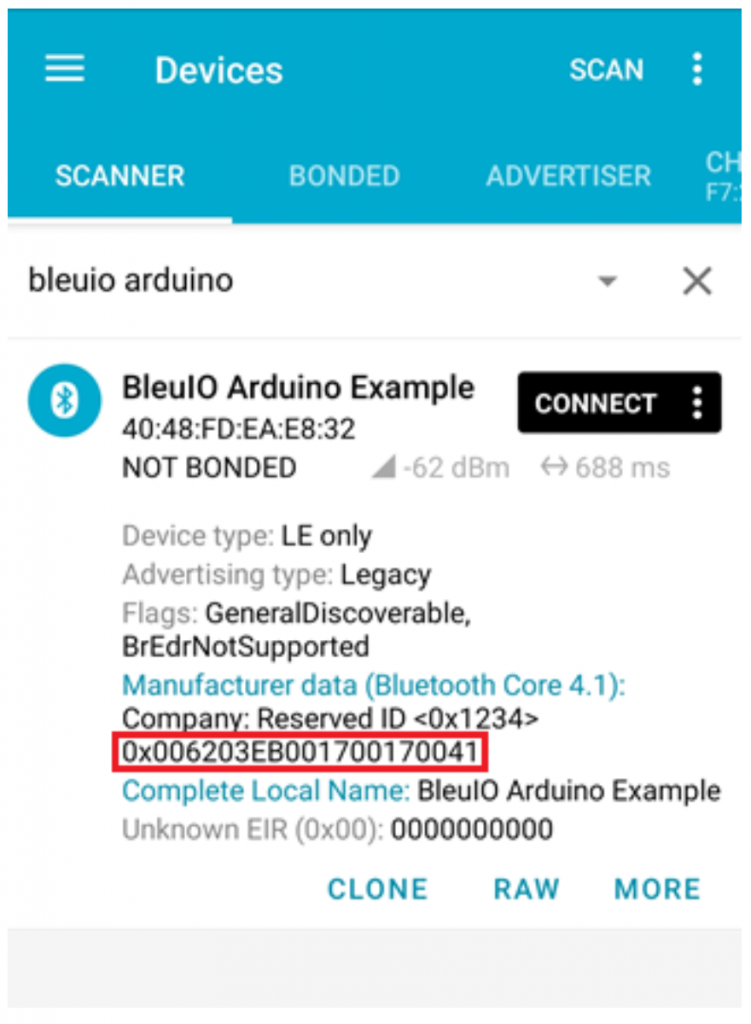
To see the results you can use any BLE scanner app. Here we use nRF Connect:
The data in the red box is our sensor values: 0x0032
When we parse the hex into decimal values we get: 0x0032 = 50 dB
In this tutorial, we’ll explore how to create a Bluetooth Low Energy (BLE) application using ReactJS and the BleuIO BLE USB dongle. BleuIO is a versatile BLE device that makes developing BLE applications fast and easy with its user-friendly AT commands.
Introduction
Bluetooth Low Energy (BLE) technology is widely used for short-range communication, particularly in IoT applications. BleuIO, with its easy-to-use AT commands, simplifies the process of integrating BLE functionality into your applications. In this tutorial, we’ll demonstrate how to create a BLE application using ReactJS. Specifically, we will show you how to scan for nearby BLE devices for three seconds and display the results on the screen, highlighting the capabilities of BleuIO.
Prerequisites
Before we start, make sure you have the following:
A computer with a Chromium-based browser (like Chrome or Edge)
Node.js and npm installed
Basic knowledge of ReactJS
Setting Up the Project
First, let’s create a new React project. If you haven’t already installed create-react-app, you can do so with the following command:
npx create-react-app ble-react-app
cd ble-react-app
npm start
This will create a new React application and start the development server.
Creating the Serial Port Component
We’ll create a component to handle the serial port communication with the BleuIO dongle. Create a new file called SerialPortComponent.jsin the src directory and add the following code:
import React, { useState, useEffect } from 'react';
// Read data from the serial port. readSerialData(reader); } catch (error) { console.error('There was an error opening the serial port:', error); } };
const readSerialData = async (reader) => { try { while (true) { const { value, done } = await reader.read(); if (done) { // Allow the serial port to be closed later. reader.releaseLock(); break; } // Convert the received data to a string and update the state. setOutput((prevOutput) => prevOutput + value); } } catch (error) { console.error('Error reading from the serial port:', error); } };
// Wait for scan to complete and read response await new Promise((resolve) => setTimeout(resolve, 3000));
// Read and process data from the serial port let scanData = ''; while (true) { const { value, done } = await reader.read(); if (done) { break; } scanData += value; } setOutput((prevOutput) => prevOutput + scanData); } else { console.error('Writer not available'); } } catch (error) { console.error('Error writing to the serial port:', error); } };
useEffect(() => { return () => { // Cleanup function to close port when component unmounts if (port) { port.close(); } if (reader) { reader.releaseLock(); } if (writer) { writer.releaseLock(); } }; }, [port, reader, writer]);
return ( <div className="mt-5"> <button className="btn btn-success me-2" onClick={connectToSerialPort} disabled={!!port} > Connect to BleuIO </button> <button className="btn btn-warning me-2" onClick={writeToSerialPort} disabled={!writer} > Scan for nearby BLE devices for 3 seconds </button>
{output && ( <div> <h3>Response from the BleuIO:</h3> <pre>{output}</pre> </div> )} </div> ); };
export default SerialPortComponent;
Explanation of the Code
Connecting to the Serial Port: The connectToSerialPort function requests access to the serial port and opens a connection. It initializes the text encoder and decoder streams for reading and writing data.
Reading Serial Data: The readSerialData function reads data from the serial port continuously and updates the output state with the received data.
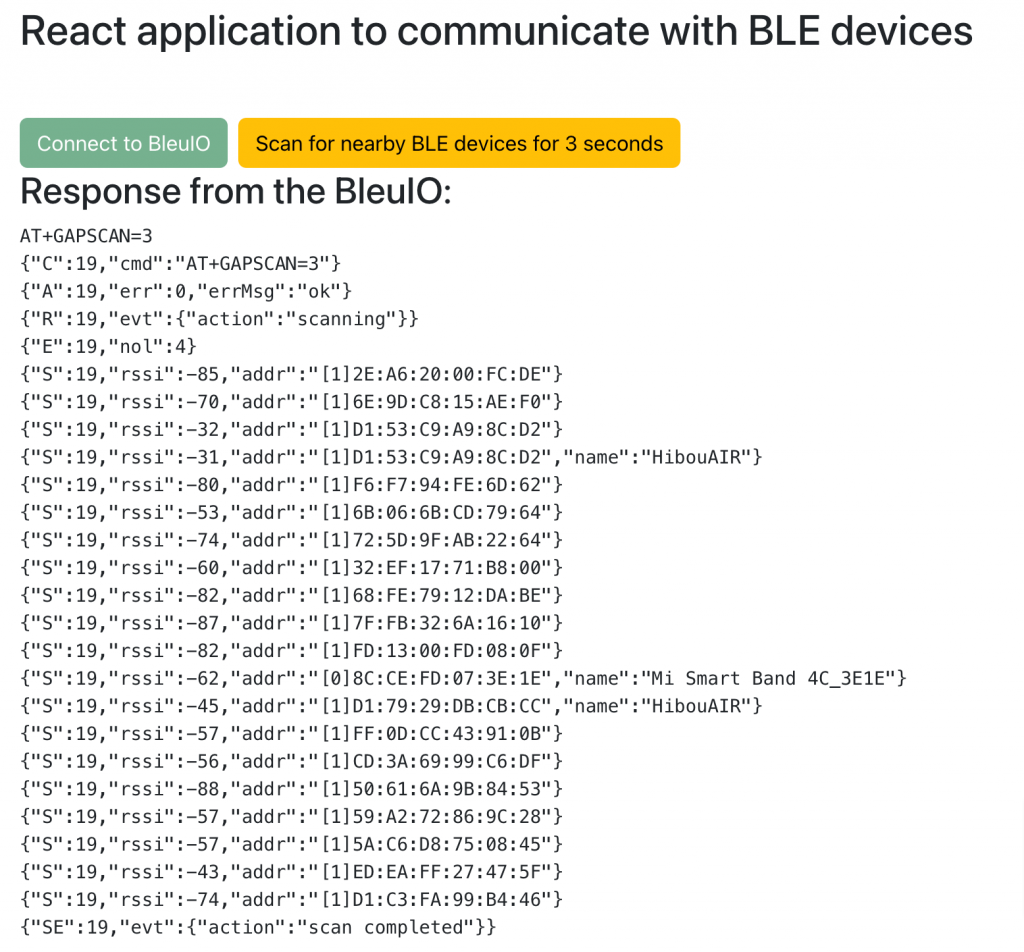
Writing to the Serial Port: The writeToSerialPort function sends AT commands to the serial port. It first sends the AT+CENTRAL command to put the device in central mode, then sends the AT+GAPSCAN=3 command to scan for nearby BLE devices for 3 seconds. It reads and displays the response from the serial port after the scan completes.
Cleanup: The useEffect hook ensures that the serial port is properly closed and resources are released when the component is unmounted.
Using the Component in Your App
Update your App.js to include the new SerialPortComponent.
// src/App.js
import React from 'react';
import SerialPortComponent from './SerialPortComponent';

function App() {
  return (
    <div className="App">
      <header className="App-header">
        <h1>BLE Application with React and BleuIO</h1>
        <SerialPortComponent />
      </header>
    </div>
  );
}

export default App;
Running the Application
Make sure your BleuIO USB dongle is connected to your computer. Start your React application:
npm start
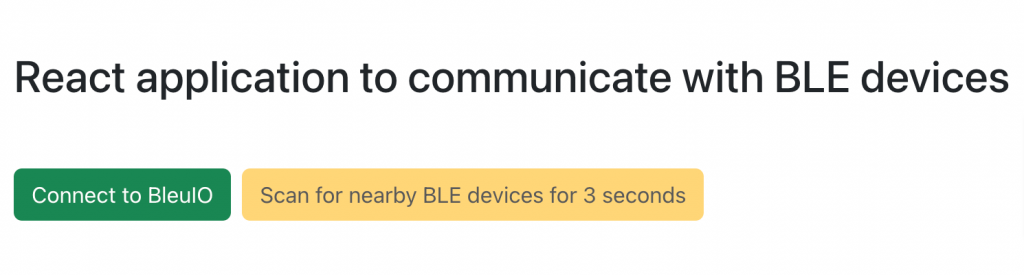
Open your browser and navigate to http://localhost:3000. You should see the application with two buttons: “Connect to BleuIO” and “Scan for nearby BLE devices for 3 seconds“.
Connect to BleuIO: Click this button to connect to the BleuIO USB dongle. The browser will prompt you to select the serial port.
Scan for nearby BLE devices for 3 seconds: After connecting, click this button to send the AT+CENTRAL and AT+GAPSCAN=3 commands to the BleuIO dongle. The output area will display the response from the device.
Output
In this tutorial, we’ve demonstrated a basic usage of BleuIO AT commands by creating a BLE application using ReactJS and the BleuIO USB dongle. By leveraging the Web Serial API and the straightforward AT commands provided by BleuIO, you can quickly develop BLE applications that run on any platform. You can expand on this example to develop your own applications using BleuIO’s comprehensive set of AT commands. Read more about the AT commands in our documentation.
BleuIO simplifies BLE development and, combined with the popularity and versatility of ReactJS, allows developers to create powerful and cross-platform BLE applications with ease. Whether you’re building IoT devices, wearable tech, or any BLE-enabled application, BleuIO is a reliable and efficient choice.
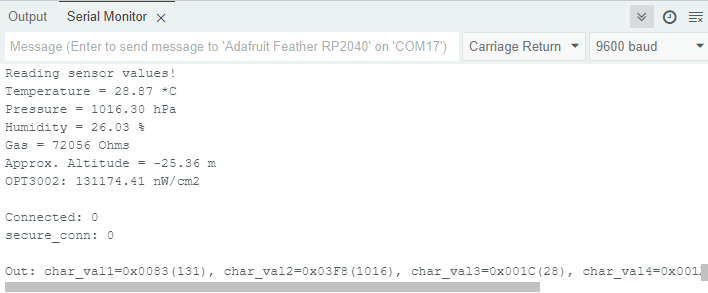
Building on the steps in our previous post Integrating BleuIO with Adafruit Feather RP2040 for Seamless BLE Applications Part 2 where we showed how to use the BleuIO to advertise sensor data, we are now going to put the data in a Custom Service. Additionally, we are going to protect the data by making it only available with a secure connection that can only be established by entering a 6-digit passkey.
This example is going to show you how to start protecting your data as well as how to set up and use a custom service.
// How often we read the sensors and update the characteristics (in
seconds)
#define READ_UPDATE_FREQUENCY   5
Click the Upload button.
Done! The dongle should now be advertising the sensor values. (If you just plugged in the Feather it may take about 10 seconds before advertising starts as the BleuIO bootloader opens and closes)
(Optional) Open Serial Monitor. You can open the Serial Monitor from the menu:
Tools>Serial Monitor
You should now see the output from the project.
Getting the data
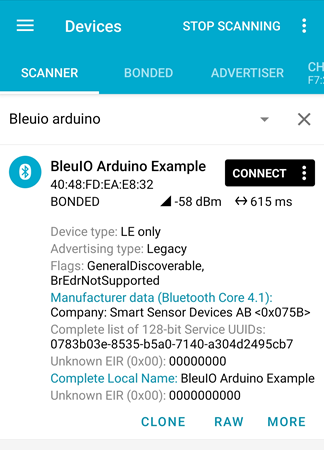
To get the results you can use any BLE scanner app. Here we use nRF Connect:
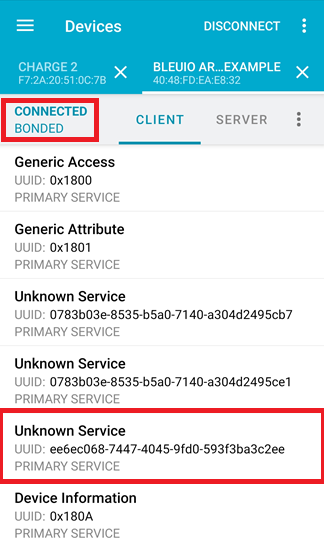
Find the device that advertise as BleuIO Arduino Example and connect.
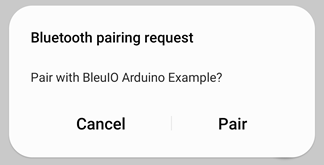
You will be prompted to pair.
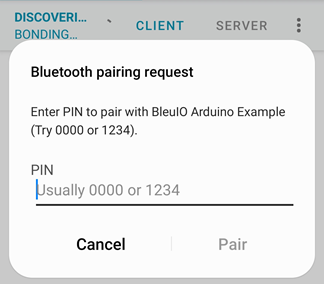
And then to enter the passkey. Enter the passkey/pin (default: 232425) and continue.
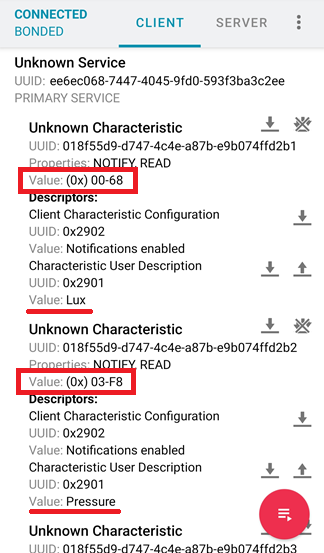
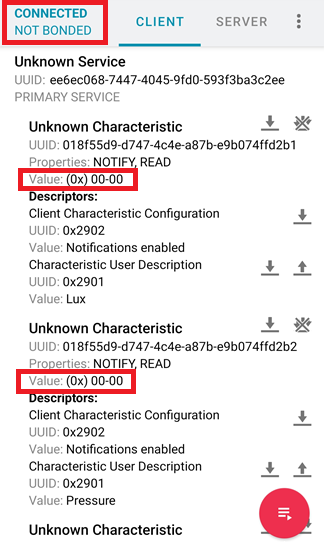
Go to the service with the UUID: ee6ec068-7447-4045-9fd0-593f3ba3c2ee Notice that you are now bonded.
The service has 5 characteristics, one for each of the sensor values:
1. Lux 2. Pressure 3. Temperature 4. Humidity 5. Gas resistance
Read and/or enable notification for each characteristic to see the data. The Characteristic User Description Descriptor of each characteristic can be read to show what value it holds.
Like in the previous example, when we parse the hex into decimal values we get:
BleuIO is a versatile Bluetooth Low Energy (BLE) USB dongle designed to simplify the development of BLE applications. With its support for AT commands and seamless integration with Rust programming language, BleuIO offers developers a straightforward and efficient way to create BLE applications. In this tutorial, we will explore how to use BleuIO and Rust to develop BLE applications easily.
About Rust Programming Language:
Rust is a modern, systems programming language that focuses on safety, performance, and concurrency. Developed by Mozilla, Rust has gained popularity for its unique features and advantages, making it an excellent choice for various application domains, including system programming, web development, and embedded systems.
Computer with Rust compiler and serial communication capabilities
Setting Up BleuIO:
Connect BleuIO Dongle:
Connect the BleuIO dongle to an available USB port on your computer.
Identify Serial Port:
Identify the serial port associated with BleuIO. For example, On macOS and Linux, it may look like /dev/cu.usbmodem4048FDE52DAF1. On windows it looks like COM6
Installing Rust and Cargo:
Windows:
Download and install the Rust compiler (including Cargo) from the official website: Rustup.
Follow the installation instructions provided on the website.
Mac/Linux:
Open a terminal and run the following command to install Rust and Cargo:
curl --proto '=https' --tlsv1.2 -sSf https://sh.rustup.rs | sh
Follow the on-screen instructions to complete the installation.
Creating a Cargo Project:
Open Terminal/Command Prompt:
Windows: Open Command Prompt or PowerShell.
Mac/Linux: Open Terminal.
Navigate to Project Directory:
cd /path/to/projects
Create a New Cargo Project:
cargo new BleuIO
This will create a new directory named “BleuIO” containing the project files.
Navigate into the Project Directory:
cd BleuIO
Writing BLE Application Code:
Open src/main.rs in Your Code Editor:
Replace the default Rust code with the BLE application code. Make sure to replace the port_name with your connected BleuIO port.
Implement BLE Application Logic:
Write Rust code to interact with BleuIO using AT commands.
use std::io::{self, Write};
use std::thread::sleep;
use std::time::Duration;
use serialport;

fn main() -> io::Result<()> {
    // Open the serial port
    let port_name = "/dev/cu.usbmodem4048FDE52DAF1";
    let mut port = serialport::new(port_name, 9600)
        .timeout(Duration::from_secs(5)) // Adjust timeout value here (5 seconds in this example)
        .open()
        .map_err(|e| io::Error::new(io::ErrorKind::Other, e))?;

    // Write "AT+CENTRAL" to set the BleuIO dongle to centrla role
    let data_central = b"AT+CENTRAL\r\n";
    port.write_all(data_central).map_err(|e| io::Error::new(io::ErrorKind::Other, e))?;

    // Wait for 500 milliseconds
    sleep(Duration::from_millis(5));

    // Write "AT+GAPSCAN=3" to scan for nearby BLE devices for 3 seconds
    let data_gapscan = b"AT+GAPSCAN=3\r\n";
    port.write_all(data_gapscan).map_err(|e| io::Error::new(io::ErrorKind::Other, e))?;

    // Read response from the BleuIO dongle until no more data is available
    let mut response = String::new();
    loop {
        let mut buffer: [u8; 128] = [0; 128];
        let bytes_read = port.read(&mut buffer).map_err(|e| io::Error::new(io::ErrorKind::Other, e))?;

        // Check if no more data is available
        if bytes_read == 0 {
            break;
        }

        // Convert bytes to string and append to the response
        let chunk = String::from_utf8_lossy(&buffer[..bytes_read]);
        response.push_str(&chunk);

        // Print the current chunk of response
        print!("{}", chunk);
    }

    // Drop the port to close it
    drop(port);

    Ok(())
}
Building and Running the Project:
Build the Project:
cargo build
Run the Project:
cargo run
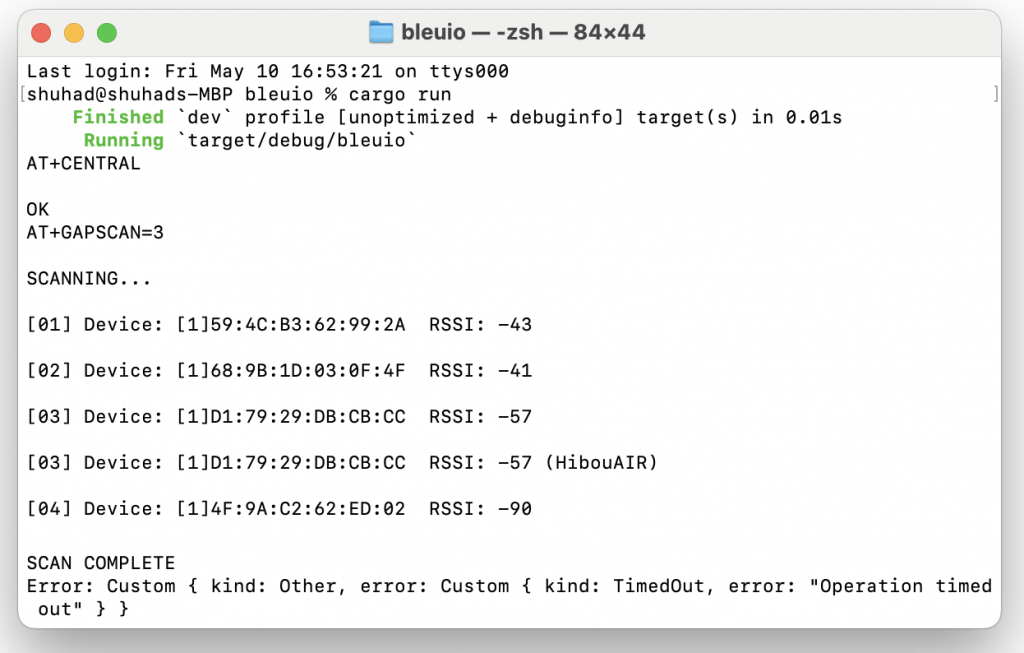
Output
In this tutorial, we’ve demonstrated how to develop a simple BLE applications using BleuIO and Rust that puts the BleuIO in central role and scans for nearby BLE devices for 3 seconds. Finally shows the list on the screen. By using BleuIO’s support for AT commands and Rust’s simplicity, developers can create BLE applications effortlessly. Start exploring the possibilities with BleuIO and Rust today!
After following the steps in our previous post Integrating BleuIO with Adafruit Feather RP2040 for Seamless BLE Applications and trying out the Adafruit TinyUSB Library Example serial_host_bridge it is now time for a more practical example. This example is going to show you how to connect real sensors to the Feather, read the values and have it command the BleuIO to advertise them.
Basically you could say that you are going to create a autonomous BLE beacon that advertise the current temperature, humidity etc.
For this example we are using a Gas sensor BME680 and a OPT3002 Light-to-Digital Sensor.
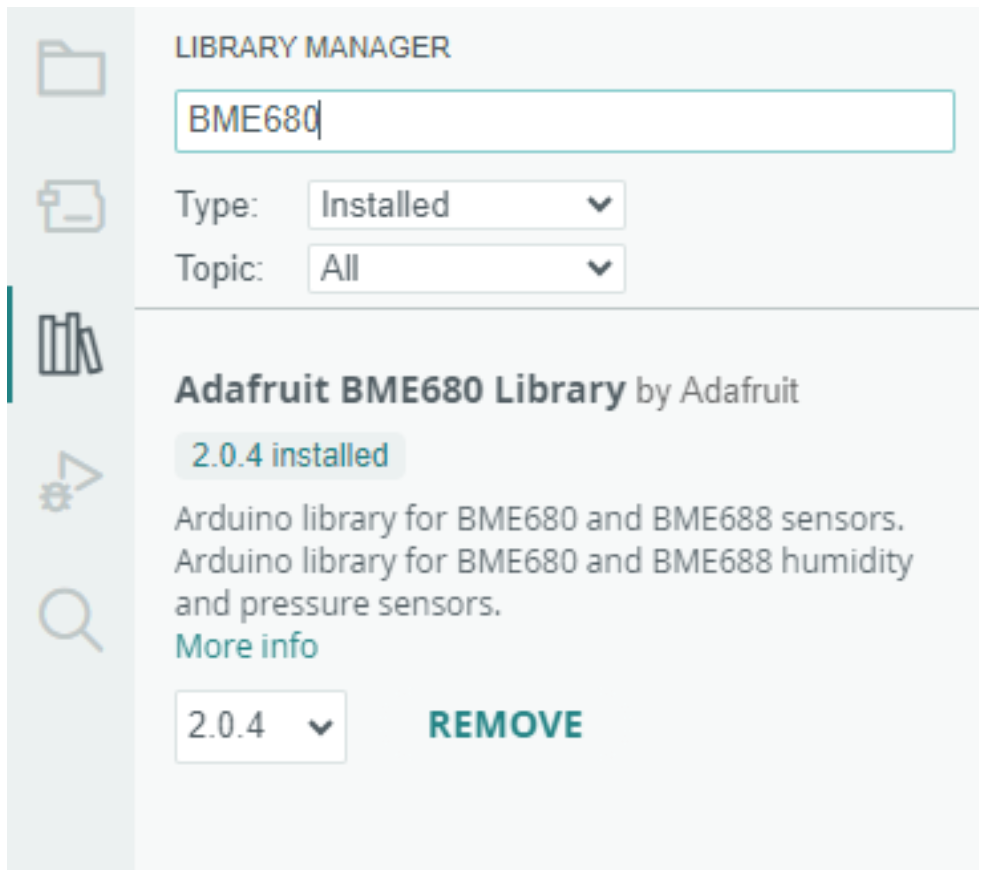
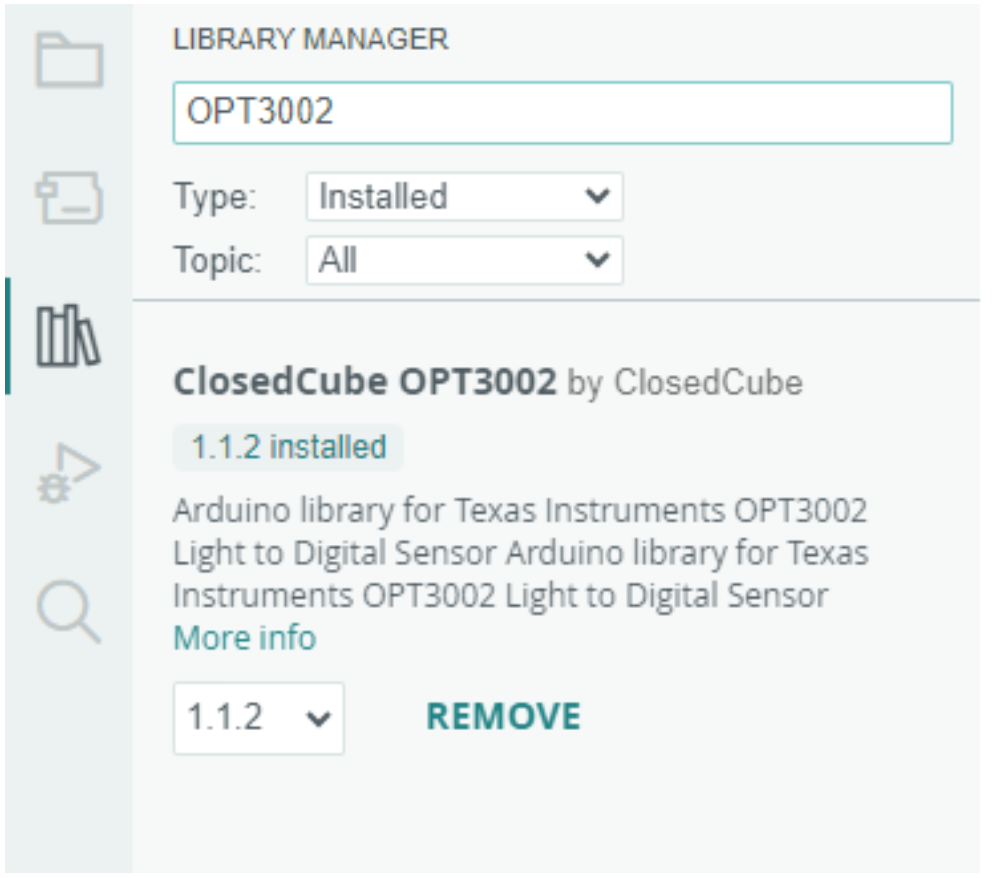
The libraries can easily be installed through the Arduino IDE:
Open Library Manager by clicking the Library Manager icon to the left or go through menu: Sketch>Include Libraries>Manage Libraries…
Search for Adafruit_BME680, and install the Adafruit_BME680 Library
Search for ClosedCube OPT3002, and install the ClosedCube OPT3002 library
Connecting I2C sensors
Connect four wires (at a minimum) for each I2C device.
Power the device with 3.3V, then a ground wire.
And a SCL clock wire, and and a SDA data wire.
Running the example
Make sure the BleuIO Dongle is connected to the Feather RP2040 Board.
Connect the Feather RP2040 Board to your computer using the USB cable.
Make sure the Feather RP2040 Board is selected aswell as the correct COM port in the dropdown menu.
(Optional) Change the frequency the sensors are read and advertising data updated, in the code
// How often we read the sensors and update the advertings message
(in seconds)
#define READ_UPDATE_FREQUENCY   5
Click the Upload button.
Done! The dongle should now be advertising the sensor values. (If you just plugged in the Feather it may take about 10 seconds before advertising starts as the BleuIO bootloader opens and closes)
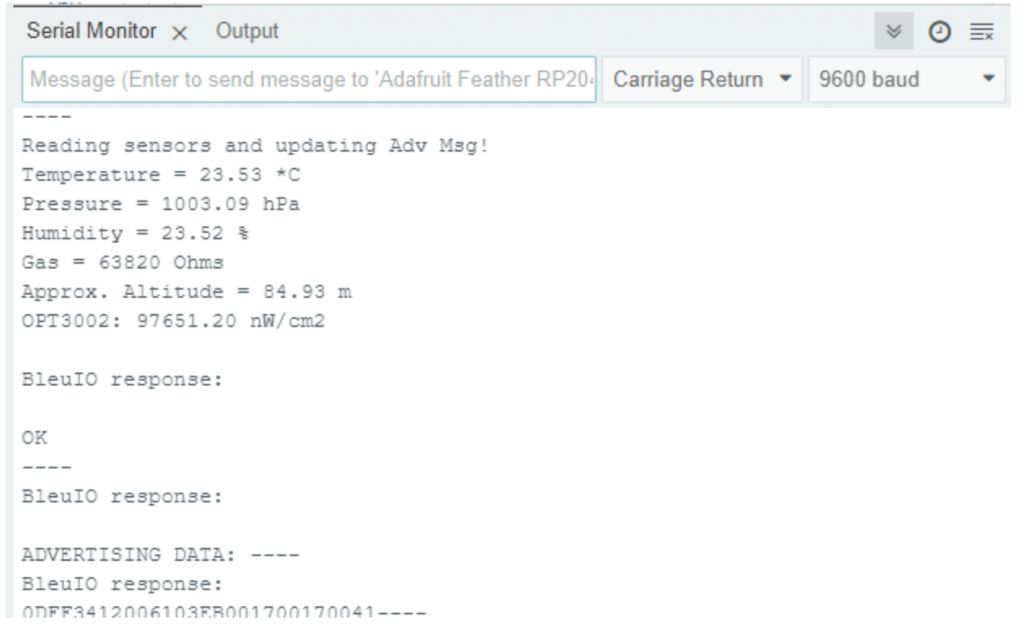
(Optional) Open Serial Monitor. You can open the Serial Monitor from the menu: Tools>Serial Monitor
You should now see the output from the project.
Scanning the results
To see the results you can use any BLE scanner app.
In today’s data-driven world, extracting meaningful insights from raw data is crucial for informed decision-making. Microsoft Excel stands as an amazing tool for data analysis, offering powerful features for visualization, manipulation, and interpretation. However, accessing and processing data from external sources, such as BLE devices, can often be challenging and time-consuming.
BleuIO revolutionizes BLE application development with its intuitive AT command interface, eliminating the need for complex coding. With BleuIO, developers can communicate effortlessly with BLE devices, retrieve data, and execute commands with ease. Whether you’re a seasoned developer or just starting out, BleuIO streamlines the development process, allowing you to focus on innovation rather than technical complications. In this tutorial we will see how to read data from an air quality monitoring BLE device and get it on Microsoft excel sheet for further analysis.
What is BleuIO?
BleuIO is a versatile BLE 5.0 USB dongle designed to simplify the development of BLE applications. With its AT command interface, developers can easily communicate with BLE devices without the need for complex coding. Whether you’re a beginner or an experienced developer, BleuIO makes BLE application development faster and more accessible.
Setting Up the Environment
Before we dive into the code, let’s set up our development environment. You’ll need:
To communicate with BleuIO, we’ll use Python and its serial library. First, ensure that you have the pyserial library installed. Then, connect BleuIO to your computer and identify the serial port it’s connected to. Next, we’ll send AT commands to BleuIO and retrieve the responses.
Here is the complete python code
import serial
import re
import json

# Define the serial port and baudrate
serial_port = "COM8"
baudrate = 57600


def read_response(ser):
    """
    Read response from serial port until a newline character is encountered.
    """
    response = b""
    while True:
        char = ser.read(1)
        if char == b"":
            break  # No more data to read
        response += char
        if char == b"\n\n":
            break  # Reached end of response
    return response.decode()


def hex_to_decimal(hex_str):
    """
    Convert hexadecimal string to decimal integer.
    """
    return round(int(hex_str, 16) / 10.0, 1)


def find_pattern(response):
    """
    Find and extract patterns matching the specified format.
    """
    pattern = r"\{T:\"(\w+)\",H:\"(\w+)\",PM1:\"(\w+)\"PM2\.5:\"(\w+)\"PM10:\"(\w+)\",IAQ:\"(\w+)\",PPM:\"(\w+)\"\}"
    matches = re.findall(pattern, response)
    return [
        {
            "T": hex_to_decimal(m[0]),
            "H": hex_to_decimal(m[1]),
            "PM1": hex_to_decimal(m[2]),
            "PM2.5": hex_to_decimal(m[3]),
            "PM10": hex_to_decimal(m[4]),
            # "IAQ": hex_to_decimal(m[5]),
            # "PPM": hex_to_decimal(m[6]),
        }
        for m in matches
    ]


def main():
    # Connect to the serial port
    ser = serial.Serial(serial_port, baudrate, timeout=1)

    # List to store responses
    responses = []

    # Send the command 'AT+CENTRAL' to the device
    ser.write(b"AT+CENTRAL\r")
    response = read_response(ser)

    # Connect to the device
    ser.write(b"AT+GAPCONNECT=[1]D1:53:C9:A9:8C:D2\r")
    response = read_response(ser)

    # Set notification
    ser.write(b"AT+SETNOTI=0021\r")
    response = read_response(ser)

    # Get all data
    ser.write(b"AT+GATTCWRITEWR=0021 GET DATA=ALL\r")
    while True:
        response = read_response(ser)
        responses.append(response.strip())
        if "DATA:END" in response:
            break  # End of response

    # Find and collect patterns matching the specified format
    collected_patterns = []
    for r in responses:
        pattern_matches = find_pattern(r)
        if pattern_matches:
            collected_patterns.extend(pattern_matches)

    # Convert to JSON
    json_data = json.dumps(collected_patterns, indent=2)
    print(json_data)

    # Close the serial port
    ser.close()


if __name__ == "__main__":
    main()
In this code we have
Establishes a connection to the serial port, sends commands to the BLE device, and retrieves responses of 7 days air quality data history stored in the device.
Parses the responses to extract relevant patterns using regular expressions.
Converts the extracted patterns into JSON format for easy handling and printing.
Finally, closes the serial port.
Integrating with Excel
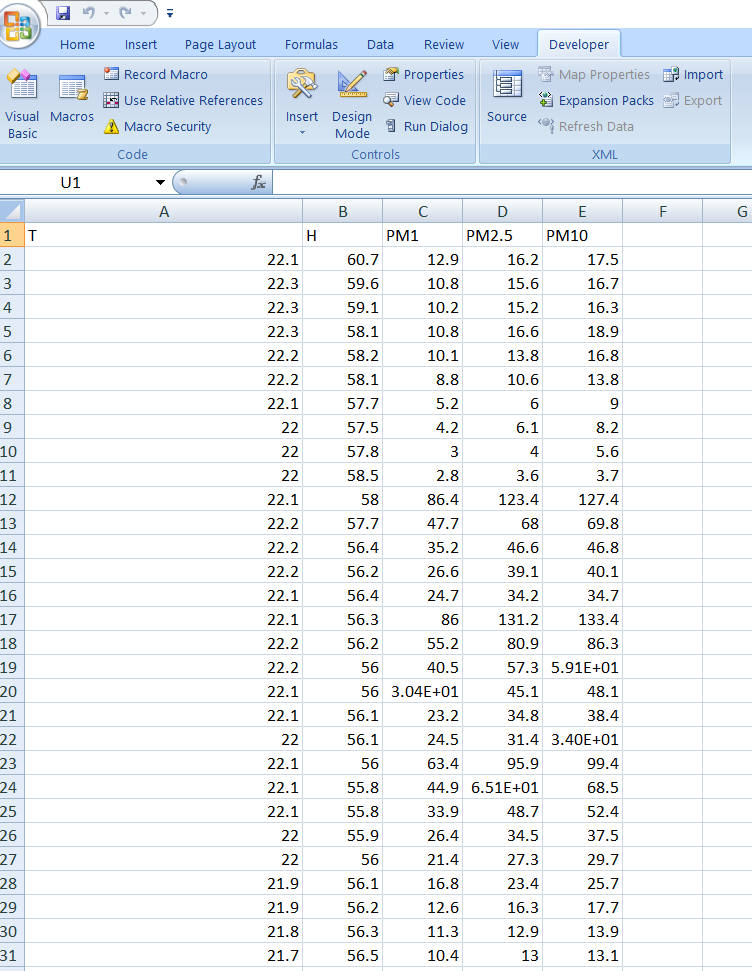
Now, let’s integrate BleuIO with Excel to visualize and analyze the air quality data. By executing a Python script within Excel’s VBA environment, we can populate the data directly into Excel for further analysis.
Here is the complete code
Sub SerialCommunication()
    Dim response As String
    Dim pythonScriptPath As String
    Dim wsh As Object, exec As Object, output As String
    Dim jsonData As Object
    Dim obj As Object
    Dim i As Integer, j As Integer

    ' Set the path to the Python script
    pythonScriptPath = "C:\Users\PC\Desktop\excel bleuio\serial_communication.py" ' Update with the correct path

    ' Create Windows Script Host object
    Set wsh = CreateObject("WScript.Shell")

    ' Execute the Python script and capture its output
    Set exec = wsh.exec("python """ & pythonScriptPath & """")

    ' Read the output of the script
    output = exec.StdOut.ReadAll

    ' Parse JSON data
    Set jsonData = JsonConverter.ParseJson(output)

    ' Write headers in the first row
    i = 1 ' Starting row
    j = 1 ' Starting column
    For Each key In jsonData(1).Keys
        Sheet1.Cells(i, j).value = key
        j = j + 1
    Next key

    ' Write data into separate columns
    i = i + 1 ' Move to the next row
    For Each obj In jsonData
        j = 1 ' Starting column
        For Each key In obj.Keys
            Sheet1.Cells(i, j).value = obj(key)
            j = j + 1
        Next key
        i = i + 1 ' Move to the next row
    Next obj
End Sub
In this code we have,
Called the python script.
The response we got from python script we then passed it using JsonConverter.
Finally we loop through the object and presented it on the Excel sheet on their respective cells.
Set up JsonConverter
If you get error like JsonConverter object is not recognized, follow the steps:
Download JSONConverter.bas: You can download the JSONConverter.bas file from various sources online. Here is a good github link to download from. https://github.com/VBA-tools/VBA-JSON It’s a common utility module for VBA that provides JSON parsing capability.
Import JSONConverter.bas into your project: Open your Excel workbook, then go to the Visual Basic Editor (Alt + F11). From the menu, select File > Import File and choose the JSONConverter.bas file you downloaded. This will add the JSONConverter module to your project.
Ensure Microsoft Scripting Runtime Reference: Go to Tools > References in the VBA editor and ensure that “Microsoft Scripting Runtime” is checked. This is needed for dictionary objects used in JSON parsing.
Run the script
Insert a Button:
Go to the “Developer” tab in Excel. If you don’t see the “Developer” tab, you may need to enable it in Excel options.
Click on the “Insert” drop-down menu in the “Controls” group.
Choose the “Button” (Form Control) option.
Click and drag to draw the button on your worksheet.
Assign the Macro:
Right-click on the button you just inserted and select “Assign Macro”.
In the “Assign Macro” dialog box, you should see a list of available macros. Since you just created a new macro, it should be listed. In this case, it should be “SerialCommunication”.
Select the “SerialCommunication” macro and click “OK”.
Edit the Macro (if needed):
If you want to edit the macro, you can click on the “Edit” button in the “Assign Macro” dialog box. This will open the VBA editor where you can make changes to the macro.
Test the Button:
Click on the button you inserted in your worksheet. This should trigger the “SerialCommunication” macro, which will execute the VBA code to communicate with the serial port and display the response in Excel.
Ensure Correct Port and Settings:
Before testing, ensure that the COM port (COM8) and other settings in the VBA code match your requirements and device specifications.
Output
Use Cases: Transforming Data into Actionable Insights
Indoor Air Quality Monitoring: Deploy BLE-enabled sensors in indoor environments to monitor air quality parameters such as temperature, humidity, and particulate matter. Excel’s data analysis capabilities enable users to identify trends, anomalies, and potential air quality issues, facilitating proactive measures for improving indoor air quality.
Environmental Studies and Research: Conduct environmental studies and research projects using BleuIO to collect air quality data in various outdoor settings. Excel serves as a powerful tool for data aggregation, statistical analysis, and visualization, enabling researchers to gain valuable insights into environmental patterns and trends.
Health and Safety Compliance: Ensure compliance with health and safety regulations by monitoring air quality in workplaces, public spaces, and industrial facilities. BleuIO, coupled with Excel, enables continuous monitoring of air quality parameters, facilitating compliance reporting and risk assessment processes.
By leveraging BleuIO’s seamless BLE communication capabilities and Excel’s robust data analysis features, developers and analysts can unlock the full potential of BLE application development and data analysis. Whether you’re monitoring air quality in indoor environments, conducting environmental research, or ensuring regulatory compliance, BleuIO and Excel provide a powerful combination for transforming raw data into actionable insights.
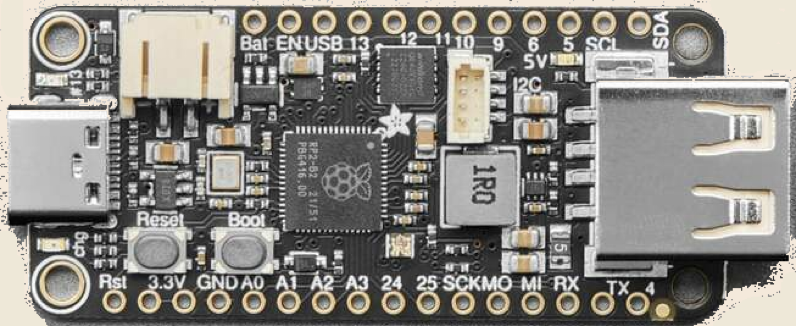
In the realm of IoT projects, finding a reliable and efficient host hardware solution is important. The Adafruit Feather RP2040 is an excellent solution for that. It comes equipped with a comprehensive ecosystem, including an IDE and libraries tailored for your new projects. With this setup, you get to keep the main USB port for uploading, debugging, and data communication, while at the same time sending and receiving data to just-about-any USB device, like the BleuIO.
In this first blog with the Adafruit Feather board, we are going to show how you can setup the USB stack and communicate with BleuIO using the Adafruit Feather RP2040 board. Later in next project we will show how to read a Temperature and Humidity sensor and display the data help of the Bluetooth Low Energy (BLE) interface.
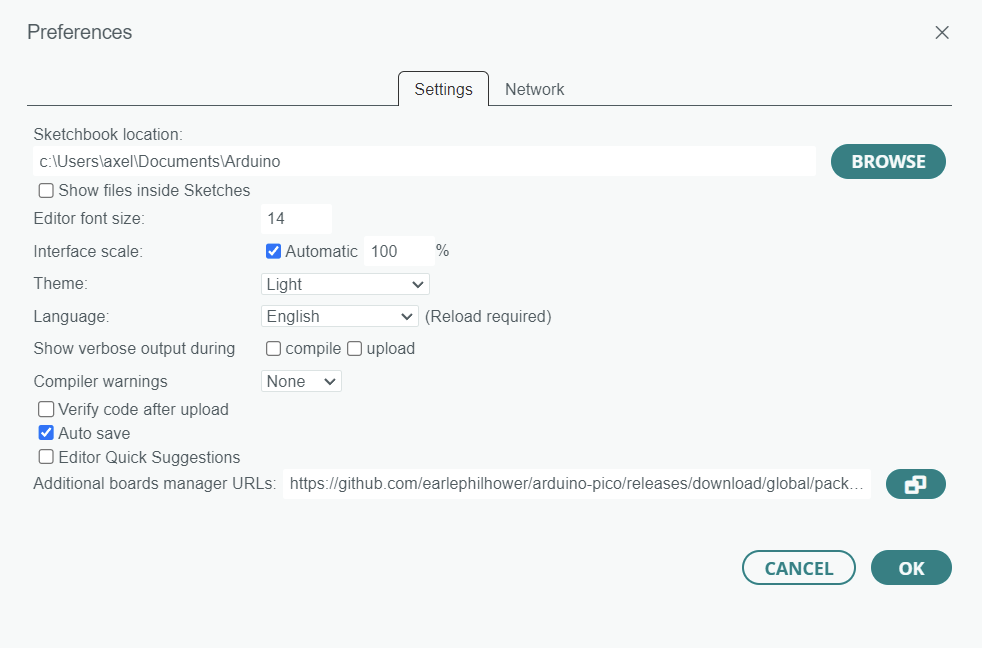
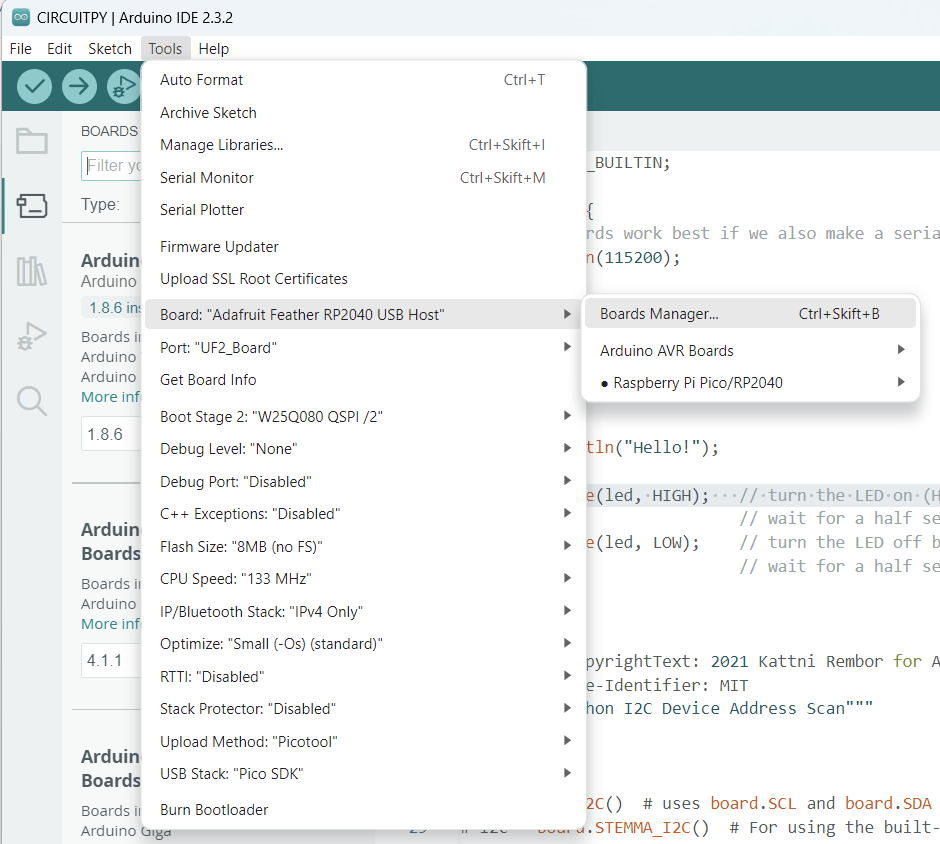
In the Arduino IDE, click on Tools > Board > Boards Manager. If you have previously selected a board, the Board menu item may have a board name after it.
In the Boards Manager, search for RP2040. Scroll down to the Raspberry Pi Pico/RP2040 by Earle F Philhower, III entry. Click Install to install it.
Choose Your Board
In the Tools > Boards menu, you should now see Raspberry Pi RP2040 Boards (possibly followed by a version number).
Navigate to the Raspberry Pi RP2040 Boards menu and choose Adafruit Feather RP2040 USB Host.
Now you’re ready to begin using Arduino with your RP2040 board! The main use case for this Feather is to act as a USB host.
Library Installation
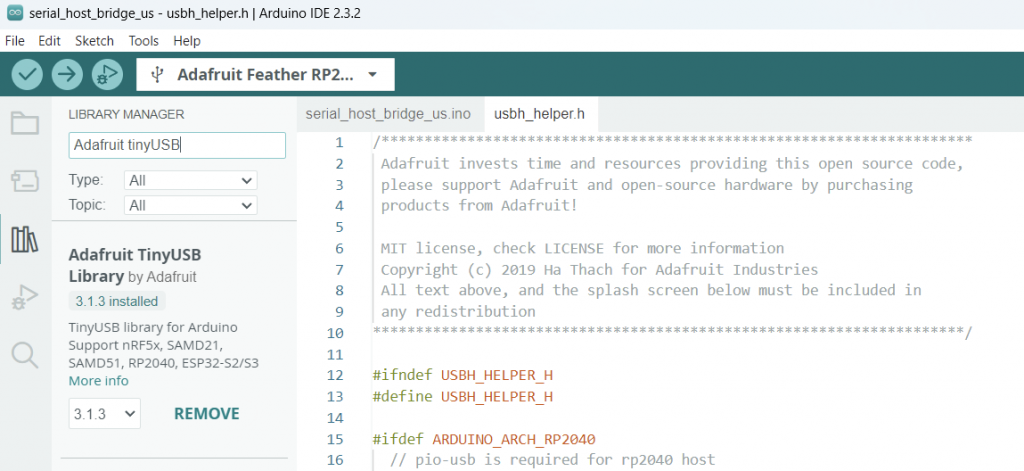
Install Adafruit_TinyUSB Library
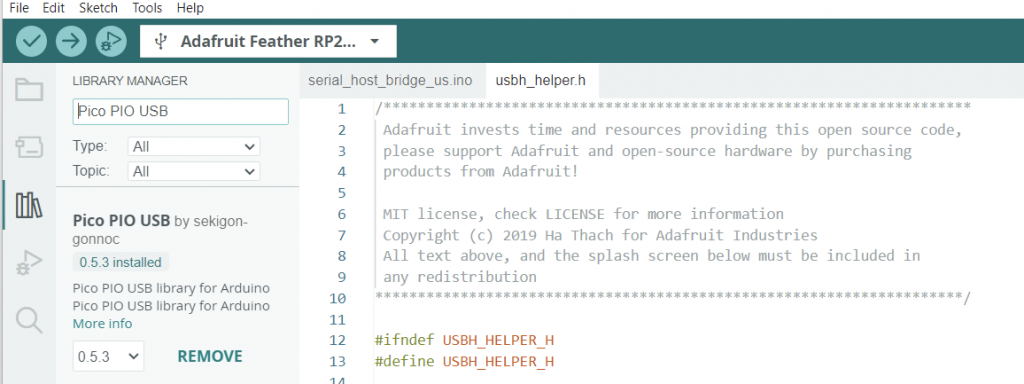
To use your Feather as a USB host, you’ll need to install the Adafruit TinyUSB library. It can be installed using the Library Manager in the Arduino IDE.
Click the Manage Libraries > menu item, search for Adafruit TinyUSB, and select the Adafruit TinyUSBLibrary
Install Pico PIO USB Library
Additionally, you’ll need to install the Pico PIO USB library.
Click the Manage Libraries > menu item again, search for PIO USB, and select the Pico PIO USB library.
Configuration and Deployment
Board Upload Settings
In the Tools menu, select Adafruit Feather RP2040 USB Host under Board.
For CPU Speed, you’ll need to select 120 MHz or240 MHz.
Finally, under USB Stack, select Adafruit TinyUSB.
Serial Host Bridge Example
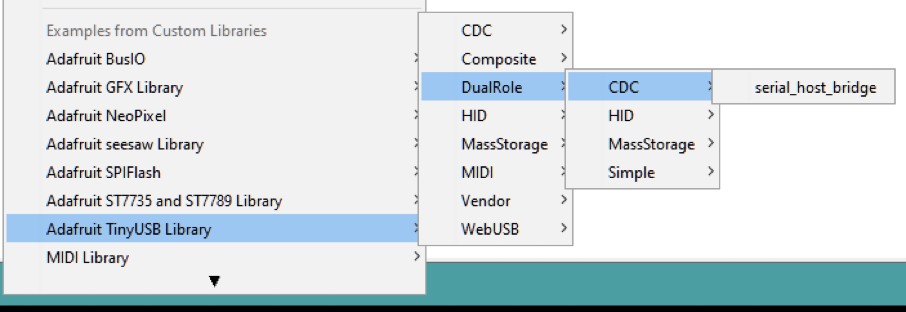
Load the example code onto your Feather after following the library installation instructions on the Arduino Library Install page.
Navigate to the Adafruit TinyUSB Library Examples and select DualRole – CDC – serial_host_bridge
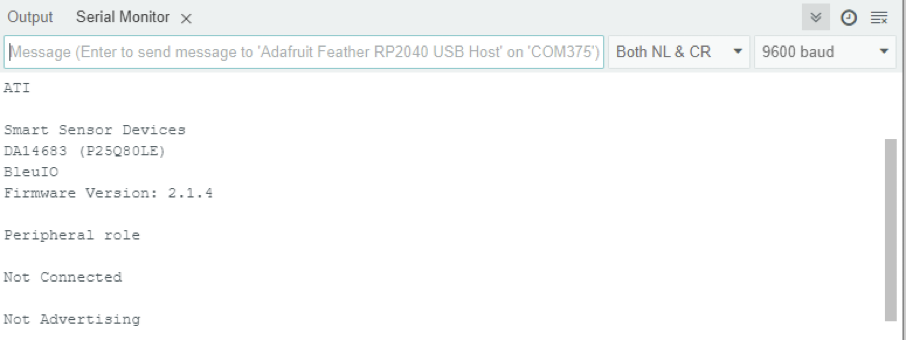
Now you can control the BleuIO USB Dongle via the Adafruit Feather board.
With these steps completed, you’re now ready to start integrating BleuIO with your Adafruit Feather RP2040 board. This setup lays the foundation for exciting IoT projects, and we’ll explore more functionalities in future tutorials where we will show how to make the BleuIO USB Dongle advertise data from a Temperature and Humidity sensor.
Stay tuned for further guides on applying BleuIO and Adafruit Feather RP2040 for your projects!
In this tutorial, we will explore how to use BleuIO, a Bluetooth Low Energy (BLE) USB dongle, for developing BLE applications with C++. We’ll demonstrate how to connect to BleuIO via a serial port, send AT commands, and receive responses. Additionally, we’ll discuss the benefits of using BleuIO and provide some use cases for BLE application development with C++.
Introduction to BleuIO
BleuIO is a BLE USB dongle designed to simplify and accelerate the development of BLE applications. It provides a set of AT commands that allow developers to interact with BLE devices and services without having to write extensive code. By leveraging these AT commands, developers can quickly prototype and develop BLE applications with minimal effort.
Prerequisites
Before getting started, ensure you have the following:
Serial communication library for C++ (e.g., <iostream>, <unistd.h>, <fcntl.h>, <termios.h>)
Basic knowledge of C++ programming
Setting Up the Environment
First, connect the BleuIO dongle to your computer via USB. Then, (for MAC operating system) determine the serial port assigned to the dongle using the ls /dev/cu.* command in the terminal. Note down the serial port name (e.g., /dev/cu.usbmodem4048FDE52DAF1) as we’ll need it to establish a serial connection.
Writing the C++ Program
Below is a C++ program that connects to BleuIO, sends an AT command, and retrieves the response.
#include <iostream>
#include <string>
#include <unistd.h>
#include <fcntl.h>
#include <termios.h>
#include <chrono>
#include <thread>

int main() {
    // Open the serial port
    const char* portname = "/dev/cu.usbmodem4048FDE52DAF1"; // Change this to match your serial port
    int serial_port = open(portname, O_RDWR);
    if (serial_port < 0) {
        std::cerr << "Error opening serial port" << std::endl;
        return 1;
    }

    // Configure the serial port settings
    struct termios tty;
    tcgetattr(serial_port, &tty);
    cfsetospeed(&tty, B9600); // Set baud rate to 9600
    cfsetispeed(&tty, B9600);
    tty.c_cflag &= ~PARENB; // No parity
    tty.c_cflag &= ~CSTOPB; // 1 stop bit
    tty.c_cflag &= ~CSIZE;
    tty.c_cflag |= CS8; // 8 bits per byte
    tty.c_cflag &= ~CRTSCTS; // Disable hardware flow control
    tty.c_cflag |= CREAD | CLOCAL; // Enable reading and ignore control lines
    tty.c_lflag &= ~(ICANON | ECHO | ECHOE | ISIG); // Raw input

    tcsetattr(serial_port, TCSANOW, &tty);

    // Write data to the serial port to put the dongle in central role
    const char* m1 = "AT+CENTRAL\r";
    write(serial_port, m1, strlen(m1));

    // Wait for 1 second to receive the response
    std::this_thread::sleep_for(std::chrono::seconds(1));

    // Write data to the serial port to scan for nearby device for three seconds
    const char* m2 = "AT+GAPSCAN=3\r";
    write(serial_port, m2, strlen(m2));

    // Wait for 1 second to receive the response
    std::this_thread::sleep_for(std::chrono::seconds(1));

    // Read response from the serial port with timeout
    char buf[1024];
    std::string response;
    int nbytes;
    fd_set fds;
    struct timeval timeout;
    FD_ZERO(&fds);
    FD_SET(serial_port, &fds);
    timeout.tv_sec = 3; // Timeout after 3 second
    timeout.tv_usec = 0;
    while (select(serial_port + 1, &fds, NULL, NULL, &timeout) > 0) {
        nbytes = read(serial_port, buf, sizeof(buf));
        if (nbytes < 0) {
            std::cerr << "Error reading from serial port" << std::endl;
            close(serial_port);
            return 1;
        }
        if (nbytes > 0) {
            response.append(buf, nbytes);
        }
    }

    // Display the response
    std::cout << "Response: " << response << std::endl;

    // Close the serial port
    close(serial_port);

    return 0;
}
Understanding the Code
We start by opening the serial port corresponding to BleuIO.
Next, we configure the serial port settings (baud rate, parity, stop bits, etc.) to match BleuIO’s communication parameters.
We then send the AT+CENTRAL command to BleuIO, which puts the dongle into central role.
After sending the command, we wait for 1 second to receive the response.
Then we send AT+GAPSCAN=3 to scan for nearby BLE devices for 3 seconds.
We read the response from the serial port with a timeout of 3 second.
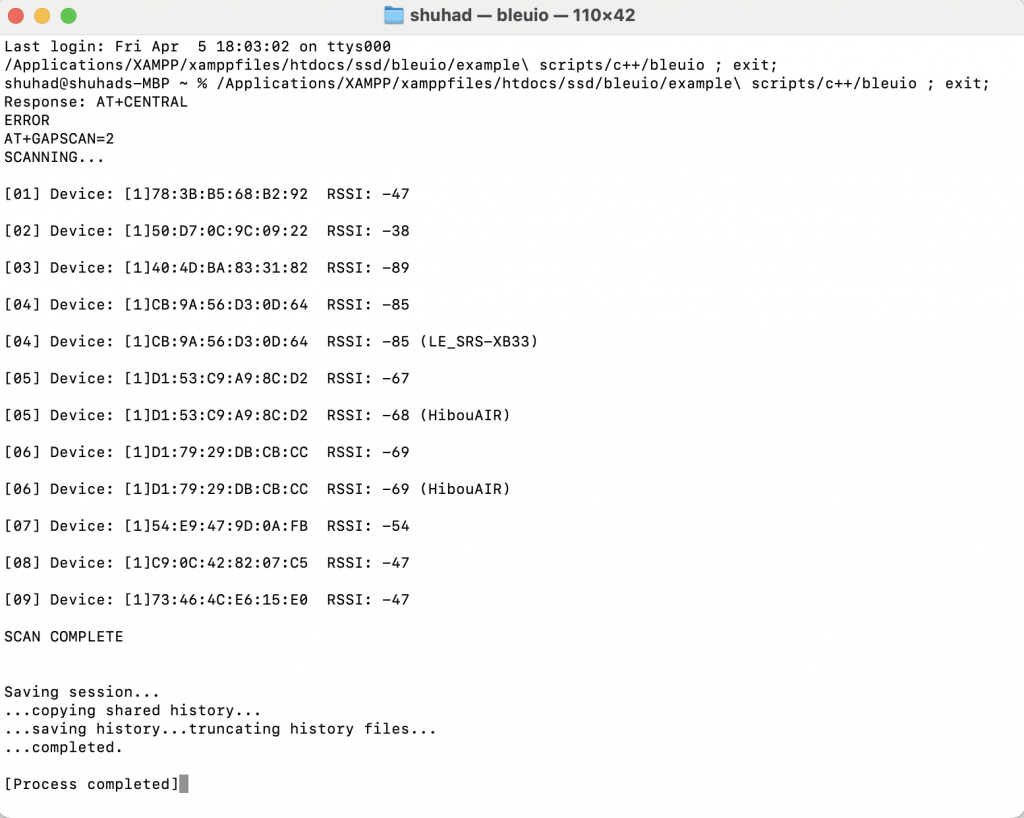
Finally, we display the response received from BleuIO and close the serial port.
Output
Use Cases
BleuIO, with its AT command interface, presents an excellent starting point for developers looking to delve into Bluetooth Low Energy (BLE) application development with C++ across various domains.
Embedded Systems Development: BleuIO simplifies BLE application development in C++ for embedded systems. Developers can quickly prototype IoT devices, smart sensors, and wearables with BleuIO’s AT command interface, enabling features like remote control and wireless connectivity.
Cross-Platform Mobile Applications: Integrating BLE features into C++ mobile apps becomes seamless with BleuIO. Developers using frameworks like Qt or cross-platform tools can leverage BleuIO’s AT commands for device discovery, data exchange, and configuration across different platforms.
Industrial Automation and Control: C++ developers in industrial settings can enhance control systems and monitoring tools with BLE connectivity using BleuIO. Its AT command support enables communication with BLE-enabled equipment for tasks like remote monitoring and real-time data acquisition.
Educational Projects and Prototyping: BleuIO serves as an accessible platform for learning BLE technology with C++. Students and hobbyists can experiment with Bluetooth communication, protocol implementation, and IoT development, turning ideas into reality with minimal overhead.
In this tutorial, we’ve demonstrated how to use BleuIO for BLE application development with C++. By leveraging BleuIO’s AT commands, developers can streamline the development process and accelerate time-to-market for BLE-enabled projects. With the provided code and insights, you can now begin exploring BLE application development using BleuIO and C++ in your own projects.