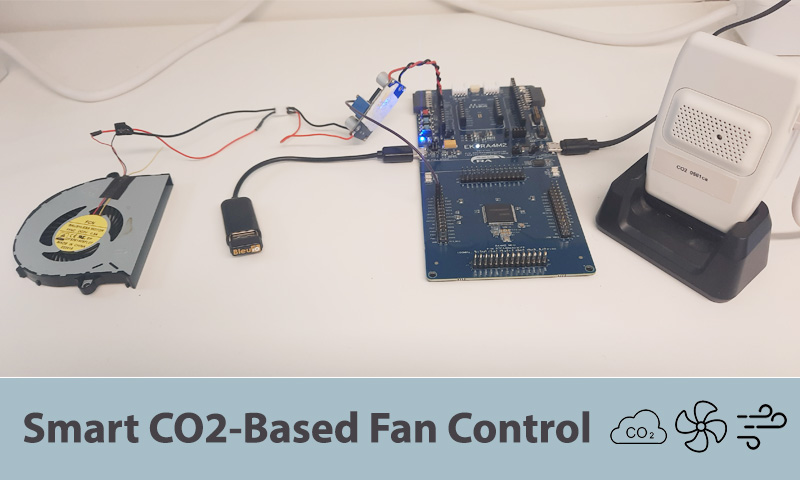
This project showcases how to integrate the Renesas EK-RA4M2 microcontroller with a BleuIO BLE USB dongle to create a smart air ventilation system. By using HibouAir‘s CO2 parameter, an air quality monitoring device, the system continuously monitors indoor air quality and automatically controls a fan based on CO2 levels.
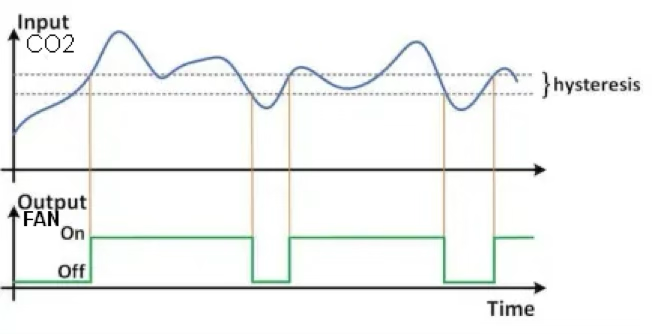
The BleuIO dongle scans for HibouAir’s BLE advertising data to retrieve real-time CO2 readings. When the CO2 concentration exceeds 600 ppm, the system activates the fan to improve air circulation. Once the CO2 level drops below 550 ppm, the fan is turned off to conserve energy.
This implementation demonstrates a practical IoT-based air quality control solution, making indoor environments healthier and more efficient.
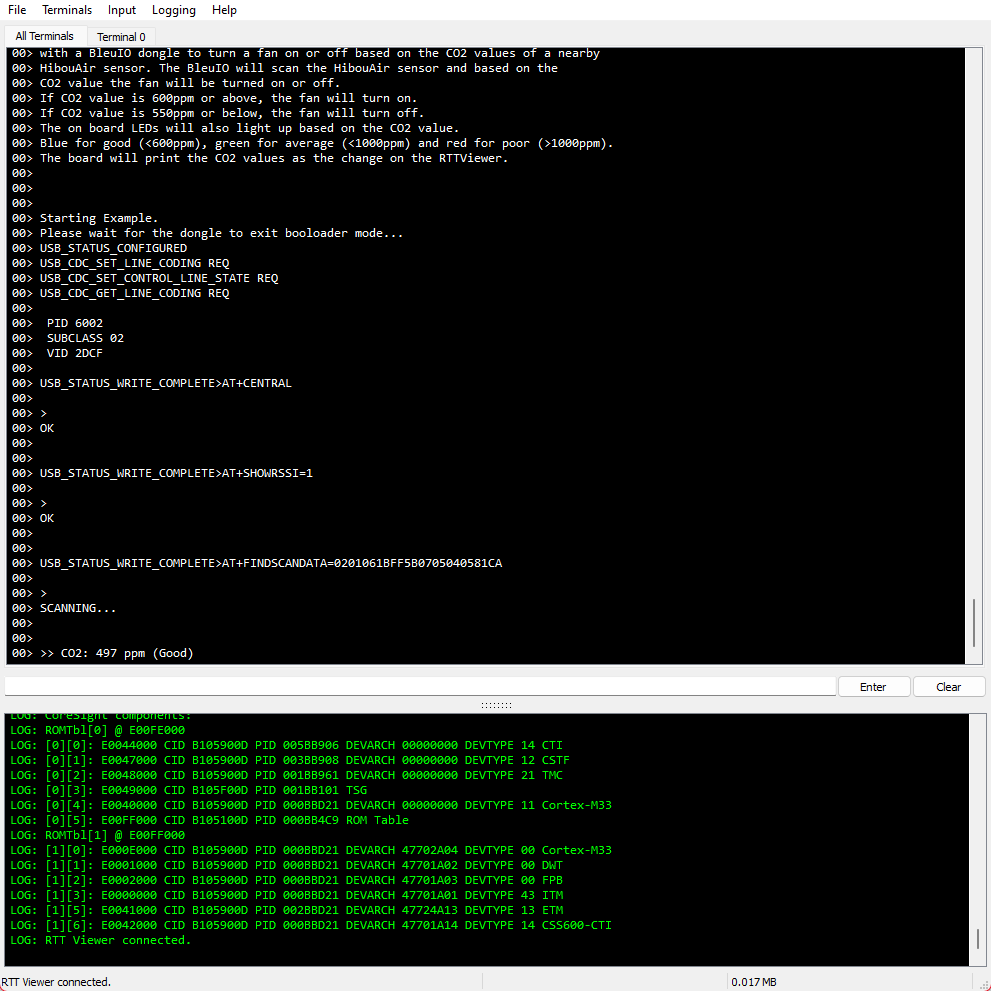
The EK-RA4M2 board prints the CO2 values, as they change, on the RTTViewer.
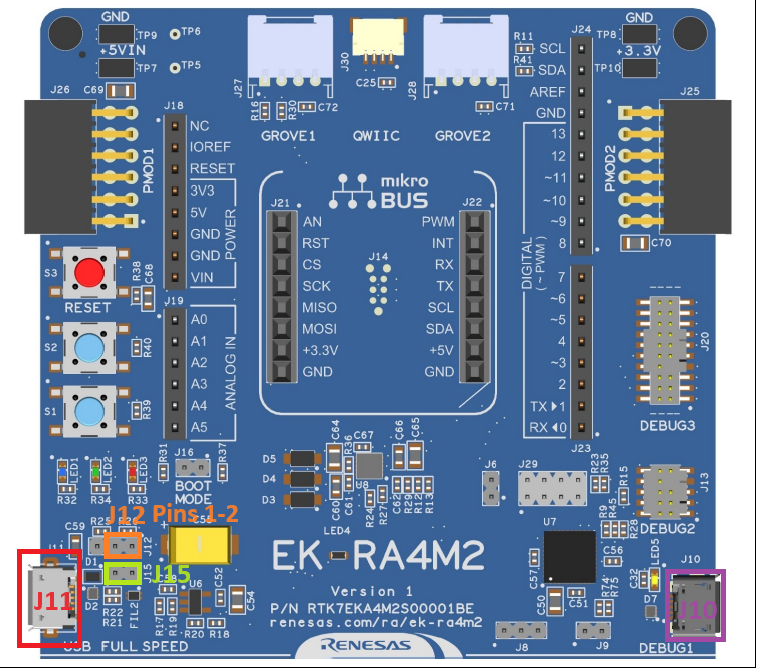
Connect a Micro USB device cable (type-A male to micro-B male) between J10 (Debug1) and a Computer USB port.
Plug in a BleuIO Dongle in the USB OTG Cable (type-A female to micro-B male) and connect it to J11 (USB Full Speed).
Make sure Jumper J12 is placed on pins 1-2
Remove Jumper J15 pins
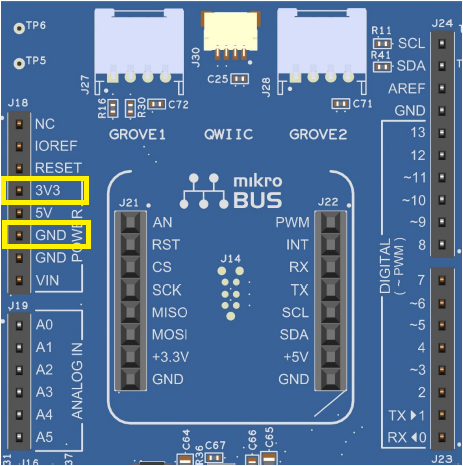
Connect the fan power adapter to 3V3 and GND on the developer kit like this:
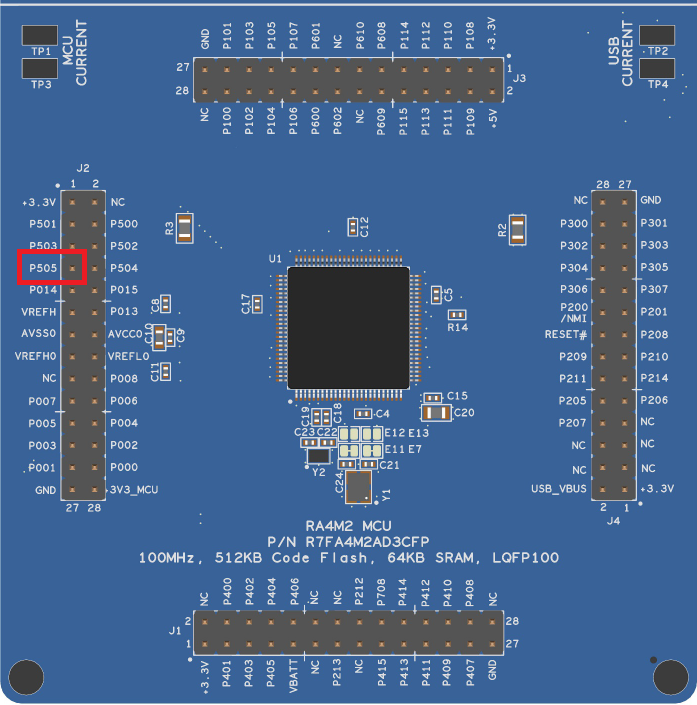
The fan power adapter will also need to be connected to GPIO pin 505 on the developer kit to turn it on and off:
Importing project
Open e² studio IDE
Choose a workspace and click ‘Launch’
Download or clone the example project. Place the folder ‘bleuio_ra4m2_fan_example’ in workspace.
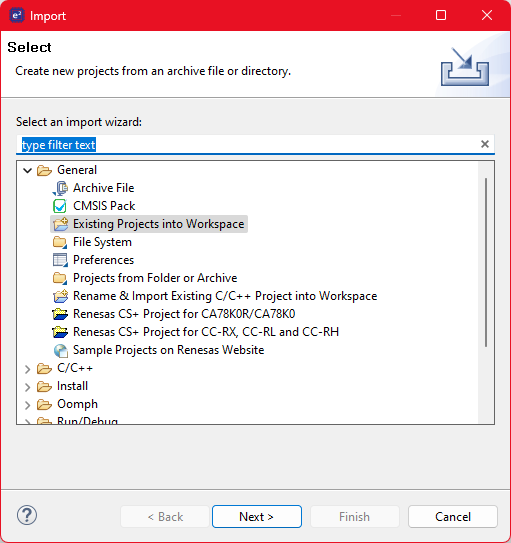
Choose Import Project
Select ‘Existing Projects into Workspace’ under the ‘General’ tab:
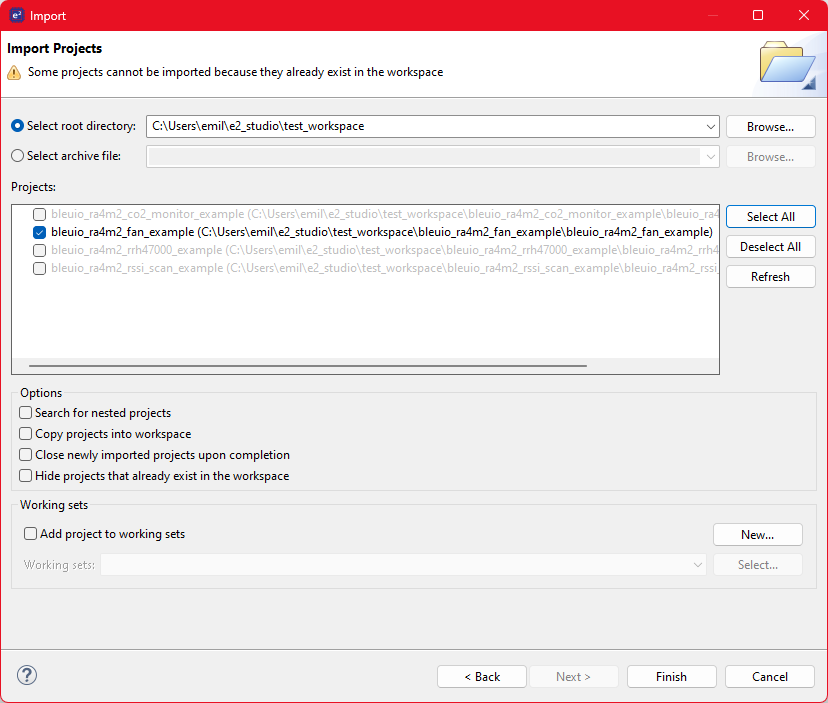
Click the ‘Browse…’ button and open the folder where the ‘bleuio_ra4m2_fan_example’ project folder is located:
Finally select the project and click ‘Finish’. You have now imported the the project!
Running the example
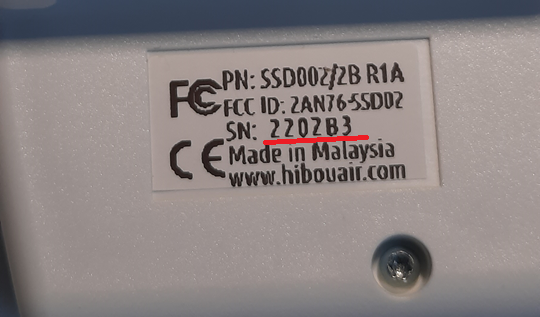
Go to file ‘usb_hcdc_app.c’ under ‘src/’ and edit line 41 to the board ID of the HibouAir Sensor:
#define BOARD_ID_TO_SCAN “2202B3”
The board ID is printed on the back of the HibouAir sensor:
You can also threshold values to change when the fan should start and stop.
The defines can be found on row 45 and 47 in ‘usb_hcdc_app.c’ under ‘src/’:
/* CO2 threshold value 1. If at this value or above, the fan will start. */ #define CO2_FAN_ROOF 600 /* CO2 threshold value 2. If at this value or below, the fan will stop. */ #define CO2_FAN_FLOOR 550
Build the project by clicking the building icon:
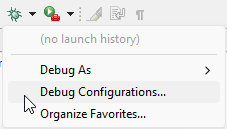
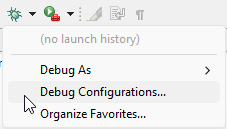
Use Debug to download and run the project. The first time you need to configure the debug settings. Click down arrow to the right of the Debug icon and select ‘Debug Configurations…’
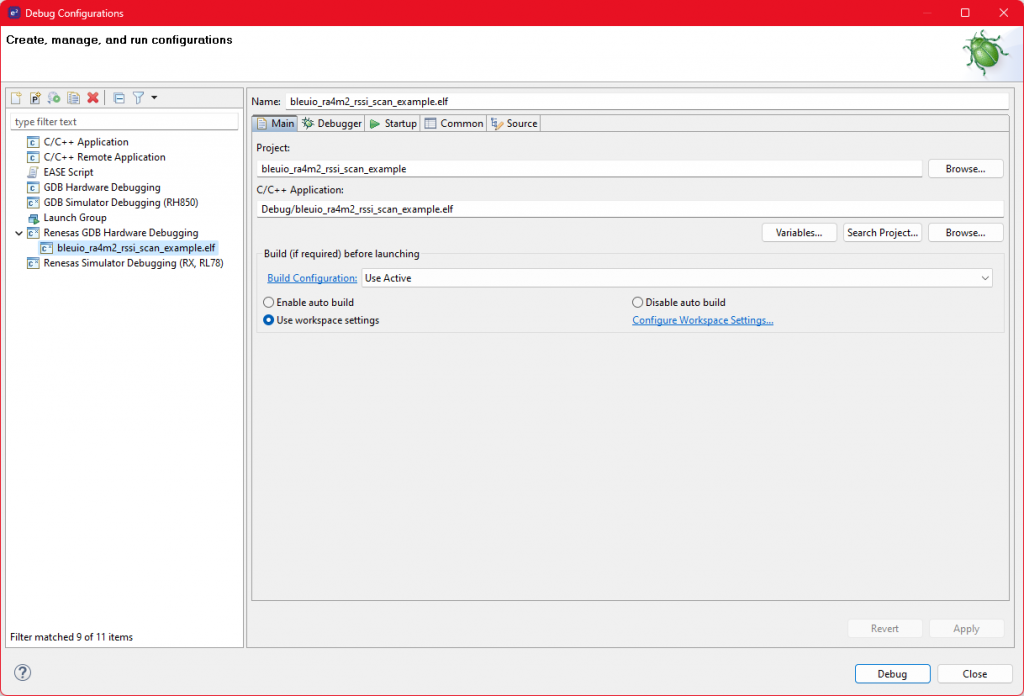
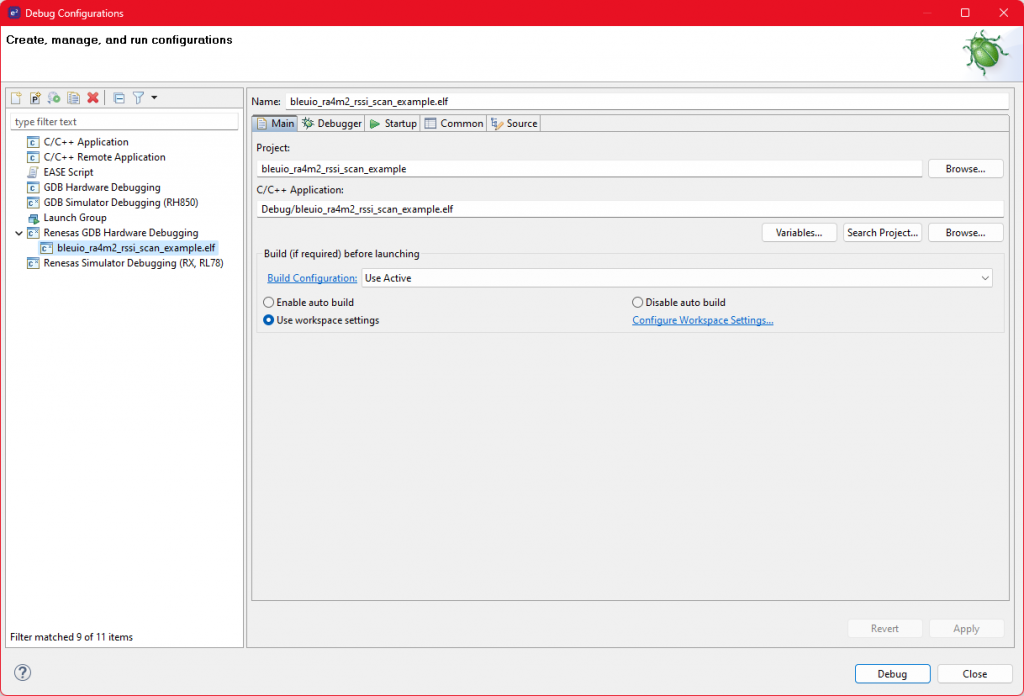
Under ‘Renesas GDB Hardware Debugging’ select ‘bleuio_ra4m2_fan_example.elf’ and click ‘Debug’
The debug is now configured and the ‘Debug’ icon can be used next time to run the project.
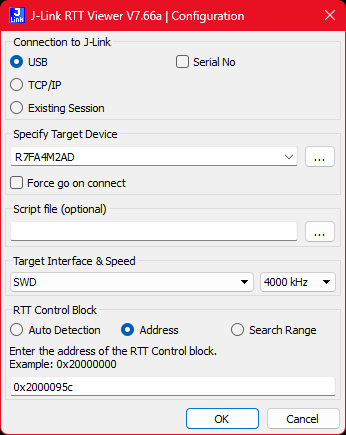
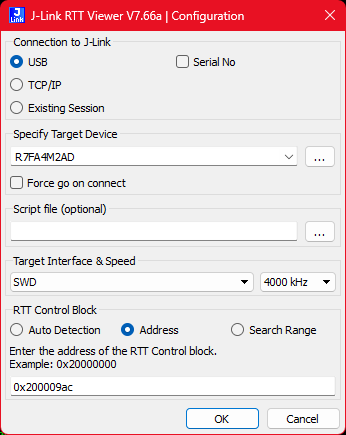
Open RTTViewer. Connect and use these settings:
Connection to J-Link: USB
Specify Target Device: R7FA4M2AD
Target Interface & Speed: SWD 4000kHz
RTT Control Block: Address 0x2000095c
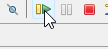
On the debugger screen in e² studio click the ‘Resume’ icon twice to run the project.
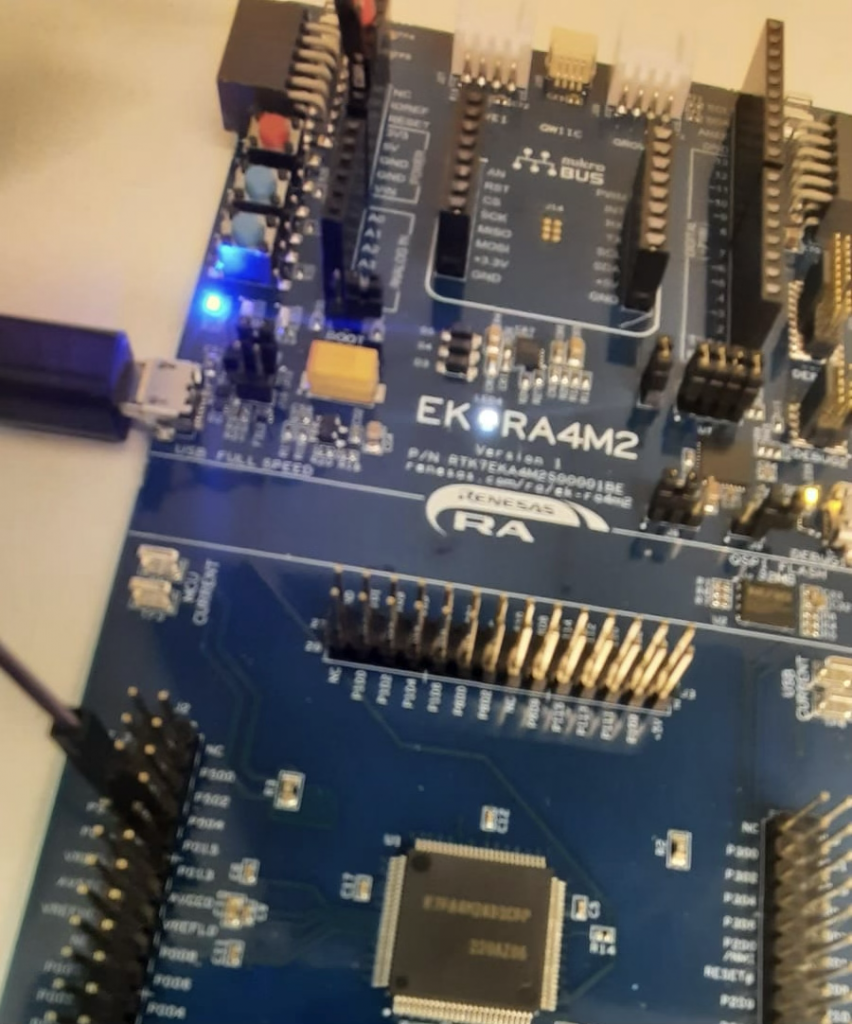
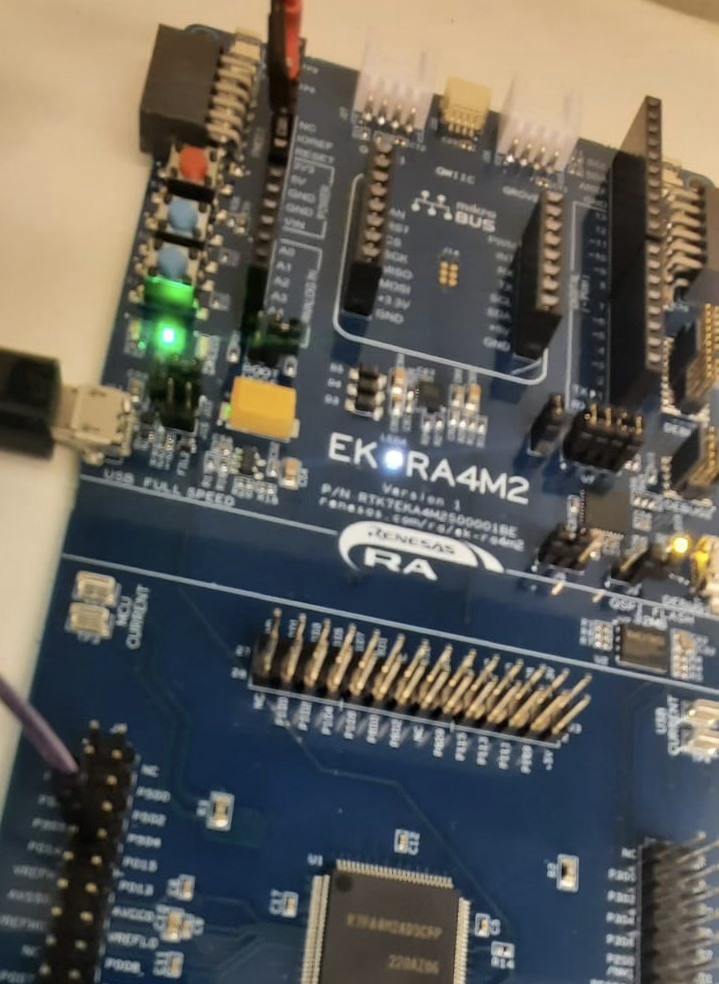
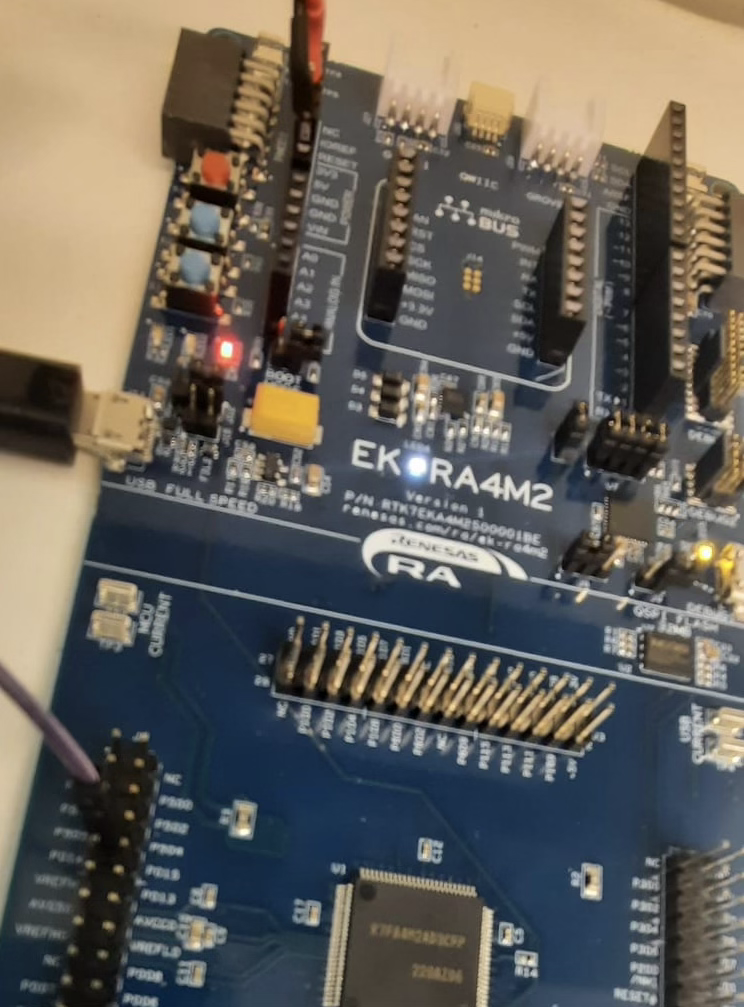
The application is now running. When starting up you should notice all LEDs lighting up for one second then only the red LED will be on. It will turn off as soon as the BleuIO is configured.
You should now see the output on the RTTViewer.
If CO2 value is 600ppm or above, the fan will turn on.
If CO2 value is 550ppm or below, the fan will turn off.
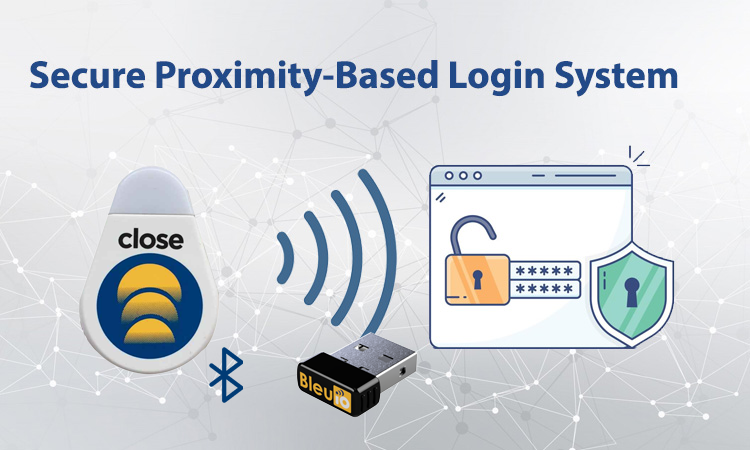
Bluetooth Low Energy (BLE) provides a powerful mechanism to enhance security through proximity-based authentication. This tutorial showcases how to create a secure login system using Node.js, Express, and BLE technology. The project demonstrates how BLE scanning can verify the presence of an authorized BLE device (such as Close Beacon) in range before granting access. This offers an extra layer of protection for your applications.
Why This Project?
With the increasing need for secure authentication mechanisms, BLE (Bluetooth Low Energy) offers a lightweight, reliable, and energy-efficient solution. This project demonstrates how you can utilize a BleuIO USB dongle to securely check the proximity of a specific Close Beacon’s mac address before granting access to sensitive resources.
Key Features:
Node.js Integration: Simplifies server-side logic using JavaScript.
BLE Device Scanning: Checks for the presence of an authorized device based on its MAC address.
Flexible Hardware Support: While this project uses Close Beacon, any BLE device can be used for authentication.
Enhanced Security: Adds an additional layer of security to the login process.
Practical Example: Serves as a foundation for more advanced BLE-based applications.
Practical Use Cases
Extra Security Layer: Combine BLE proximity detection with traditional authentication methods for added security.
Access Control Systems: Enable access to sensitive areas only when an authorized device is nearby.
BLE-Powered IoT Applications: Use BleuIO for real-time device monitoring and communication.
Dependencies: Install express and serialport using npm: npm install express serialport
How It Works
Step 1: Frontend (HTML and JavaScript)
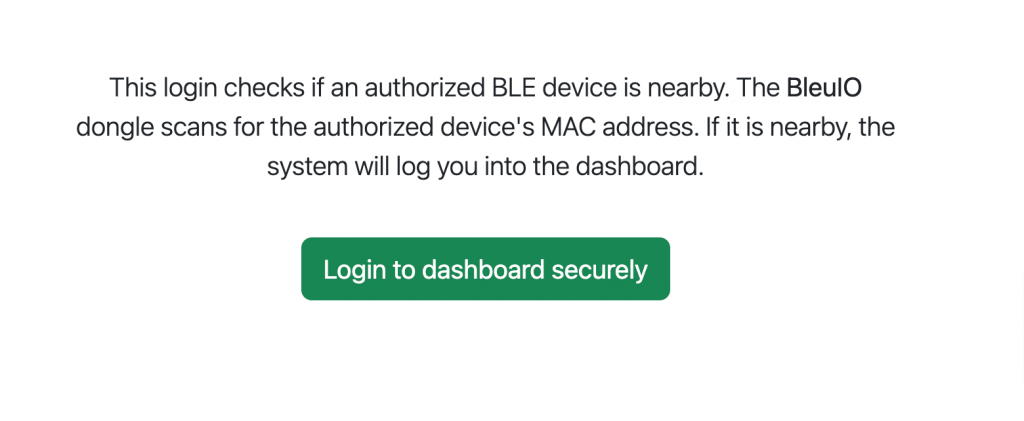
The index page displays a button, “Login to dashboard securely.” When clicked, it sends a request to the server to scan for BLE devices.
index.html:
<!-- index.html -->
<!DOCTYPE html>
<html lang="en">
  <head>
    <meta charset="UTF-8" />
    <meta name="viewport" content="width=device-width, initial-scale=1.0" />
    <link
      href="https://cdn.jsdelivr.net/npm/bootstrap@5.3.3/dist/css/bootstrap.min.css"
      rel="stylesheet"
      integrity="sha384-QWTKZyjpPEjISv5WaRU9OFeRpok6YctnYmDr5pNlyT2bRjXh0JMhjY6hW+ALEwIH"
      crossorigin="anonymous"
    />

    <title>Login Securely</title>
  </head>
  <body>
    <div class="container text-center mt-5">
      <br />
      <div class="row">
        <div class="col-md-6 offset-md-3">
          <p class="lead">
            This login checks if an authorized BLE device is nearby. The
            <strong>BleuIO</strong>
            dongle scans for the authorized device's MAC address. If it is
            nearby, the system will log you into the dashboard.
          </p>
        </div>
      </div>

      <br />
      <button class="btn btn-success btn-lg" id="scanBtn">
        Login to dashboard securely
      </button>
      <div id="listScan"></div>
    </div>

    <script>
      document.getElementById('scanBtn').addEventListener('click', () => {
        fetch('/scanbledevice')
          .then((response) => response.json())
          .then((data) => {
            // Log the response for debugging
            console.log(data.message);

            // Redirect to /dashboard if the device is nearby
            if (data.success) {
              window.location.href = '/dashboard';
            } else {
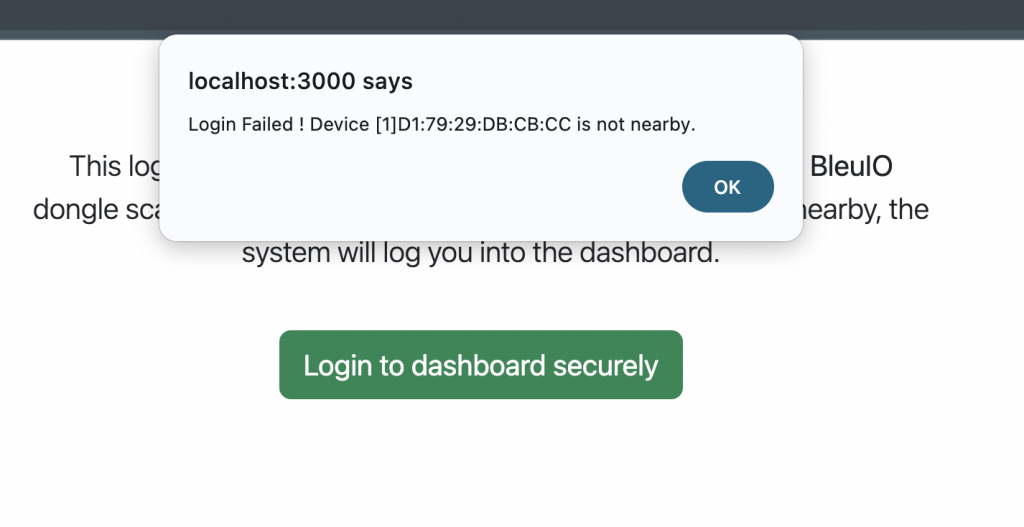
              alert(data.message); // Show a message if the device is not nearby
            }
          })
          .catch((err) => {
            console.error('Error:', err);
            alert('An error occurred while scanning for devices.');
          });
      });
    </script>
  </body>
</html>
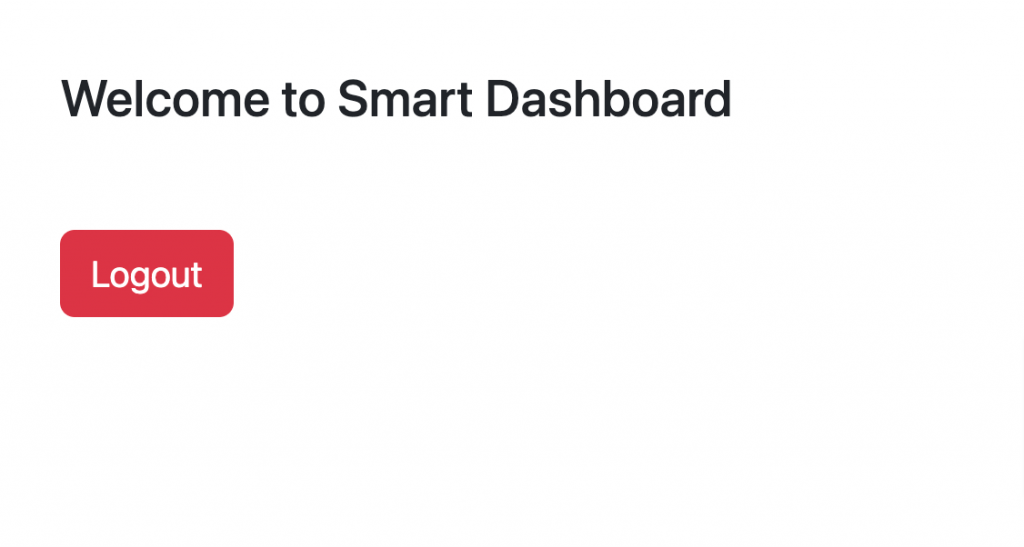
The server handles requests to scan for BLE devices, manage the serial port connection, and redirect users to the dashboard.
server.js:
// server.js
const express = require('express');
const { scanBLE, disconnectBLE } = require('./script');

const app = express();
const port = 3000;

// Serve the HTML file
app.get('/', (req, res) => {
  res.sendFile(__dirname + '/index.html');
});
app.get('/dashboard', (req, res) => {
  res.sendFile(__dirname + '/dashboard.html');
});
app.get('/disconnect', (req, res) => {
  disconnectBLE()
    .then((message) => {
      res.json({ success: true, message });
    })
    .catch((err) => {
      console.error('Error during disconnect:', err);
      res
        .status(500)
        .json({ success: false, message: 'Failed to disconnect serial port' });
    });
});

// Endpoint to fetch the list of serial ports
app.get('/scanbledevice', (req, res) => {
  scanBLE()
    .then((bleDevice) => {
      const targetMacAddress = '[1]D1:79:29:DB:CB:CC';

      // Check if the target device is nearby
      const isNearby = bleDevice.some((line) =>
        line.includes(targetMacAddress)
      );

      // Respond with a message
      if (isNearby) {
        res.json({
          success: true,
          message: `Device ${targetMacAddress} is nearby.`,
        });
      } else {
        res.json({
          success: false,
          message: `Login Failed ! Device ${targetMacAddress} is not nearby.`,
        });
      }
    })
    .catch((err) => {
      console.error('Error during BLE scan:', err);
      res
        .status(500)
        .json({ success: false, message: 'Error fetching BLE devices.' });
    });
});

// Start the server
app.listen(port, () => {
  console.log(`Server is running on http://localhost:${port}`);
});
Step 3: BLE Scanning Logic
The script connects to the BleuIO dongle, configures it, and scans for nearby devices.
script.js:
// script.js
const { SerialPort } = require('serialport');
var firstPort = '';
var readDataArray = [];
var openPort;
// Function to fetch the ble device list
function scanBLE() {
  return new Promise((resolve, reject) => {
    SerialPort.list()
      .then((ports) => {
        //filter ports to get BleuIO path
        // windows
        /* result = ports.filter(
            (portVal) =>
              portVal.pnpId && portVal.pnpId.includes("VID_2DCF&PID_6002")
          ); */
        //Mac
        result = ports.filter(
          (portVal) =>
            portVal.manufacturer &&
            portVal.manufacturer.includes('Smart Sensor Devices')
        );
        // get the first port path of the BleuIO connected to computer
        firstPort = result[0] && result[0].path;
        openPort = new SerialPort({ path: firstPort, baudRate: 115200 });
        // function to read serial port data
        const readData = (dm) => {
          return new Promise((resolve, reject) => {
            openPort.on('readable', () => {
              let data = openPort.read();
              let enc = new TextDecoder();
              let arr = new Uint8Array(data);
              let rawString = enc.decode(arr);

              // Split response into lines and trim extra spaces or empty lines
              let lines = rawString
                .split(/[\r\n]+/)
                .filter((line) => line.trim() !== '');
              readDataArray.push(...lines);

              // Log each line for better readability
              lines.forEach((line) => console.log(line));

              if (rawString.includes(dm)) {
                return resolve(readDataArray);
              } else {
                return resolve(readDataArray);
              }
            });
          });
        };

        // put the dongle to central role
        openPort.write('AT+CENTRAL\r', (err) => {
          if (err) {
            return reject(
              new Error('Error setting dongle to central role ' + err.message)
            );
          } else {
            // Set the RSSI filter
            openPort.write('AT+FRSSI=-56\r', (err) => {
              if (err) {
                return reject(
                  new Error('Error setting RSSI filter ' + err.message)
                );
              } else {
                // Scan for BLE devices for three seconds
                openPort.write('AT+GAPSCAN=3\r', (err) => {
                  if (err) {
                    return reject(
                      new Error('Error initiating BLE scan ' + err.message)
                    );
                  } else {
                    setTimeout(() => {
                      resolve(readData('SCAN COMPLETE'));
                    }, 3500);
                  }
                });
              }
            });
          }
        });
      })
      .catch((err) => {
        console.error('Error listing serial ports:', err);
        reject(err);
      });
  });
}
function disconnectBLE() {
  return new Promise((resolve, reject) => {
    if (openPort && openPort.isOpen) {
      openPort.close((err) => {
        if (err) {
          console.error('Error closing serial port:', err);
          return reject(err);
        }
        console.log('Serial port disconnected.');
        resolve('Disconnected');
      });
    } else {
      console.log('No serial port to disconnect.');
      resolve('No port to disconnect');
    }
  });
}

module.exports = { scanBLE, disconnectBLE };
Full source code is available at github. Source code
Output
This project is an example of how to integrate BleuIO with Node.js to build a BLE-powered secure login system. The source code is available and can be adapted for your use case. Start experimenting with BleuIO today and unlock the potential of BLE in your applications!
Awareness of Air quality monitoring importance for health and productivity has been increasing lately, especially in indoor environments like offices and homes. In this tutorial, we’ll demonstrate how to create a real-time CO₂ monitoring application using Go, a modern programming language with a vibrant community, alongside the BleuIO BLE USB dongle and HibouAir, a BLE-enabled air quality sensor.
This project showcases how to use Go’s simplicity and performance to build an efficient application that scans for CO₂ data, decodes it, and provides real-time notifications on macOS when the CO₂ level exceeds a critical threshold. By using BleuIO’s integrated AT commands, you can focus on your application logic without worrying about complex embedded BLE programming.
Project Overview
The goal of this project is to:
Use BleuIO to scan for BLE advertisements from HibouAir, which broadcasts real-time CO₂ levels.
Decode the advertised data to extract CO₂ concentration.
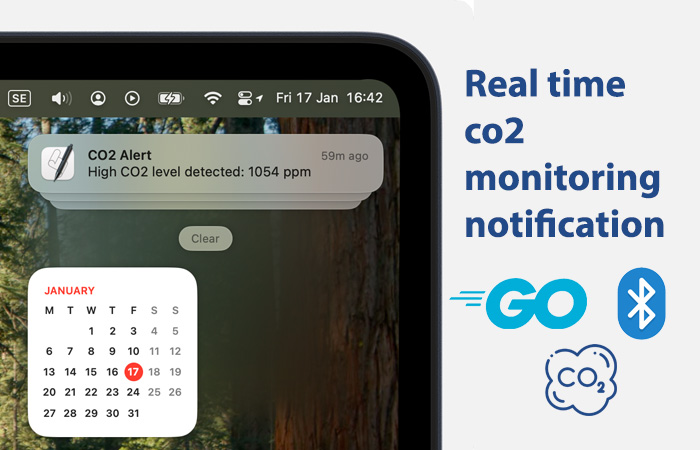
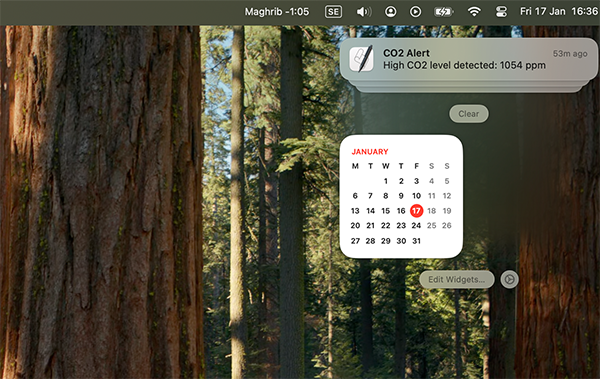
Send a real-time macOS notification when CO₂ levels exceed a specified threshold (1000 ppm in this example).
Notifications are implemented using the macOS osascript utility, ensuring you are immediately alerted about high CO₂ levels on your laptop screen.
Why This Project Is Useful
When you’re focused on work, you might not notice subtle changes in your environment. This application ensures you’re notified directly on your laptop screen when CO₂ levels become unsafe. This is especially helpful for:
Office Workers: Monitor meeting rooms or shared spaces where ventilation may be insufficient.
Remote Workers: Ensure a healthy workspace at home without distractions.
Educational Settings: Keep classrooms or labs safe for students and staff.
Technical Details
Tools and Devices
Programming Language: Go – Chosen for its simplicity, performance, and active community.
BLE USB Dongle: BleuIO – Simplifies BLE communication with built-in AT commands.
CO₂ Monitoring Device: HibouAir – Provides real-time air quality metrics over BLE.
How It Works
Initialize the Dongle:
Set the BleuIO dongle to the central role to enable scanning for BLE devices.
Scan for Advertised Data:
Use the AT+FINDSCANDATA command to scan for HibouAir’s advertisements containing air quality data.
Decode CO₂ Information:
Extract and convert the relevant part of the advertisement to get the CO₂ level in ppm.
Send Notifications:
Use Go’s exec.Command to invoke macOS osascript and display a desktop notification if the CO₂ level exceeds the threshold.
func main() { // Open the serial port mode := &serial.Mode{ BaudRate: 9600, } port, err := serial.Open("/dev/cu.usbmodem4048FDE52CF21", mode) if err != nil { log.Fatalf("Failed to open port: %v", err) } defer port.Close()
// Initial setup: Set the dongle to central mode err = setupDongle(port) if err != nil { log.Fatalf("Failed to set up dongle: %v", err) }
// Repeatedly scan for advertised data and process it for { err := scanAndProcessData(port) if err != nil { log.Printf("Error during scan and process: %v", err) } time.Sleep(10 * time.Second) // Wait before the next scan (interval) } }
// setupDongle sets the dongle to central mode func setupDongle(port serial.Port) error { _, err := port.Write([]byte("AT+CENTRAL\r")) if err != nil { return fmt.Errorf("failed to write AT+CENTRAL: %w", err) } time.Sleep(1 * time.Second) // Ensure the command is processed
buf := make([]byte, 100) _, err = port.Read(buf) if err != nil { return fmt.Errorf("failed to read response from AT+CENTRAL: %w", err) }
fmt.Println("Dongle set to central mode.") return nil }
// scanAndProcessData scans for advertised data and processes it func scanAndProcessData(port serial.Port) error { _, err := port.Write([]byte("AT+FINDSCANDATA=220069=2\r")) if err != nil { return fmt.Errorf("failed to write AT+FINDSCANDATA: %w", err) }
time.Sleep(3 * time.Second) // Wait for scan to complete
buf := make([]byte, 1000) n, err := port.Read(buf) if err != nil { return fmt.Errorf("failed to read scan response: %w", err) }
response := string(buf[:n])
// Extract the first advertised data firstAdvertisedData := extractFirstAdvertisedData(response) if firstAdvertisedData == "" { fmt.Println("No advertised data found.") return nil }
// Extract the specific part (6th from last to 3rd from last) and convert to decimal if len(firstAdvertisedData) >= 6 { extractedHex := firstAdvertisedData[len(firstAdvertisedData)-6 : len(firstAdvertisedData)-2]
decimalValue, err := strconv.ParseInt(extractedHex, 16, 64) if err != nil { return fmt.Errorf("failed to convert hex to decimal: %w", err) } fmt.Printf("CO₂ Value: %d ppm\n", decimalValue)
// Send notification if CO₂ value exceeds 1000 if decimalValue > 1000 { sendNotification("CO₂ Alert", fmt.Sprintf("High CO₂ level detected: %d ppm", decimalValue)) } } else { fmt.Println("Advertised data is too short to extract the desired part.") } return nil }
// extractFirstAdvertisedData extracts the first advertised data from the response func extractFirstAdvertisedData(response string) string { scanner := bufio.NewScanner(strings.NewReader(response)) for scanner.Scan() { line := scanner.Text() if strings.Contains(line, "Device Data [ADV]:") { parts := strings.Split(line, ": ") if len(parts) > 1 { return parts[1] } } } if err := scanner.Err(); err != nil { log.Printf("Error scanning response: %v", err) } return "" }
// sendNotification sends a macOS notification with the specified title and message func sendNotification(title, message string) { script := `display notification "` + message + `" with title "` + title + `"` cmd := exec.Command("osascript", "-e", script) err := cmd.Run() if err != nil { log.Printf("Error sending notification: %v", err) } }
This project demonstrates how to build a real-time CO₂ monitoring application using Go, BleuIO, and HibouAir. By using Go’s capabilities and BleuIO’s ease of use, you can focus on the logic of your application and quickly adapt the solution to your specific needs.
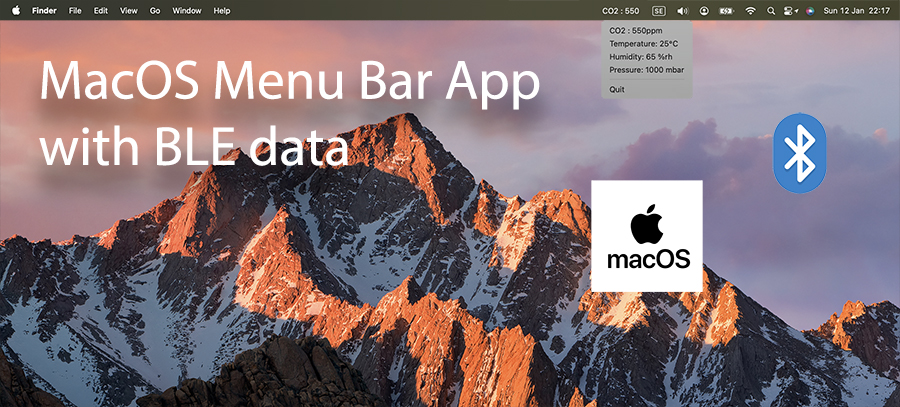
In this tutorial, we will guide you through creating a BLE real-time macOS menu bar application using the BleuIO USB BLE dongle. BleuIO is an incredibly versatile tool that simplifies the development of BLE (Bluetooth Low Energy) applications, making it ideal for developers looking to build innovative projects with ease.
macOS menu bar applications offer a seamless way to monitor and interact with data in real time without requiring a dedicated application window. By leveraging the power of the BleuIO dongle, we can create a menu bar app that provides live updates on environmental metrics like temperature, humidity, and CO2 levels. This project demonstrates how BleuIO can be integrated into real-time applications, showcasing its potential for BLE-based projects.
Why is This Project Useful?
Real-Time Updates: The app fetches BLE data at regular intervals and updates the macOS menu bar dynamically.
Ease of Access: The macOS menu bar provides a non-intrusive interface, allowing users to access live data at a glance.
Extensibility: This tutorial serves as a starting point for developers to explore more advanced BLE applications with BleuIO.
Requirements
To complete this project, you will need:
BleuIO USB BLE Dongle: A powerful and easy-to-use BLE dongle for developing BLE applications.
HibouAir – Air Quality Monitor: A BLE-enabled air quality monitor that broadcasts real-time environmental data such as temperature,pressure,voc,light, humidity, and CO2 levels.
macOS System: A macOS device with Python 3 installed.
Python Libraries:
rumps: For creating macOS menu bar applications.
bleuio: For communicating with the BleuIO dongle.
How Real-Time Updates Are Handled
The app connects to the BleuIO dongle and scans for BLE advertisements air quality data from HibouAir. Using a timer, the app periodically initiates a scan every 2 minutes. The decoded data is then displayed directly in the macOS menu bar, providing real-time updates without user intervention.
Step-by-Step Guide
Step 1: Set Up the Environment
Ensure you have a macOS system with Python 3 installed.
Install the necessary dependencies using pip: pip install rumps bleuio
Plug in your BleuIO USB dongle.
Step 2: Project Overview
Our goal is to:
Connect to the BleuIO dongle.
Put the dongle in Central Mode to scan for BLE advertisements.
Scan for real time air quality data from HibouAir
Decode the advertisement data to extract temperature, humidity, pressure, and CO2 levels.
Update the macOS menu bar with the decoded data in real time.
Step 3: Writing the Code
Below is the Python script for the macOS menu bar app. This code handles the dongle initialization, data scanning, decoding, and menu updates.
import rumps
import time
import json
from datetime import datetime
from bleuio_lib.bleuio_funcs import BleuIO
boardID="220069"

# Function to decode advertisement data
def adv_data_decode(adv):
    try:
        pos = adv.find("5B0705")
        if pos == -1:
            raise ValueError("Invalid advertisement data: '5B0705' not found.")

        dt = datetime.now()
        current_ts = dt.strftime("%Y/%m/%d %H:%M:%S")

        # Temperature decoding
        temp_hex = int(adv[pos + 22:pos + 26][::-1], 16)  # Reversed bytes
        if temp_hex > 1000:
            temp_hex = (temp_hex - (65535 + 1)) / 10
        else:
            temp_hex = temp_hex / 10

        # Pressure decoding (convert from little-endian)
        pressure_bytes = bytes.fromhex(adv[pos + 18:pos + 22])
        pressure = int.from_bytes(pressure_bytes, byteorder='little') / 10

        # Humidity decoding (convert from little-endian)
        humidity_bytes = bytes.fromhex(adv[pos + 26:pos + 30])
        humidity = int.from_bytes(humidity_bytes, byteorder='little') / 10

        return {
            "boardID": adv[pos + 8:pos + 14],
            "pressure": pressure,
            "temp": temp_hex,
            "hum": humidity,
            "co2": int(adv[pos + 46:pos + 50], 16),
            "ts": current_ts,
        }
    except Exception as e:
        print(f"Error decoding advertisement data: {e}")
        return {}


# Callback function for scan results
def my_scan_callback(scan_input):
    try:
        scan_result = json.loads(scan_input[0])
        data = scan_result.get("data", "")

        decoded_data = adv_data_decode(data)

        # Update menu with decoded data
        app.update_menu(decoded_data)

    except Exception as e:
        print(f"Error parsing scan result: {e}")

# Callback function for events
def my_evt_callback(evt_input):
    cbTime = datetime.now()
    currentTime = cbTime.strftime("%H:%M:%S")
    print(f"\n\n[{currentTime}] Event: {evt_input}")

class AirQualityApp(rumps.App):
    def __init__(self):
        super(AirQualityApp, self).__init__("CO2 : 550")
        self.my_dongle = None  # Placeholder for the dongle object
        self.co2_item = rumps.MenuItem(title="CO2 : 550ppm", callback=lambda _: None)
        self.temp_item = rumps.MenuItem(title="Temperature: 25°C", callback=lambda _: None)
        self.hum_item = rumps.MenuItem(title="Humidity: 65 %rh", callback=lambda _: None)
        self.press_item = rumps.MenuItem(title="Pressure: 1000 mbar", callback=lambda _: None)

        self.menu = [
            self.co2_item,
            self.temp_item,
            self.hum_item,
            self.press_item,
            None  # Separator
        ]

        # Establish connection and start scanning on startup
        self.connect_dongle()
        self.start_periodic_scan()

    def connect_dongle(self):
        try:
            self.my_dongle = BleuIO()  # Initialize the dongle
            self.my_dongle.register_evt_cb(my_evt_callback)  # Register event callback
            self.my_dongle.register_scan_cb(my_scan_callback)  # Register scan callback
            print("Dongle connected successfully.")

            # Set the dongle to central mode
            response = self.my_dongle.at_central()
            print("Dongle is now in central mode.")

        except Exception as e:
            print(f"Error connecting to dongle: {e}")

    def scan(self, _=None):  # Added `_` to accept the timer argument
        try:
            # Start scanning for specific data
            response = self.my_dongle.at_findscandata(boardID, 3)
            print(f"Scan initiated. Response: {response.Rsp}")
        except Exception as e:
            print(f"Error during scan: {e}")

    def start_periodic_scan(self):
        try:
            rumps.timer(120)(self.scan)  # Run the scan method every 30 seconds
        except Exception as e:
            print(f"Error setting up periodic scan: {e}")

    def update_menu(self, decoded_data):
        try:
            self.title = f"CO2 : {decoded_data.get('co2', 'N/A')}ppm"  # Update app title
            self.co2_item.title = f"CO2 : {decoded_data.get('co2', 'N/A')}ppm"
            self.temp_item.title = f"Temperature: {decoded_data.get('temp', 'N/A')}°C"
            self.hum_item.title = f"Humidity: {decoded_data.get('hum', 'N/A')} %rh"
            self.press_item.title = f"Pressure: {decoded_data.get('pressure', 'N/A')} mbar"
        except Exception as e:
            print(f"Error updating menu: {e}")

if __name__ == "__main__":
    app = AirQualityApp()
    app.run()
Note : Make sure to change the BoardID to your HibouAir CO2 device on line 6
Step 4: Run the App
Save the script as bleuio.py.
Run the script using: python bleuio.py
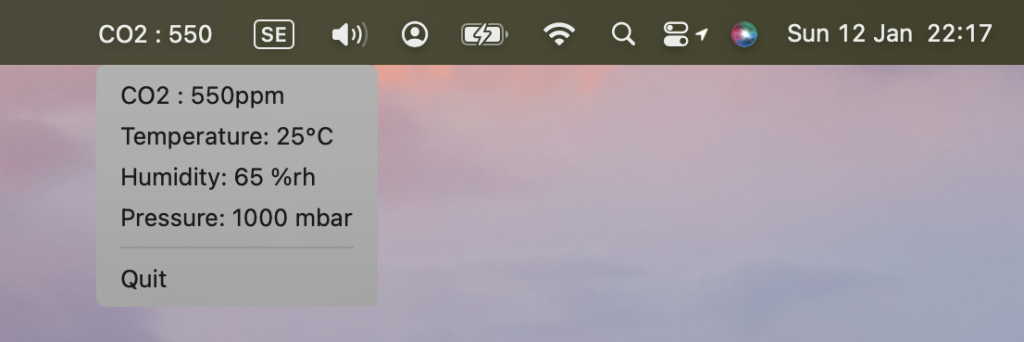
The app will appear in the macOS menu bar with latest CO2 value. Click the icon to view the live BLE data updates.
Output
Extending the Project
This project is a foundation for exploring the capabilities of BleuIO. You can extend it to:
Monitor additional BLE devices.
Implement alert notifications for specific data thresholds.
Log the data to a file or send it to a cloud service for further analysis.
This tutorial demonstrates how to create a real-time macOS menu bar application using the BleuIO dongle. By following this guide, you’ll not only learn how to handle BLE data but also understand how to integrate it into user-friendly macOS applications. BleuIO opens up endless possibilities for BLE-based projects, and we’re excited to see what you create next!
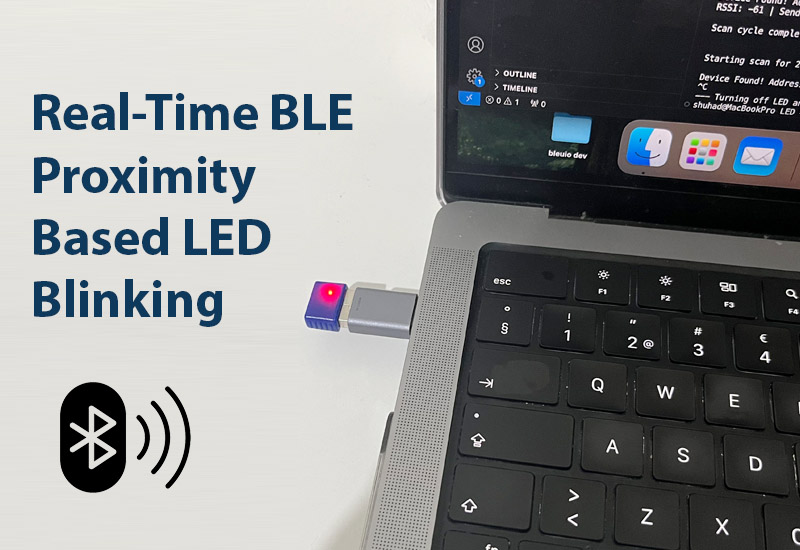
BleuIO, a versatile BLE USB dongle, simplifies BLE application development with its powerful AT commands and cross-platform compatibility. This tutorial demonstrates how to use BleuIO with Python to build a real-time BLE proximity-based LED control system.
In this example, we focus on monitoring the RSSI (Received Signal Strength Indicator) of a specific BLE device and controlling the LED blinking rate of BleuIO based on proximity. The closer the device, the faster the blinking rate. The script also ensures clean termination, turning off the LED when the program exits.
This tutorial uses the BleuIO Python library to showcase a practical use case. However, the concepts can be implemented in any programming language.
Graceful Termination: The script turns off the LED when terminated with Ctrl + C.
Output
This example demonstrates how easy it is to use BleuIO for BLE applications. Whether you’re building proximity-based solutions or exploring BLE capabilities, BleuIO’s AT commands and Python library make it simple to get started.
Take this script, adapt it to your needs, and unlock the potential of BLE with BleuIO!
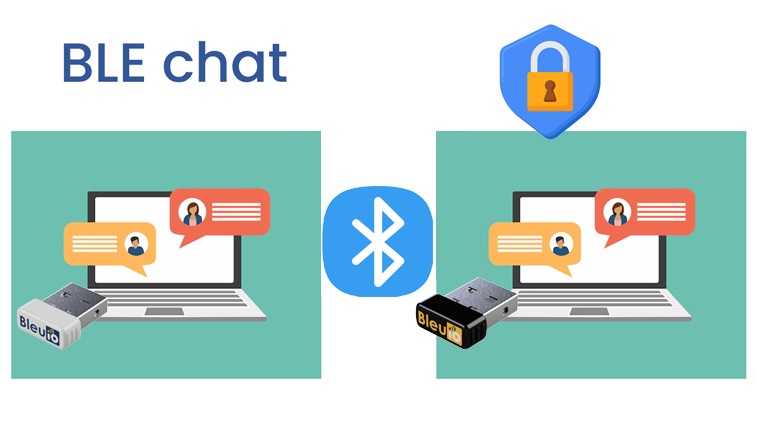
Bluetooth Low Energy (BLE) has become a core technology in the modern world, enabling secure and efficient communication for IoT devices, wearables, healthcare gadgets, and more. One of the fascinating applications of BLE is in creating private communication systems. In this tutorial, we will explore how to create a BLE chat application using the BleuIO USB dongle, a powerful yet simple device for BLE application development.
Why This Project?
With increasing concerns about privacy, BLE chat offers a solution that keeps communication entirely local. Unlike internet-based messaging systems, BLE chat does not rely on servers or cloud storage, ensuring that no data leaves your devices. This project demonstrates a simple prototype of such a BLE-based communication system.
How It Works
The project involves two laptops, each connected to a BleuIO USB dongle. For simplicity, we designate one laptop as User 1 (Central role) and the other as User 2 (Peripheral role). Here’s a high-level breakdown of the workflow:
Setup: Each laptop runs a script to initialize its BleuIO dongle. User 1 starts in a dual role and acts as the central device. User 2 also sets its dongle in a dual role but begins advertising itself.
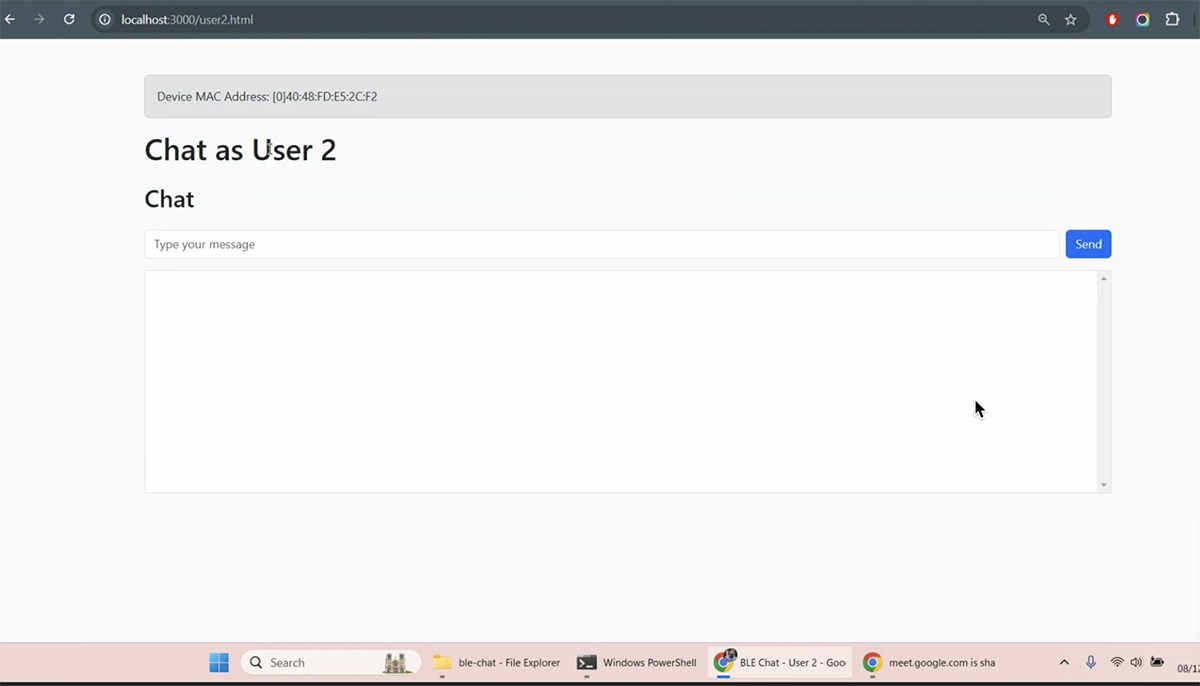
Connection: Once User 2 starts advertising, it displays its MAC address. User 1 uses this MAC address to connect to User 2.
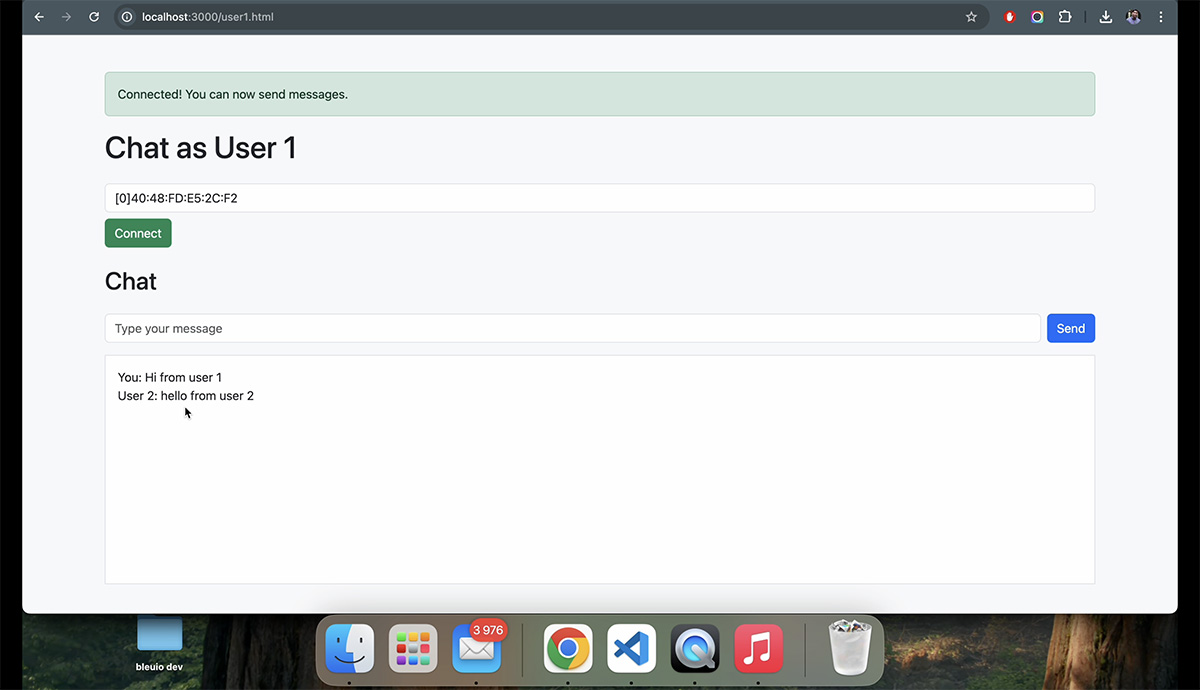
Messaging: After establishing a connection, the users can send and receive messages in real time. The communication is direct and local, with no reliance on external servers.
Setting Up the Project
The source code for this project is available on GitHub: BLE Chat Source Code. You can explore, experiment, and build on it to fit your needs.
Steps to Set Up the Project:
Clone the Repository Open a terminal on both computers and run git clone https://github.com/smart-sensor-devices-ab/ble-chat.git
Install Dependencies Navigate to the project directory and install the required Node.js dependencies cd ble-chat npm install
Run the Server Start the server by running node server.js Ensure the server is running on both computers. The terminal should display messages confirming the dongle is detected.
Running the Scripts
Once the servers are running on both computers, follow these steps to use the BLE chat application:
User 1 Setup:
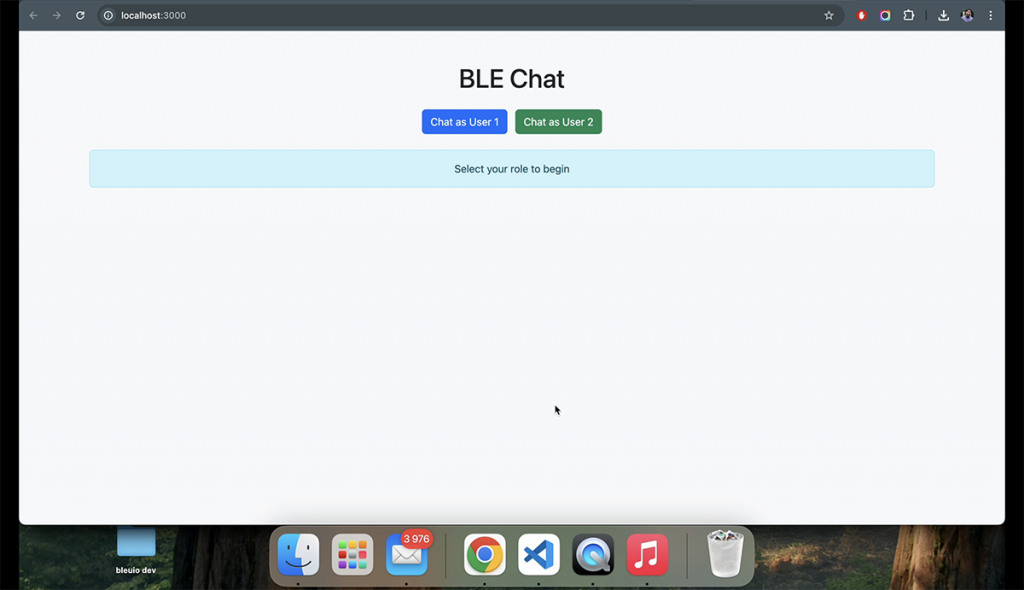
Open the browser and navigate to http://localhost:3000.
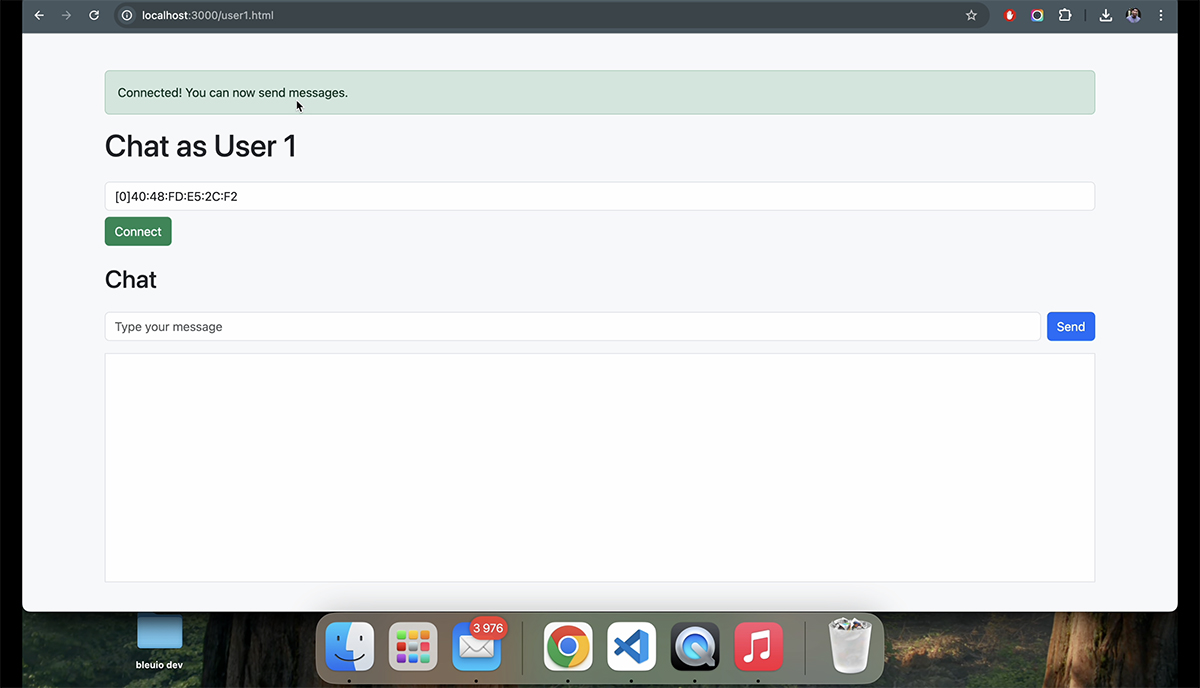
Click “Chat as User 1.” This will initialize the BleuIO dongle in dual role mode.
User 2 Setup:
On the second computer, open the browser and navigate to http://localhost:3000.
Click “Chat as User 2.” This will initialize the BleuIO dongle in dual role mode and start advertising. You’ll also see the MAC address of the dongle displayed on the screen.
Connecting the Devices:
Copy the MAC address from User 2’s screen and enter it on User 1’s screen in the provided input field.
Click “Connect” on User 1. Once the connection is established, you’ll see a confirmation message.
Start Chatting:
Use the chat interface on both devices to send messages back and forth. Messages sent from one device will instantly appear on the other device’s screen.
Output
In the video below, we demonstrate how this project works with two BleuIO dongles connected to two different computers. To provide a complete view, we are sharing the screen of the second computer to showcase how the chat functions in real-time.
Use Cases for BLE Chat
The BLE chat prototype we’ve created can inspire real-world applications. Here are some potential use cases:
Secure Local Communication: BLE chat can be used for private messaging within offices, factories, or homes without the need for internet connectivity.
Education Projects: BLE chat can be a great project for students learning about BLE technology and its applications.
Why Choose BleuIO for Your BLE Projects?
The BleuIO USB dongle makes BLE application development accessible for everyone, from beginners to advanced developers. Its built-in AT commands allow you to quickly prototype applications without diving into complex BLE stacks or SDKs. Whether you’re working on a small hobby project or an enterprise-level IoT solution, BleuIO provides the tools you need.
Here are some standout features of BleuIO:
Cross-Platform Compatibility: Works seamlessly on Windows, macOS, and Linux.
Simple AT Commands: No need for extensive coding; just use the built-in commands to control the dongle.
Lightweight and Portable: Easy to carry and set up for on-the-go development.
This BLE chat application demonstrates the power and simplicity of BLE communication using the BleuIO USB dongle. While it’s a prototype, it showcases how BLE can enable private, secure, and efficient messaging without relying on external networks.
If you’re interested in exploring this further, the source code for the project is available. You can modify and extend it to fit your specific needs. With BleuIO, the possibilities are endless.
Order Your BleuIO USB Dongle Today! Ready to create your own BLE applications? Visit BleuIO’s to learn more and order your dongle today.
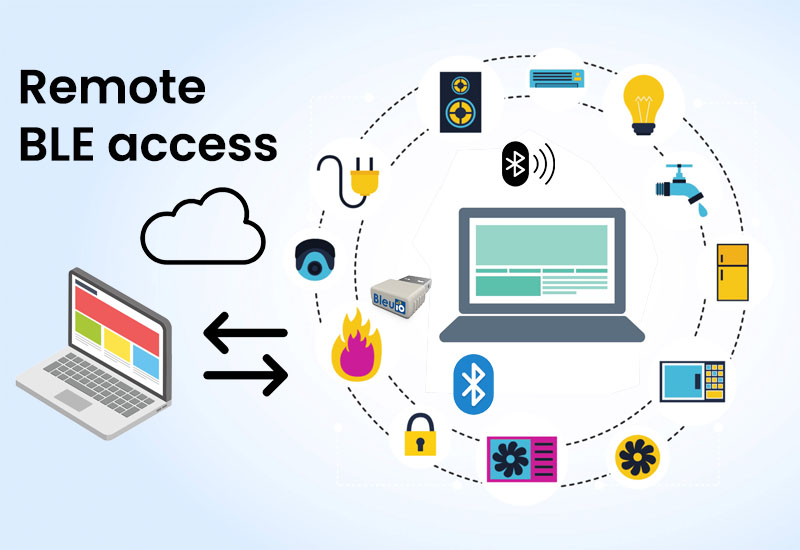
This article will discuss about accessing a Bluetooth Low Energy (BLE) device—specifically the BleuIO BLE USB dongle—from a cloud-based computer. This setup is invaluable for developers, researchers, and organizations that need to control or monitor BLE devices located in remote or hard-to-reach locations. We will explain how to set up both local and cloud servers, and how to establish a secure connection between them, allowing you to send commands and receive data from a remote BLE device with ease.
Why Do We Need Remote Access to BLE Devices?
Remote access to BLE devices opens up new possibilities in IoT, distributed applications, and various remote monitoring and management scenarios. Here are a few key use cases where this approach can be especially beneficial:
Remote Device Monitoring: In scenarios where BLE devices like sensors or trackers are deployed in different physical locations—such as environmental monitoring stations, healthcare devices in hospitals, or industrial sensors in manufacturing facilities—remote access allows centralized monitoring and control. For example, an environmental monitoring company could deploy BLE sensors in different regions and access data from all devices from a single central hub.
Distributed Development and Testing: Developers and QA engineers can use remote access for testing and debugging BLE applications from any location, without needing to be physically near the BLE devices. This is particularly useful for teams working on IoT applications who want to test BLE functionality across different device types or networks. For instance, a developer could work on BLE application features from home, while the test device is connected to a machine in the office.
Centralized Management of BLE Devices: Organizations that manage multiple BLE devices across various locations, such as in retail stores, hospitals, or warehouses, can benefit from a centralized server setup to communicate with and manage all devices remotely. A central server could send updates, retrieve data, or manage configurations for multiple BLE devices, providing an efficient and scalable solution for distributed IoT applications.
Remote Troubleshooting and Maintenance: For businesses that deploy BLE devices at customer sites or in field locations, remote access allows technical support teams to troubleshoot issues without requiring on-site visits. This can reduce downtime and improve customer satisfaction. For example, a support technician could diagnose issues with a BLE-enabled device at a remote client site, identifying and resolving problems directly from the company’s central office.
By using BleuIO with AT commands, we make BLE application development much simpler and more accessible. The BleuIO dongle is compatible with Windows, macOS, and Linux, allowing consistent development across platforms.
Project Structure and Components
In this project, we’ll use the following components to remotely access and control BLE devices:
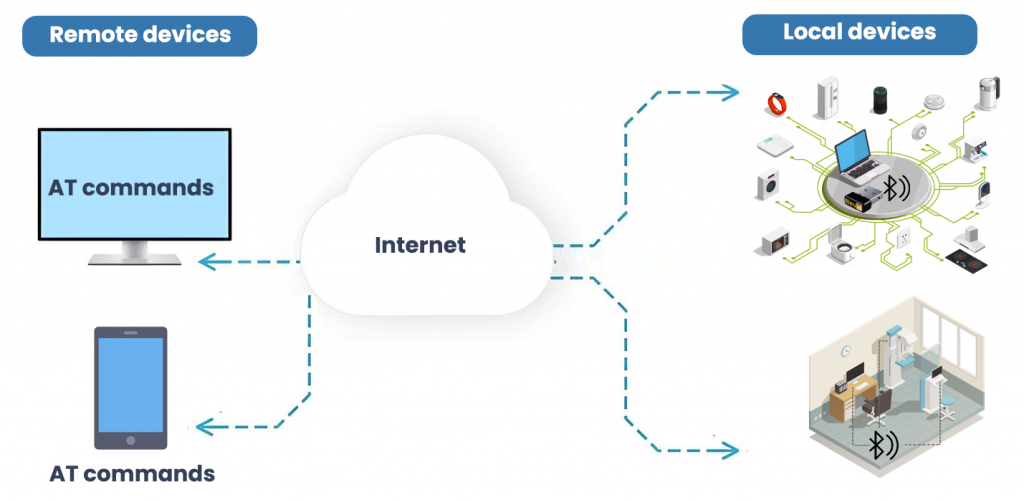
Device with BleuIO Connected (Local Device): This is the device with the BleuIO dongle physically attached, acting as the local interface for sending and receiving BLE commands. It will run a small server to manage communication with the BLE dongle over a serial connection.
Remote Access Server (Cloud Server): This is the server that provides remote access to the local device. By connecting to the local server, it enables us to send commands and receive data from the BLE dongle remotely.
LocalTunnel: We’ll use LocalTunnel to generate a secure public URL, allowing the cloud server to communicate with the local device without needing complex router configurations. This URL acts as a bridge, making the local device accessible from anywhere with internet access.
Node.js: Both the local device and the cloud server will use Node.js to run simple server scripts that facilitate communication between the cloud server and the BLE dongle.
Step-by-Step Guide
Step 1: Setting Up the Local Server with BleuIO dongle connected to it
Local device is where the BleuIO dongle is physically connected. We’ll set up a Node.js server that communicates with the dongle through the serial port. This server will accept commands from the cloud server and send them to the BLE dongle, then return the response.
Install Node.js (if not already installed) on Local device.
Create a project folder and initialize a Node.js project: mkdir local_serial_server cd local_serial_server npm init -y
Install Dependencies:
Install serialport to handle serial communication with the BLE dongle.Install socket.io to manage WebSocket connections.
npm install serialport socket.io
Create the Local Serial Server Script:
Create a file named local_serial_server.js. This script will:
Listen for WebSocket connections from the cloud server.Accept commands, pass them to the BleuIO dongle, and send back responses.
const server = http.createServer(); const io = socketIo(server);
// Define the serial port path and baud rate const portPath = 'COM592'; // Replace 'COM3' with your dongle's port const serialPort = new SerialPort({ path: portPath, baudRate: 9600 });
// Listen for incoming connections from the cloud server io.on('connection', (socket) => { console.log('Connected to cloud server');
// Receive command from cloud and send to serial port socket.on('sendCommand', (command) => { const formattedCommand = `${command}\r\n`; console.log(`Sending command to serial port: ${formattedCommand}`); serialPort.write(formattedCommand); });
// Send serial responses to cloud server serialPort.on('data', (data) => { console.log(`Data received from serial port: ${data}`); socket.emit('serialResponse', data.toString()); }); });
// Start the server on a specified port const LOCAL_PORT = 4000; // Choose any port, ensure firewall allows it server.listen(LOCAL_PORT, () => { console.log(`Local Serial Server running on http://localhost:${LOCAL_PORT}`); });
Find and Set the Serial Port Path:
In your local_serial_server.js, specify the correct serial port path for your BLE dongle (e.g., COM3 on Windows or /dev/ttyUSB0 on Linux).
Run the Local Serial Server:
Start the server by running: node local_serial_server.js
At this point, the local server is ready, but it’s only accessible to itself. Next, we’ll use LocalTunnel to make it accessible to the cloud server.
Step 2: Exposing the Local Server to the Internet Using LocalTunnel
Since local device 1 and cloud device are on different networks, we’ll need to create a public URL for the local server. There are several options to make a local server accessible publicly, including tools like ngrok, Pagekite, and LocalTunnel. For this tutorial, we’ll be using LocalTunnel as it’s free and easy to set up, but feel free to explore other solutions if they better meet your needs.
Install LocalTunnel:
On local device, install LocalTunnel globally npm install -g localtunnel
Start LocalTunnel:
Open a new terminal window on local device and run lt --port 4000
LocalTunnel will generate a public URL (e.g., https://five-sides-live.loca.lt). This URL will allow cloud device to access the local server running on port 4000 of Local device.
Save the LocalTunnel URL:
Copy the URL provided by LocalTunnel. This URL will be used in the cloud server configuration on Cloud device.
Step 3: Setting Up the Cloud Server on Cloud device
In this setup, Cloud device will act as the cloud server that connects to local device’s LocalTunnel URL, allowing remote access to the BLE dongle. Cloud device can be any machine with Node.js installed—located anywhere, such as a remote computer in New York. You could also deploy this server on a cloud platform like Heroku, Replit, or Vercel for persistent access.
For simplicity, in this example, we’ll demonstrate how to set up the cloud server on another computer running Node.js, not connected to the same network as local device.
Create a Project Folder on cloud device and Initialize Node.js:
Open a terminal or command prompt on cloud device and create a folder for the cloud server mkdir cloud_serial_server cd cloud_serial_server npm init -y
Install Dependencies:
You’ll need express to serve the front-end pages and socket.io to manage WebSocket communication.
Install socket.io-client to allow the cloud server to connect to the LocalTunnel URL created on Local device npm install express socket.io socket.io-client
Create the Cloud Server Script: In the cloud_serial_server folder, create a file named cloud_server.js. This script will Connect to the LocalTunnel URL (generated by Local device) and forward BLE commands to the local server.Serve the front-end pages (index.html and page2.html) for interacting with the BLE device remotely.
const express = require('express');
const http = require('http');
const socketIo = require('socket.io');
const ioClient = require('socket.io-client'); // Client for local serial server

const app = express();
const server = http.createServer(app);
const io = socketIo(server);

// Connect to the local serial server via WebSocket
const LOCAL_SERVER_URL = 'https://real-poets-count.loca.lt';
const localSocket = ioClient(LOCAL_SERVER_URL);

// Serve static files (frontend files for Page 1 and Page 2)
app.use(express.static('public'));

// Handle messages from Page 2 and forward to local serial server
io.on('connection', (socket) => {
  console.log('Client connected to cloud server');

  // Receive command from Page 2 and forward to local serial server
  socket.on('sendCommand', (command) => {
    console.log(`Forwarding command to local server: ${command}`);
    localSocket.emit('sendCommand', command); // Send to local serial server
  });

  socket.on('disconnect', () => {
    console.log('Client disconnected from cloud server');
  });
});

// Receive data from local serial server and forward to clients
localSocket.on('serialResponse', (data) => {
  console.log(`Received data from local serial server: ${data}`);
  io.emit('serialResponse', data); // Broadcast to connected clients
});

const PORT = process.env.PORT || 3000;
server.listen(PORT, () => {
  console.log(`Cloud server is running on http://localhost:${PORT}`);
});
Update the LocalTunnel URL in Cloud Server:
Replace the LOCAL_SERVER_URL in cloud_server.js with the LocalTunnel URL you generated on Local device (e.g., https://five-sides-live.loca.lt).
Run the Cloud Server:
Start the cloud server by running:bashCopy codenode cloud_server.js
This will start a server that listens for connections on Cloud device. You can open a web browser on Cloud device and go to http://localhost:3000 to access the front-end pages.
Access the Front-End Pages:
Open a browser and navigate to http://localhost:3000/index.html (for displaying BLE responses) and http://localhost:3000/page2.html (for sending commands).
Note: If you decide to deploy this server to a cloud platform (e.g., Heroku, Replit, or Vercel), replace localhost with the appropriate URL provided by the platform.
With this setup, Cloud device can be anywhere in the world, allowing you to control and receive data from the BLE dongle on Local device (in Stockholm) remotely.
This tutorial demonstrates the potential of combining Node.js, BLE technology, and tunneling services for remote BLE access. The BleuIO dongle’s compatibility and simplicity make it an excellent choice for developers interested in building BLE applications across various operating systems.
This article takes a deep dive into the capabilities of BleuIO, exploring how it can simplify BLE application testing, especially in complex environments like IoT, health, automotive, and smart home applications. Whether you are a seasoned developer or a newcomer, BleuIO provides a reliable, versatile tool to jumpstart your BLE projects. We’ll also cover an example project, the BLE Connectivity Test Tool, to illustrate BleuIO’s ease of use and the possibilities it opens up for developers.
Example Project: Building a BLE Connectivity Test Tool
To demonstrate the practicality and ease of using BleuIO, let’s look at a sample project: a BLE Connectivity Test Tool. This tool allows developers to test the connection stability of a BLE device, such as the HibouAir air quality monitor, by performing repeated connection and disconnection attempts. This example showcases how easy it is to set up a real-world testing scenario with BleuIO, perfect for those looking to explore connectivity applications.
This BLE Connectivity Test Tool will:
Scan for the HibouAir Device: Use BleuIO to locate the device based on its BLE address.
Initiate Connections: Repeatedly connect and disconnect from the HibouAir device, tracking the success and failure of each attempt.
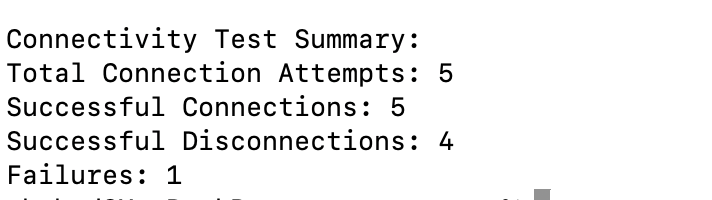
Log Results: Display a summary at the end, indicating successful connections and any errors encountered.
Code Overview
The Python script below uses the official BleuIO Python library, which simplifies interaction with BLE devices. It uses AT commands to set the dongle in central mode, initiate connections, and disconnect after a set duration.
import time
from datetime import datetime
from bleuio_lib.bleuio_funcs import BleuIO

# Initialize the BleuIO dongle
dongle = BleuIO()

# Device address of HibouAir (replace with your actual address if different)
device_address = "[1]D1:79:29:DB:CB:CC"

# Number of connection attempts
test_count = 5
# Duration to stay connected in seconds
connect_duration = 2
# Delay between connection attempts
delay_between_tests = 5

# Counters for tracking connection results
successful_connections = 0
successful_disconnections = 0
connection_failures = 0

# Register scan callback to handle scanned device responses
def my_scan_callback(scan_input):
    print("\n\nScan Result: " + str(scan_input))

# Register event callback to handle connection events with timestamps
def my_evt_callback(evt_input):
    cbTime = datetime.now()
    currentTime = cbTime.strftime("%H:%M:%S")
    print("\n\n[" + str(currentTime) + "] Event: " + str(evt_input))

# Set up the callback functions
dongle.register_evt_cb(my_evt_callback)
dongle.register_scan_cb(my_scan_callback)

# Set the BLE role to central to initiate connections
dongle.at_central()

# Start the connection test
print("Starting BLE Connectivity Test with HibouAir device...\n")
for i in range(test_count):
    print(f"\nAttempt {i+1}/{test_count}")

    # Connect to the device
    connect_response = dongle.at_gapconnect(device_address)
    if connect_response.Ack.get("err") == 0:  # Check if the connection was successful
        print("Connection successful!")
        successful_connections += 1
        time.sleep(connect_duration)  # Stay connected for the specified duration

        # Disconnect
        disconnect_response = dongle.at_gapdisconnect()
        if disconnect_response.Ack.get("err") == 0:
            print("Disconnected successfully.")
            successful_disconnections += 1
        else:
            print("Error during disconnect:", disconnect_response.Ack.get("errMsg"))
            connection_failures += 1
    else:
        print("Connection failed:", connect_response.Ack.get("errMsg"))
        connection_failures += 1

    # Wait before the next attempt
    time.sleep(delay_between_tests)


# Display test results summary
print("\nConnectivity Test Summary:")
print(f"Total Connection Attempts: {test_count}")
print(f"Successful Connections: {successful_connections}")
print(f"Successful Disconnections: {successful_disconnections}")
print(f"Failures: {connection_failures}")
This tool’s simplicity shows how BleuIO can be used in the development and testing process, making it a preferred choice for developers who want to avoid BLE’s traditional complexities.
Output
Real-World Applications of BleuIO
IoT Device Testing: From smart home devices to industrial sensors, BleuIO is invaluable for testing the connectivity and data transmission of IoT devices.
Wearable Tech Development: For developers working on BLE-enabled wearables like fitness trackers or health monitors, BleuIO provides a straightforward way to test device connectivity.
Educational and Prototyping Tool: BleuIO’s ease of use makes it an excellent educational tool for introducing BLE concepts to students and rapid prototyping for startups.
Environmental Monitoring: As demonstrated with the HibouAir air quality monitor, BleuIO facilitates connectivity testing in applications involving environmental data, like CO2 monitoring, temperature, and humidity.
Why BleuIO for BLE Development?
Developing BLE applications often requires specialized hardware and software expertise. Traditional BLE development involves understanding intricate details of Bluetooth stacks, profiles, and data protocols. BleuIO alleviates this by offering a straightforward command structure that abstracts the technical details, allowing developers to quickly build and test applications.
In addition, BleuIO’s compact design makes it suitable for portable applications and rapid prototyping. From sensor connectivity to device tracking and monitoring, BleuIO proves to be a versatile asset for a range of BLE applications.
BleuIO offers an all-in-one solution for BLE development, bridging the gap between beginner-friendly usability and powerful functionality. With support for multiple platforms, easy integration with popular programming languages, and straightforward AT command access, BleuIO empowers developers to quickly and efficiently test, prototype, and deploy BLE applications.
By using tools like the BLE Connectivity Test Tool, developers can focus on creating innovative applications without needing to dive deep into the complexities of BLE. BleuIO enables developers to bring their ideas to life, from IoT to healthcare and beyond. Start your BLE development journey with BleuIO today and see the difference in ease and efficiency it brings to your projects.
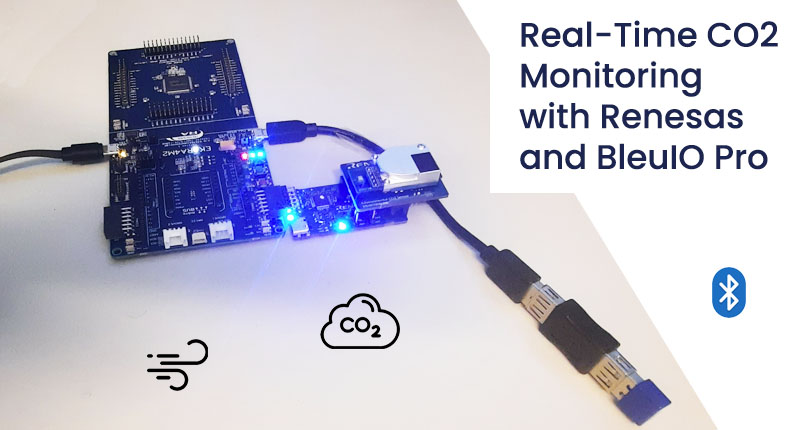
Introduction This project demonstrates how to integrate the Renesas EK-RA4M2 development board with the Renesas CO2 Sensor (RRH47000) and the new BleuIO Pro Dongle (SSD025) by Smart Sensor Devices, built on the Renesas Bluetooth Low Energy SoC DA14695. In this setup, the dongle advertises sensor data from the CO2 sensor, including CO2 concentration, humidity, and temperature.
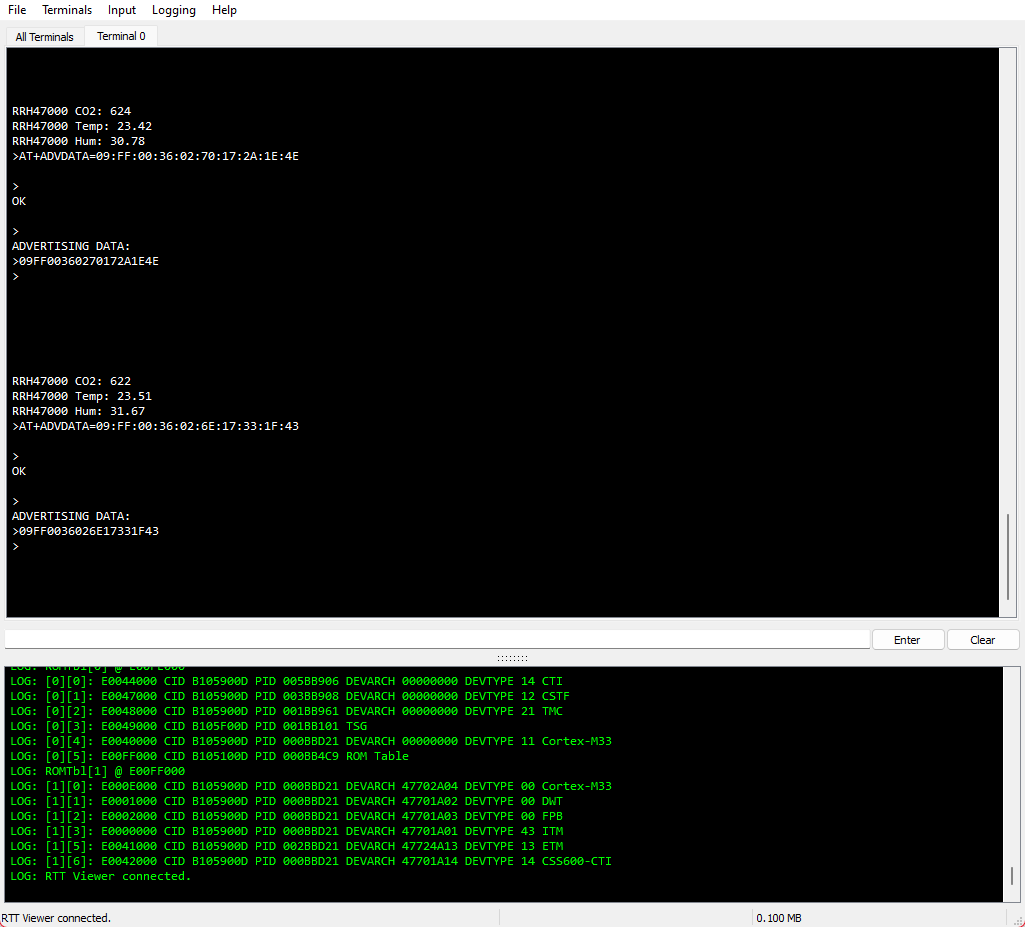
The sensor data is displayed using the RTT Viewer.
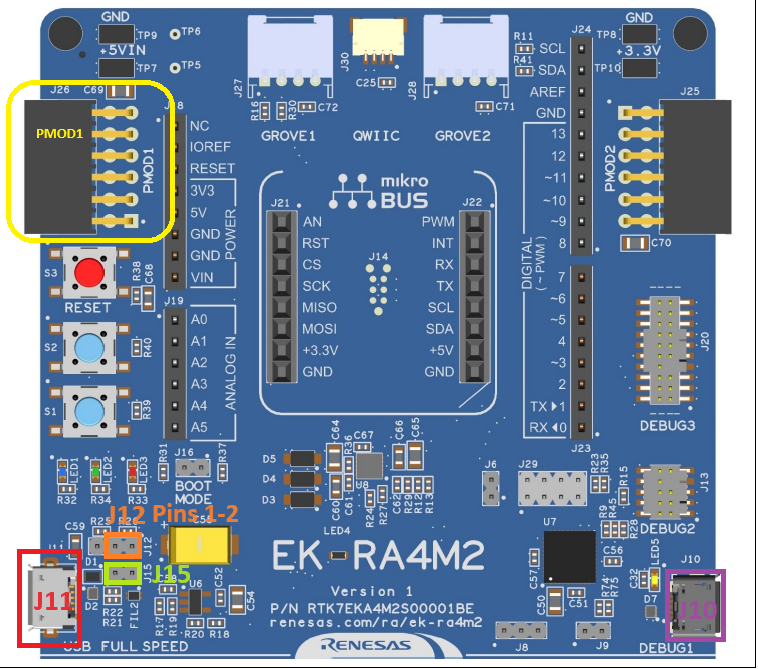
Connect a Micro USB device cable (Type-A male to Micro-B male) between J10 (Debug1) on the EK-RA4M2 and a computer’s USB port.
Plug in the BleuIO Dongle using a USB OTG Cable (Type-A female to Micro-B male) and connect it to J11 (USB Full Speed).
Ensure that Jumper J12 is placed on pins 1-2.
Remove Jumper J15 pins.
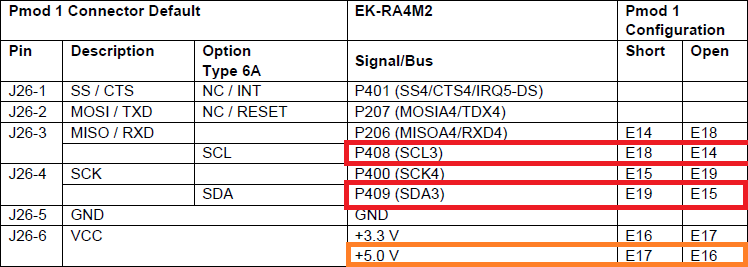
Setting up PMOD1 The RRH47000 sensor connects via PMOD1. Since the sensor requires 5V, and PMOD by default provides 3.3V, some modifications are necessary:
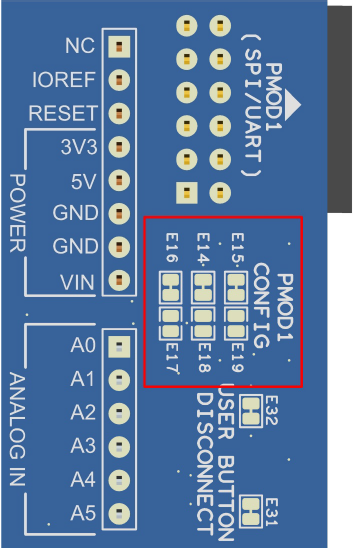
For 5V the PMOD1 Config trace cut jumper E17 must be Short and E16 be Open. For I2C SCL E18 need to be Short and E14 need to be Open. For I2C SDA E19 need to be Short and E15 need to be Open.
The PMOD1 config can be found on the back of the RA4M2:
Importing the Project
Open e² studio IDE
Choose a workspace and click ‘Launch’
Download or clone the example project. Place the folder ‘bleuio_ra4m2_co2_monitor_example’ in workspace.
Choose Import Project
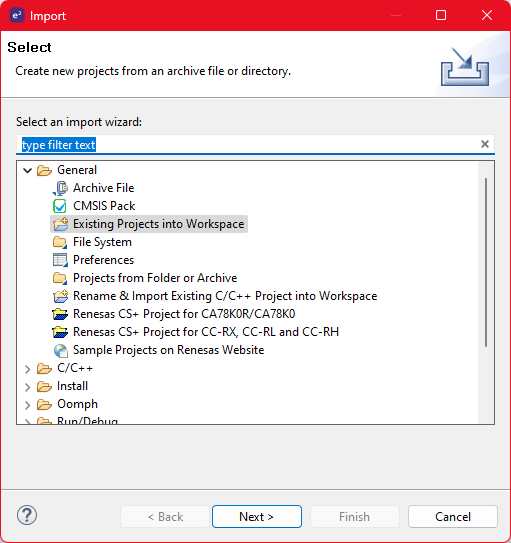
Select ‘Existing Projects into Workspace’ under the ‘General’ tab:
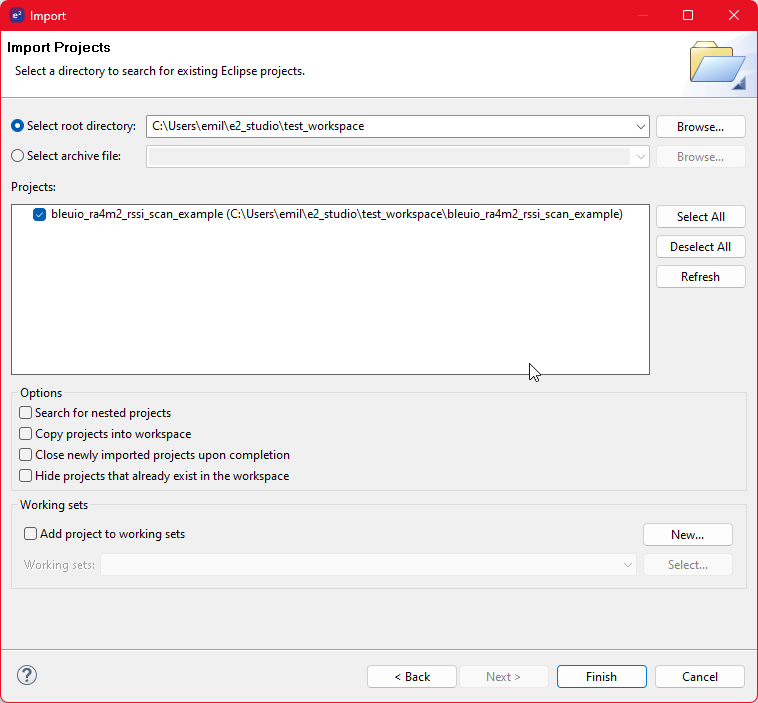
Click the ‘Browse…’ button and open folder where the ‘bleuio_ra4m2_co2_monitor_example’ project folder is located:
Finally select the project and click ‘Finish’. You have now imported the the project!
Running the Example
Build the project by clicking the building icon:
Use Debug to download and run the project. The first time you need to configure the debug settings. Click down arrow to the right of the Debug icon and select ‘Debug Configurations…’
Under ‘Renesas GDB Hardware Debugging’ select ‘bleuio_ra4m2_co2_monitor_example.elf’ and click ‘Debug’.
The debug is now configured and the ‘Debug’ icon can be used next time to run the project.
Open RTTViewer. Connect and use these settings:
Connection to J-Link: USB
Specify Target Device: R7FA4M2AD
Target Interface & Speed: SWD 4000kHz
RTT Control Block: Address 0x200009ac
On the debugger screen in e² studio click the ‘Resume’ icon twice to run the project.
The application is now running. When starting up you should notice all LEDs lighting up for one second then only the red LED will be on. It will turn off as soon as the BleuIO is configured and the green LED will turn on when advertising start.
You should now see the output on the RTTViewer.
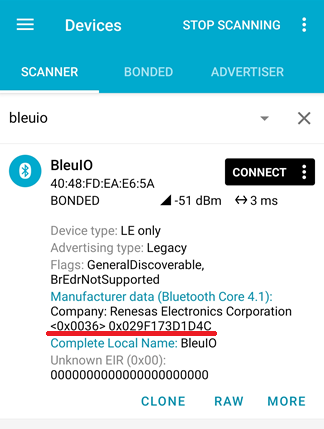
Scanning the Dongle To view the advertised data, use an app like nRF Connect.
Decoding the Advertising Message The advertising data format is as follows:
020106: Default advertising flag for connectable devices.
09FF3600026E173E1D27: Manufacturer-specific data.
09: Message size.
FF: Manufacturer Specific Data flag.
3600: Renesas Manufacturer ID (little-endian).
026E: CO2 value in hex (622 in decimal).
173E: Temperature value, split into two bytes (23.62°C).
1D27: Humidity value, split into two bytes (29.39%).
This example serves as a foundational guide for integrating the Renesas EK-RA4M2 development board with a CO2 sensor and the BleuIO Pro Dongle for real-time monitoring. With its flexible setup, you can extend this project to suit your specific applications, such as real-time air quality monitoring, smart building systems, or other IoT-based environmental solutions. By leveraging the capabilities of the BleuIO Pro and Renesas platform, you can create robust, scalable solutions for your next Bluetooth Low Energy (BLE) project.
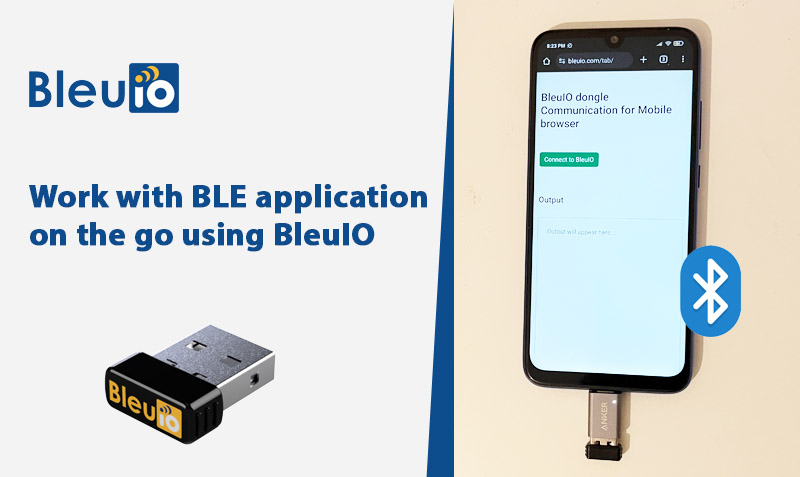
In today’s fast-paced world, flexibility and mobility in development are crucial. Whether you’re on the go or just want the convenience of working from your mobile device, having the ability to connect and interact with your development tools directly from your smartphone or tablet can be a game-changer. This article will guide you through a groundbreaking way to connect the BleuIO USB dongle to your mobile device using the Web Serial API. This tutorial will not only introduce you to the BleuIO dongle’s capabilities but also show you how to harness the power of BLE (Bluetooth Low Energy) on your mobile device with custom AT commands. By the end of this guide, you’ll be ready to run BLE scripts directly from your mobile browser, making BLE development more accessible and portable than ever.
Why This Matters
BleuIO is a versatile USB dongle that allows developers to easily add Bluetooth Low Energy (BLE) capabilities to their projects. Traditionally, connecting BLE devices to a mobile device required specialized apps or programming with platform-specific APIs. However, with the advent of the Web Serial API, it’s now possible to interact with BLE devices directly from a web browser, even on mobile devices. This means you can execute AT commands, scan for nearby BLE devices, and even build custom BLE applications right from your mobile browser.
This article is designed to help you leverage these capabilities, making BleuIO more accessible and useful whether you’re in the office, at home, or on the move. By following this tutorial, you’ll not only learn how to connect and communicate with BleuIO using your mobile device but also gain insight into how to integrate these features into your own BLE applications.
Getting Started: What You’ll Need
BleuIO USB Dongle: The star of this tutorial, a compact USB device that adds BLE functionality to any device with a USB port.
Mobile Device: A smartphone or tablet with a USB OTG (On-The-Go) adapter to connect the BleuIO dongle.
Web Browser: A modern web browser that supports the Web Serial API. For this tutorial, we’ll focus on Google Chrome for Android.
A Simple HTML/JavaScript Setup: We’ll walk through creating a basic web interface to send and receive AT commands from the BleuIO dongle.
Step 1: Setting Up Your Development Environment
Before diving into the code, let’s ensure your mobile device is ready. Here’s a quick checklist:
Connect BleuIO to Your Mobile Device: Use a USB OTG adapter to connect the BleuIO dongle to your smartphone or tablet.
Install a Compatible Browser: Ensure you have Google Chrome installed on your device. As of the time of writing, Chrome is one of the few mobile browsers that support the Web Serial API.
Step 2: Writing the Web Interface
Next, we’ll create a simple web interface that will allow you to connect to the BleuIO dongle, send AT commands, and display the responses. Below is the code we’ll use:
<!DOCTYPE html>
<html lang="en">
  <head>
    <meta charset="UTF-8" />
    <meta name="viewport" content="width=device-width, initial-scale=1.0" />
    <title>Web Serial API with BleuIO</title>
    <link
      href="https://cdn.jsdelivr.net/npm/bootstrap@5.3.3/dist/css/bootstrap.min.css"
      rel="stylesheet"
      integrity="sha384-QWTKZyjpPEjISv5WaRU9OFeRpok6YctnYmDr5pNlyT2bRjXh0JMhjY6hW+ALEwIH"
      crossorigin="anonymous"
    />

    <script type="module">
      import { serial as webSerialPolyfill } from 'web-serial-polyfill@1.0.15';
      // Use webSerialPolyfill as you would navigator.serial.
    </script>
  </head>
  <body>
    <div class="container mt-5">
      <h1>BleuIO dongle Communication for Mobile browser</h1>
      <br /><br />
      <div class="row">
        <div class="col-md-6">
          <button id="connect" class="btn btn-success">
            Connect to BleuIO
          </button>
          <button id="disconnect" class="btn btn-danger" style="display: none">
            Disconnect
          </button>
          <br /><br /><br /><br />
          <div id="command-section" style="display: none">
            Basic command <br />
            <button id="scanBtn" class="btn btn-primary">
              Scan for nearby BLE devices (AT+GAPSCAN=3)
            </button>
            <br />
            <br />
            Write your own AT commands
            <input
              type="text"
              id="inputData"
              class="form-control"
              placeholder="Write AT commands"
            /><br />
            <button id="send" class="btn btn-warning">Send</button>
          </div>
        </div>
        <div class="col-md-6">
          <h4>Output</h4>
          <br />
          <textarea
            id="output"
            style="height: 500px; width: 100%; border: 1px solid grey"
            class="rounded p-4"
            placeholder="Output will appear here..."
            readonly
          ></textarea>
        </div>
      </div>
    </div>

    <script type="module" crossorigin>
      import { serial as webSerialPolyfill } from 'https://cdn.jsdelivr.net/npm/web-serial-polyfill@1.0.15';
      var serial_module = null;
      if ('serial' in navigator) {
        serial_module = navigator.serial;
      } else {
        if ('usb' in navigator) {
          serial_module = webSerialPolyfill;
        }
      }
      let port;
      let reader;
      const connectButton = document.getElementById('connect');
      const disconnectButton = document.getElementById('disconnect');
      const sendButton = document.getElementById('send');
      const outputArea = document.getElementById('output');
      const inputField = document.getElementById('inputData');
      const commandSection = document.getElementById('command-section');

      connectButton.addEventListener('click', async () => {
        try {
          port = await serial_module.requestPort();
          await port.open({ baudRate: 9600 });

          reader = port.readable.getReader();

          // Hide connect button, show disconnect button and command section
          connectButton.style.display = 'none';
          disconnectButton.style.display = 'block';
          commandSection.style.display = 'block';

          while (true) {
            const { value, done } = await reader.read();
            if (done) {
              reader.releaseLock();
              break;
            }
            outputArea.value += new TextDecoder().decode(value);
          }
        } catch (error) {
          console.error('Failed to connect:', error);
          alert(
            'Failed to connect to the device. Please try again.',
            JSON.stringify(error)
          );
        }
      });

      disconnectButton.addEventListener('click', async () => {
        try {
          if (reader) {
            reader.cancel();
            reader = null;
          }
          if (port) {
            await port.close();
            port = null;
          }

          // Show connect button, hide disconnect button and command section
          connectButton.style.display = 'block';
          disconnectButton.style.display = 'none';
          commandSection.style.display = 'none';
        } catch (error) {
          console.error('Failed to disconnect:', error);
          alert('Failed to disconnect from the device. Please try again.');
        }
      });

      sendButton.addEventListener('click', async () => {
        outputArea.value = '';
        const writer = port.writable.getWriter();
        const dataToSend = inputField.value + '\r\n';
        const data = new TextEncoder().encode(dataToSend);
        await writer.write(data);
        writer.releaseLock();
      });
      document.getElementById('scanBtn').addEventListener('click', async () => {
        const writer = port.writable.getWriter();
        let dataToSend = 'AT+CENTRAL' + '\r\n';
        let data = new TextEncoder().encode(dataToSend);
        await writer.write(data);
        dataToSend = 'AT+GAPSCAN=3' + '\r\n';
        data = new TextEncoder().encode(dataToSend);
        await writer.write(data);
        writer.releaseLock();
      });
    </script>
  </body>
</html>
Step 3: Running the Script
Once your HTML file is ready, you can open it in your mobile browser. We have uploaded the script on github to try out.
Connect to BleuIO: Tap the “Connect to BleuIO” button to initiate a connection.
Send Commands: Once connected, you can start sending AT commands or use the built-in “Scan for BLE Devices” button to see nearby BLE devices.
View Output: The responses from the BleuIO dongle will appear in the output section on the right.
Step 4: Customizing and Expanding
This setup provides a solid foundation for more advanced BLE development on mobile devices. You can easily modify the script to add more AT commands or even build a full-fledged BLE application. Whether you want to control BLE devices, gather data, or create interactive applications, this setup offers flexibility and mobility.
Output:
With the BleuIO USB dongle and the Web Serial API, you can now bring BLE development to your mobile device, giving you the freedom to code, test, and interact with BLE devices wherever you are. This capability opens up new possibilities for developers who need to work on the go, providing a powerful toolset right in your pocket.