Building a BLE Application with ReactJS and BleuIO
June 7, 2024
In this tutorial, we’ll explore how to create a Bluetooth Low Energy (BLE) application using ReactJS and the BleuIO BLE USB dongle. BleuIO is a versatile BLE device that makes developing BLE applications fast and easy with its user-friendly AT commands.
Introduction
Bluetooth Low Energy (BLE) technology is widely used for short-range communication, particularly in IoT applications. BleuIO, with its easy-to-use AT commands, simplifies the process of integrating BLE functionality into your applications. In this tutorial, we’ll demonstrate how to create a BLE application using ReactJS. Specifically, we will show you how to scan for nearby BLE devices for three seconds and display the results on the screen, highlighting the capabilities of BleuIO.
Prerequisites
Before we start, make sure you have the following:
- A BleuIO USB dongle
- A computer with a Chromium-based browser (like Chrome or Edge)
- Node.js and npm installed
- Basic knowledge of ReactJS
Setting Up the Project
First, let’s create a new React project. If you haven’t already installed create-react-app, you can do so with the following command:
npx create-react-app ble-react-app
cd ble-react-app
npm start
This will create a new React application and start the development server.
Creating the Serial Port Component
We’ll create a component to handle the serial port communication with the BleuIO dongle. Create a new file called SerialPortComponent.js in the src directory and add the following code:
import React, { useState, useEffect } from 'react';

const SerialPortComponent = () => {
  const [port, setPort] = useState(null);
  const [output, setOutput] = useState('');
  const [reader, setReader] = useState(null);
  const [writer, setWriter] = useState(null);

  const connectToSerialPort = async () => {
    try {
      // Request a port and open a connection.
      const selectedPort = await navigator.serial.requestPort();
      await selectedPort.open({ baudRate: 9600 });
      setPort(selectedPort);

      const textDecoder = new TextDecoderStream();
      const readableStreamClosed = selectedPort.readable.pipeTo(
        textDecoder.writable
      );
      const reader = textDecoder.readable.getReader();
      setReader(reader);

      const textEncoder = new TextEncoderStream();
      const writableStreamClosed = textEncoder.readable.pipeTo(
        selectedPort.writable
      );
      const writer = textEncoder.writable.getWriter();
      setWriter(writer);

      // Read data from the serial port.
      readSerialData(reader);
    } catch (error) {
      console.error('There was an error opening the serial port:', error);
    }
  };

  const readSerialData = async (reader) => {
    try {
      while (true) {
        const { value, done } = await reader.read();
        if (done) {
          // Allow the serial port to be closed later.
          reader.releaseLock();
          break;
        }
        // Convert the received data to a string and update the state.
        setOutput((prevOutput) => prevOutput + value);
      }
    } catch (error) {
      console.error('Error reading from the serial port:', error);
    }
  };

  const writeToSerialPort = async () => {
    setOutput('');
    try {
      if (writer) {
        // Send AT+CENTRAL command
        await writer.write('AT+CENTRAL\r');
        setOutput((prevOutput) => prevOutput + 'AT+CENTRAL\r\n');

        // Wait for a short while to ensure the command is processed
        await new Promise((resolve) => setTimeout(resolve, 500));

        // Send AT+GAPSCAN=3 command
        await writer.write('AT+GAPSCAN=3\r');
        setOutput((prevOutput) => prevOutput + 'AT+GAPSCAN=3\r\n');

        // Wait for scan to complete and read response
        await new Promise((resolve) => setTimeout(resolve, 3000));

        // Read and process data from the serial port
        let scanData = '';
        while (true) {
          const { value, done } = await reader.read();
          if (done) {
            break;
          }
          scanData += value;
        }
        setOutput((prevOutput) => prevOutput + scanData);
      } else {
        console.error('Writer not available');
      }
    } catch (error) {
      console.error('Error writing to the serial port:', error);
    }
  };

  useEffect(() => {
    return () => {
      // Cleanup function to close port when component unmounts
      if (port) {
        port.close();
      }
      if (reader) {
        reader.releaseLock();
      }
      if (writer) {
        writer.releaseLock();
      }
    };
  }, [port, reader, writer]);

  return (
    <div className="mt-5">
      <button
        className="btn btn-success me-2"
        onClick={connectToSerialPort}
        disabled={!!port}
      >
        Connect to BleuIO
      </button>
      <button
        className="btn btn-warning me-2"
        onClick={writeToSerialPort}
        disabled={!writer}
      >
        Scan for nearby BLE devices for 3 seconds
      </button>

      {output && (
        <div>
          <h3>Response from the BleuIO:</h3> <pre>{output}</pre>
        </div>
      )}
    </div>
  );
};

export default SerialPortComponent;
Explanation of the Code
- Connecting to the Serial Port: The
connectToSerialPortfunction requests access to the serial port and opens a connection. It initializes the text encoder and decoder streams for reading and writing data. - Reading Serial Data: The
readSerialDatafunction reads data from the serial port continuously and updates the output state with the received data. - Writing to the Serial Port: The
writeToSerialPortfunction sends AT commands to the serial port. It first sends theAT+CENTRALcommand to put the device in central mode, then sends theAT+GAPSCAN=3command to scan for nearby BLE devices for 3 seconds. It reads and displays the response from the serial port after the scan completes. - Cleanup: The
useEffecthook ensures that the serial port is properly closed and resources are released when the component is unmounted.
Using the Component in Your App
Update your App.js to include the new SerialPortComponent.
// src/App.js
import React from 'react';
import SerialPortComponent from './SerialPortComponent';

function App() {
  return (
    <div className="App">
      <header className="App-header">
        <h1>BLE Application with React and BleuIO</h1>
        <SerialPortComponent />
      </header>
    </div>
  );
}

export default App;
Running the Application
Make sure your BleuIO USB dongle is connected to your computer. Start your React application:
npm start
Open your browser and navigate to http://localhost:3000. You should see the application with two buttons: “Connect to BleuIO” and “Scan for nearby BLE devices for 3 seconds“.
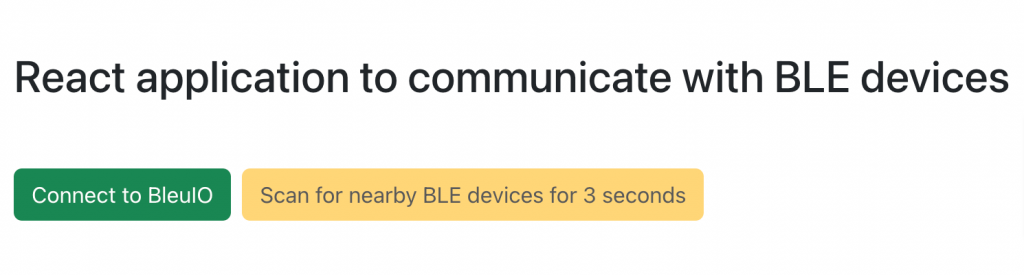
- Connect to BleuIO: Click this button to connect to the BleuIO USB dongle. The browser will prompt you to select the serial port.
- Scan for nearby BLE devices for 3 seconds: After connecting, click this button to send the
AT+CENTRALandAT+GAPSCAN=3commands to the BleuIO dongle. The output area will display the response from the device.
Output
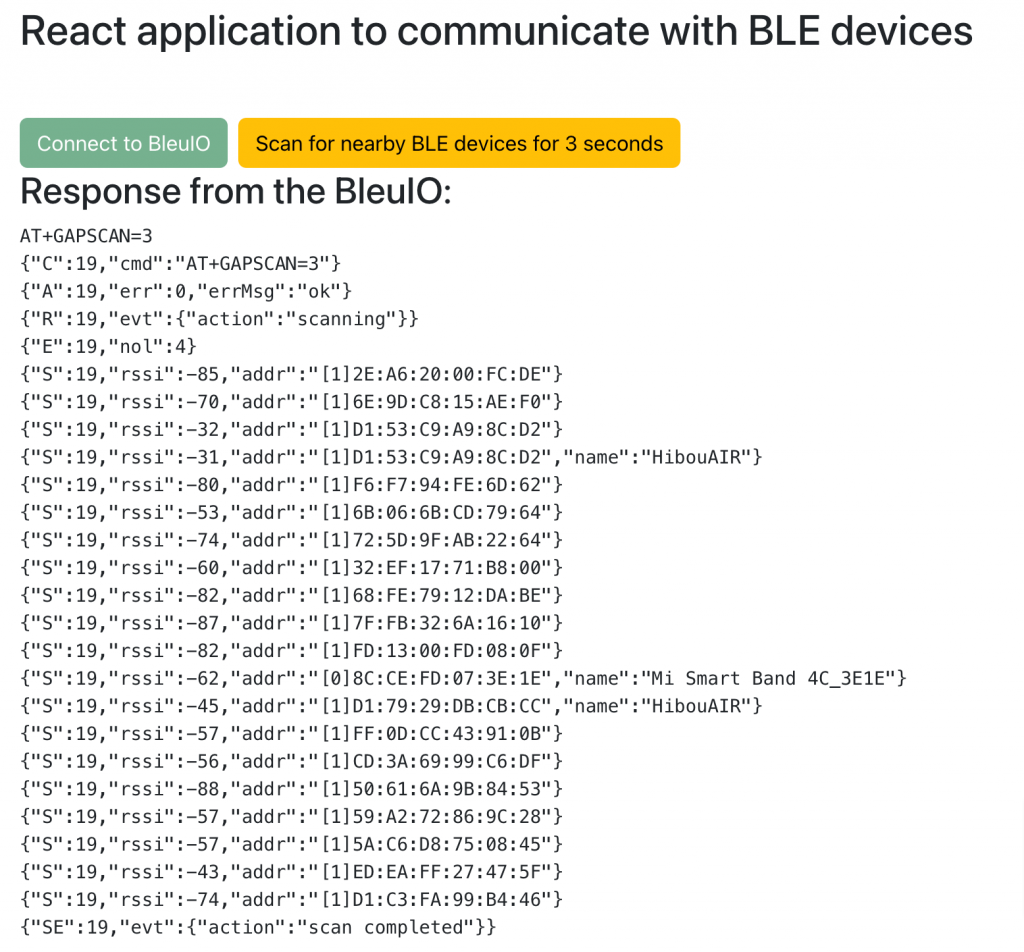
In this tutorial, we’ve demonstrated a basic usage of BleuIO AT commands by creating a BLE application using ReactJS and the BleuIO USB dongle. By leveraging the Web Serial API and the straightforward AT commands provided by BleuIO, you can quickly develop BLE applications that run on any platform. You can expand on this example to develop your own applications using BleuIO’s comprehensive set of AT commands. Read more about the AT commands in our documentation.
BleuIO simplifies BLE development and, combined with the popularity and versatility of ReactJS, allows developers to create powerful and cross-platform BLE applications with ease. Whether you’re building IoT devices, wearable tech, or any BLE-enabled application, BleuIO is a reliable and efficient choice.