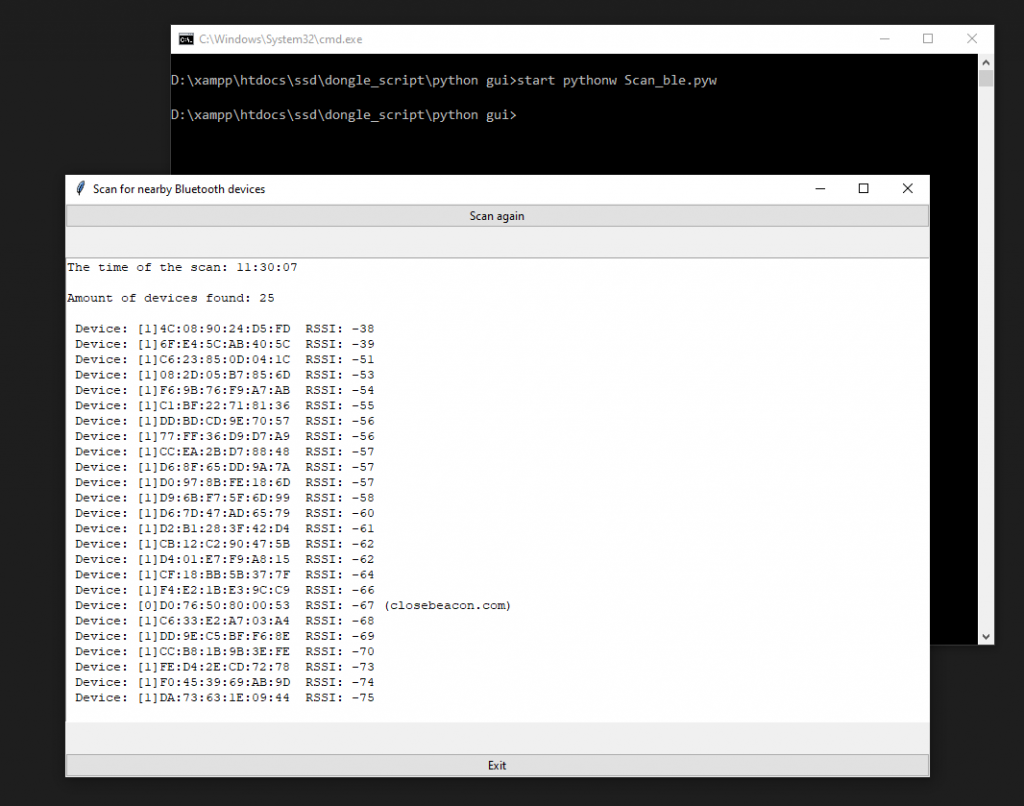
This article is a guide for creating Java applications that can scan for nearby Bluetooth devices. This example project will be helpful to create BLE application easily. Source file is available.
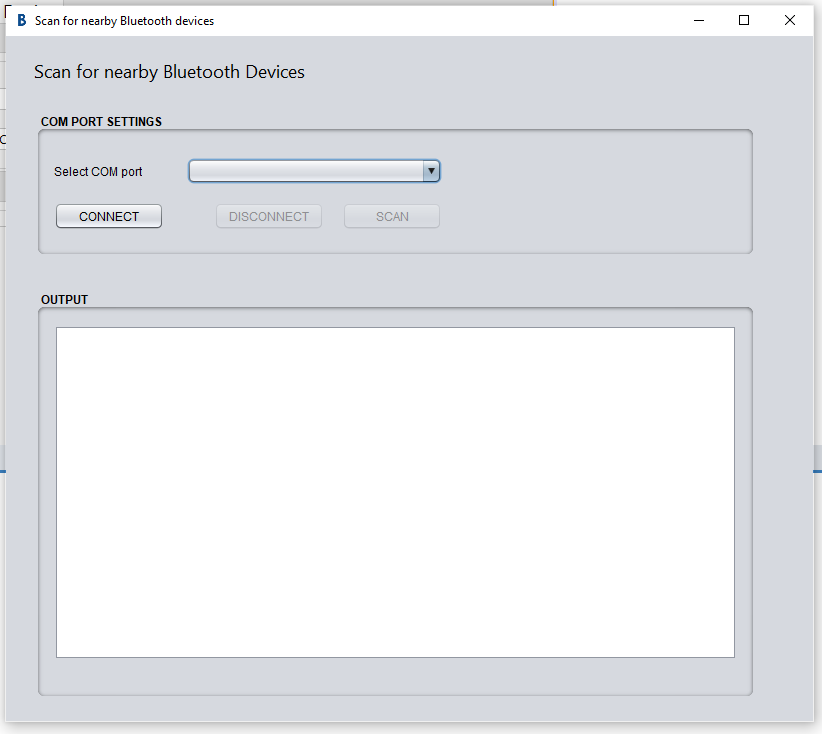
The script has a COM port settings section. This section shows connected devices to the COM port. Using jSerialComm we get the list of COM ports and show it on a dropdown menu to select.
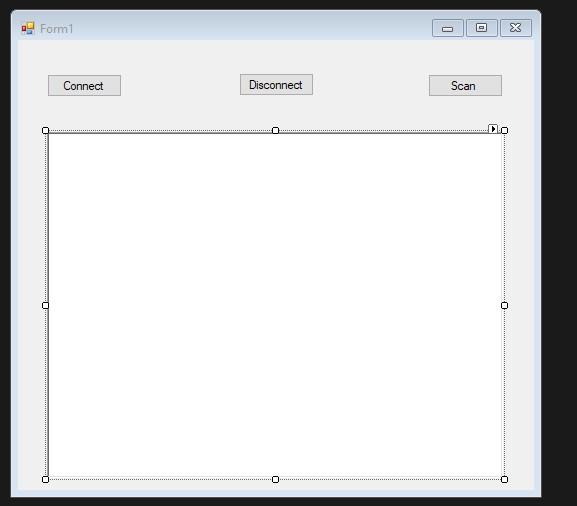
The connect and disconnect buttons manages the connection of the dongle.
Once we are connected to the BleuIO dongle, we will be able to write AT commands to the dongle using serial port write command.
By clicking on the SCAN button , it will put the dongle into CENTRAL mode, wait for one second and write another AT command (AT+GAPSCAN=3) to scan for nearby Bluetooth devices for three seconds.
The response will be available on the output panel.
The script can be updated as required. For example. If you want to scan for more than three seconds, just update the MainJFrame.java file 271 line.
Select jSerialComm library to resolve the issue. jSerialComm is available at root folder. You can also download it from https://fazecast.github.io/jSerialComm/
Step 2 : Run the project
Connect BleuIO dongle into the computer.
Run the project using NetBean play button.
Alternatively we can open the project using command line interface by going to the root folder of the project and type
java -jar "dist/JavaBleuIO.jar"
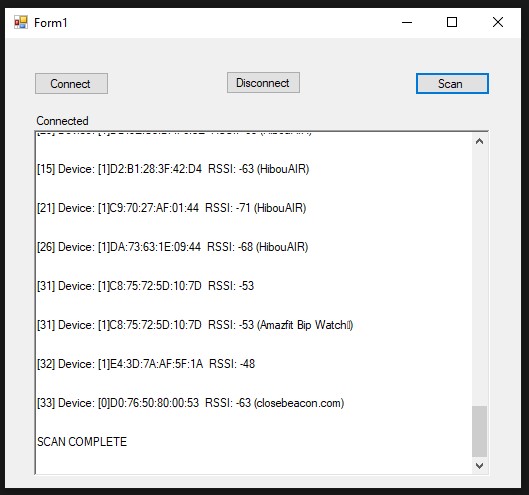
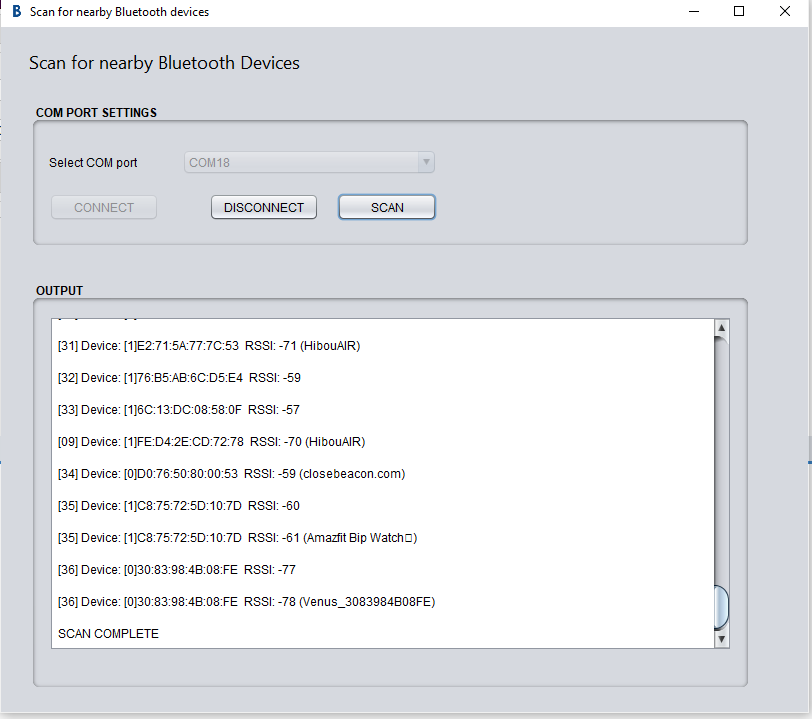
The output will look like this.
Lets select a COM port where the BleuIO dongle is connected and click connect. After successful connection, we should be able to click on scan button. The response will be available on output screen.
If we click on scan button again , it will look for nearby devices for three seconds and show the output.
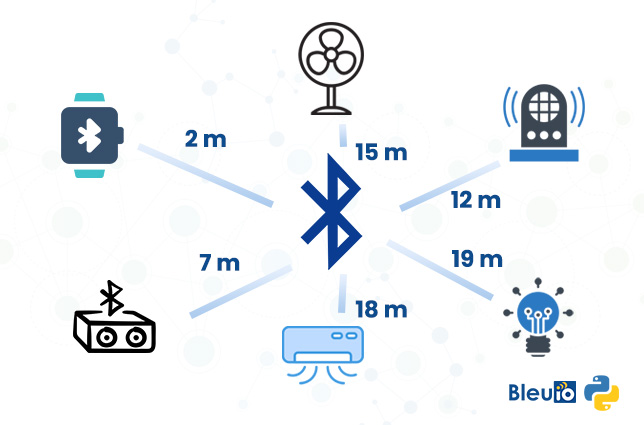
Bluetooth ranging technology is very popular. There are many localization systems that exist based on beacons. Beacon technology usually estimates the distance between devices using the received signal strength (RSSI).
Bluetooth can be an excellent way to narrow down a search area at close distances when tracking something. This feature can be used in several fields. such as Secure Locks for Buildings and Automotive, Asset localization & tracking, Indoor navigation etc
GPS tracking isn’t excellent at giving accurate measurements of the close distance, especially in the indoor environment. On the other hand, Bluetooth is excellent in short ranges because the waves can go through walls. This might fill the gap that GPS tracking has when tracking devices in indoor spaces.
However, most calculations of the distance between two Bluetooth devices are estimates. It’s hard to determine the exact distance between two Bluetooth devices because many factors affect the calculations. Despite the challenges, there are methods to determine the distance between two Bluetooth devices with an accuracy of at least 80%.
The ranging method is simple to implement, and it has the formula to calculate the distance between two Bluetooth devices. As the name suggests, both devices need to be within Bluetooth range to estimate the distance.
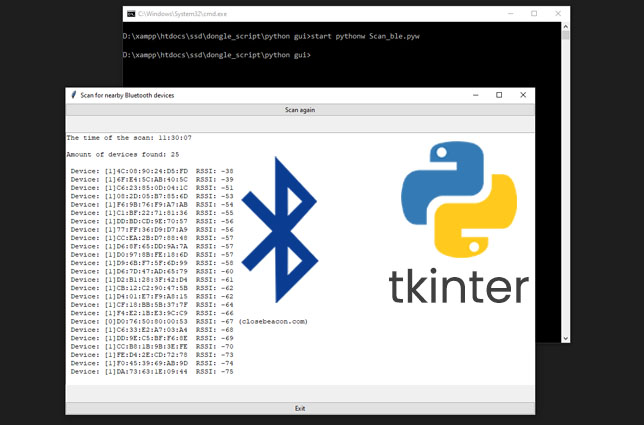
This article will share a simple python script to determine nearby Bluetooth devices and their distance in meters.
This script scans for nearby Bluetooth devices and gets an approximation of the distance by using the well-known RSSI to distance formula.
Get the script from GitHub at https://github.com/smart-sensor-devices-ab/python_bluetooth_device_distance_meter.git
Connect the BleuIO to your computer. The script uses pyserial to connect to the Bluetooth USB dongle BleuIO.
Update the script and write the correct COM port, where the dongle is connected.
After connecting to the dongle, we put the dongle into the central role so that it can scan for nearby Bluetooth devices.
Then we do a simple Gap scan using AT+GAPSCAN=3 command to scan for nearby Bluetooth devices for 3 seconds.
After that, we read the output from the serial port and use our RSSI to distance formula to get the distance in meters.
Finally, we sort the result by distance before printing it out on screen.
Here is the final script file.
import serial
import time
your_com_port = "COM18" # Change this to the com port your dongle is connected to.
connecting_to_dongle = True
print("Connecting to dongle...")
# Trying to connect to dongle until connected. Make sure the port and baudrate is the same as your dongle.
# You can check in the device manager to see what port then right-click and choose properties then the Port Settings
# tab to see the other settings
while connecting_to_dongle:
try:
console = serial.Serial(
port=your_com_port,
baudrate=57600,
parity="N",
stopbits=1,
bytesize=8,
timeout=0,
)
if console.is_open.__bool__():
connecting_to_dongle = False
except:
print("Dongle not connected. Please reconnect Dongle.")
time.sleep(5)
print("Connected to Dongle.")
# function to convert rssi to distance in meter
def rssiToDistance(rssi):
n=2
mp=-69
return round(10 ** ((mp - (int(rssi)))/(10 * n)),2)
#put the dongle in dual role, so we can scan for nearby device
console.write(str.encode("AT+CENTRAL"))
console.write("\r".encode())
print("Putting dongle in Central role.")
time.sleep(0.1)
# Scan for nearby devices for 3 seconds
console.write(str.encode("AT+GAPSCAN=3"))
console.write("\r".encode())
time.sleep(0.1)
print("Looking for nearby Bluetooth devices ...")
dongle_output2 = console.read(console.in_waiting)
time.sleep(3)
print("Scan Complete!")
filtered = []
# Filter out unncecssary outputs and keep only the list of devices (also remove index)
for dev in dongle_output2.decode().splitlines():
if len(dev)>20:
filtered.append(dev.split(maxsplit=1)[1])
# Get unique device by device id and add distance to each raw
seen = set()
out = []
for elem in filtered:
prefix = elem.split(' ')[1]
if prefix not in seen:
seen.add(prefix)
out.append(elem + " Distance: "+str(rssiToDistance(elem.split()[3]))+" meter")
# sort list by closest device
out.sort(key=lambda x:int(x.split()[3]),reverse=True)
# print(out)
for i in range(0, len(out)):
print (out[i])
time.sleep(0.1)
console.close()
Output
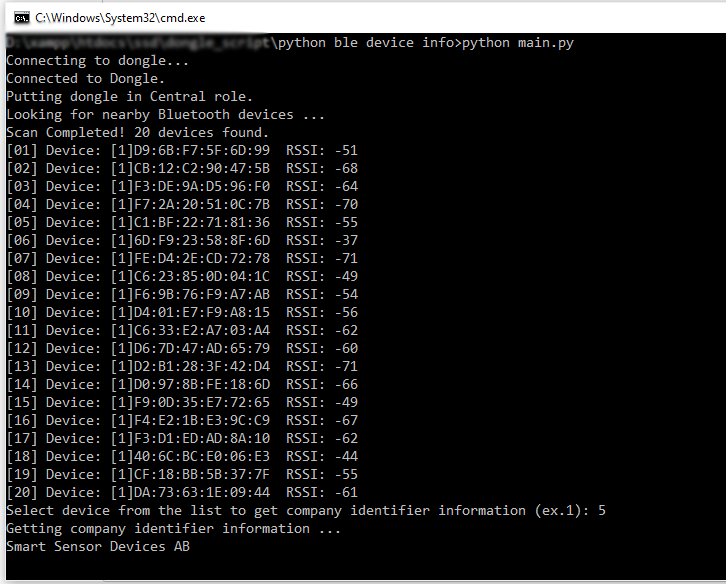
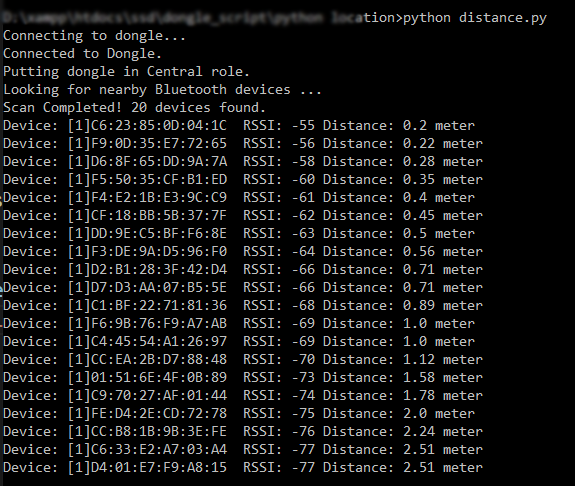
After running the script, we see a total 20 devices found nearby. The list shows their distance in meter from the central device.
There are so many Bluetooth-enabled smart devices that it can be confusing how the technology connects the devices. Often we want to connect to multiple peripheral devices simultaneously to get advertised packets or do other operations. In this article, we will see how we can get advertised packets from two different Air quality monitoring sensor devices.
For this project, we will use Chrome Web serial API to connect to a Bluetooth USB dongle. Using the serial port read/write operation we will scan for specific device advertised data and filter out what we need. After that, we decode the advertised packet to meaningful air quality data using the device documentation.
At first, we will get the bleuIO javascript library from NPM. This library will help us easily connect to the serial port,wtire AT commands and read responses in real-time.
Type npm i bleuio on the command prompt of your project root folder.
After that, we create two files. index.html and script.js
Index.html will be responsible for the output and layouts of the project.
Script.js will have the programming and logic to connect to the dongle and read/write data.
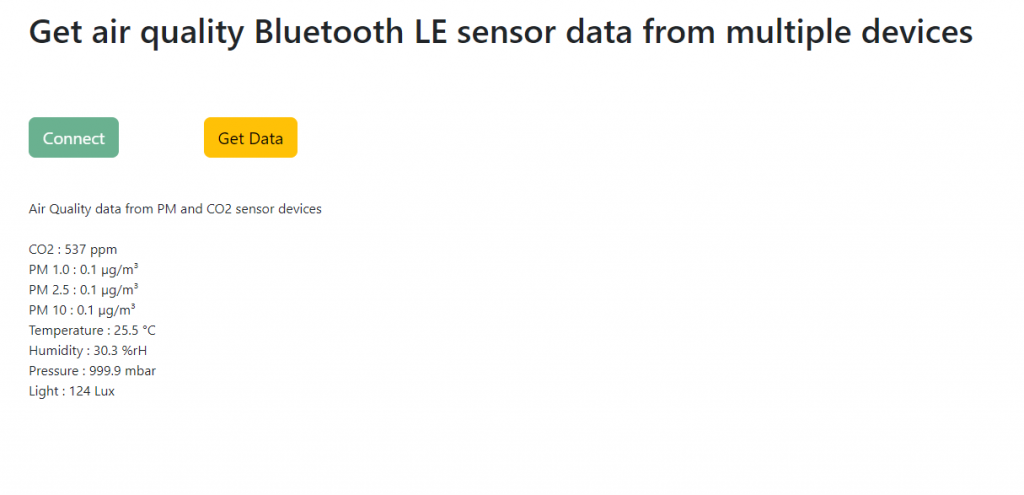
There will be two buttons connect and get data.
The connect button will connect to the bleuIO dongle using the serial port.
The get data button will do several tasks.
At first, we put the dongle in a dual role (central mode) so that it can scan for peripheral devices. Then we will look for advertised data with their sensor ID one after another.
Using the documentation from the air quality device, we decode the advertised data.
import * as my_dongle from 'bleuio'
document.getElementById('connect').addEventListener('click', function(){
my_dongle.at_connect()
document.getElementById("connect").classList.add('disabled');
})
let dev1BoardID='45840D'
let dev2BoardID='60FDED'
document.getElementById('getData').addEventListener('click', function(){
//show loading
document.getElementById("loading").style.display = "block";
//make the dongle in dual role , so it can scan for peripheral devices advertised data
my_dongle.at_dual().then(()=>{
//scan for a devices advertised data, a PM sensor
my_dongle.at_findscandata(dev1BoardID,8).then((x)=>{
//it returns an array of advertised data
//from the array, we take the last one
//it looks like this "[F9:0D:35:E7:72:65] Device Data [ADV]: 0201061BFF5B07050345840DB1031527FB002A010402040004000400000001"
//then we split it by space
//so we can get the advertised data only (the last part)
return x[x.length-1].split(" ").pop()
}).then((adv1)=>{
//now lets decode the advertised data for this device using the device documentaion
let pmEnvData=advDataDecode(adv1)
//we do the same process to get advertised data of another device
//after waiting 1 seconds
setTimeout(()=>{
my_dongle.at_findscandata(dev2BoardID,8).then((y)=>{
let adv2= y[y.length-1].split(" ").pop()
//again we decode the advertised data for this device using the device documentaion
let co2EnvData=advDataDecode(adv2)
//now merge pm data to this array
co2EnvData.pm1=pmEnvData.pm1
co2EnvData.pm25=pmEnvData.pm25
co2EnvData.pm10=pmEnvData.pm10
document.getElementById('airData').innerHTML=`
Air Quality data from PM and CO2 sensor devices<br/><br/>
CO2 : ${co2EnvData.co2} ppm<br/>
PM 1.0 : ${co2EnvData.pm1} µg/m³<br/>
PM 2.5 : ${co2EnvData.pm25} µg/m³<br/>
PM 10 : ${co2EnvData.pm10} µg/m³<br/>
Temperature : ${co2EnvData.temp} °C<br/>
Humidity : ${co2EnvData.hum} %rH<br/>
Pressure : ${co2EnvData.pressure} mbar<br/>
Light : ${co2EnvData.light} Lux<br/>
`
//hide loading
document.getElementById("loading").style.display = "none";
})
},1000)
})
})
})
const advDataDecode =((data)=>{
let pos = data.indexOf("5B0705")
let dt = new Date();
let currentTs = dt.getFullYear()
+ '/'
+ (dt.getMonth() + 1).toString().padStart(2, "0")
+ '/'
+ dt.getDate().toString().padStart(2, "0")
+' '
+
dt.getHours().toString().padStart(2, "0")
+
':'
+
dt.getMinutes().toString().padStart(2, "0")
+
':'
+dt.getSeconds().toString().padStart(2, "0")
let tempHex=parseInt('0x'+data.substr(pos+22,4).match(/../g).reverse().join(''))
if(tempHex>1000)
tempHex = (tempHex - (65535 + 1) )/10
else
tempHex = tempHex/10
return {
"boardID":data.substr(pos+8,6),
"type":data.substr(pos+6,2),
"light":parseInt('0x'+data.substr(pos+14,4).match(/../g).reverse().join('')),
"pressure":parseInt('0x'+data.substr(pos+18,4).match(/../g).reverse().join(''))/10,
"temp":tempHex,
"hum":parseInt('0x'+data.substr(pos+26,4).match(/../g).reverse().join(''))/10,
"pm1":parseInt('0x'+data.substr(pos+34,4).match(/../g).reverse().join(''))/10,
"pm25":parseInt('0x'+data.substr(pos+38,4).match(/../g).reverse().join(''))/10,
"pm10":parseInt('0x'+data.substr(pos+42,4).match(/../g).reverse().join(''))/10,
"co2":parseInt('0x'+data.substr(pos+46,4)),
"ts":currentTs
}
})
In general, most of us think of Bluetooth as a simple device-to-device connection used to do things like play music or other audio (speakers/headsets), offer quick access (smartwatches), or perform other tasks. But there is a new Bluetooth standard and it allows the browser to control Bluetooth devices nearby.
These features can be accessed using Web Bluetooth or Web serial API. What is promising is that both features are already available in Chromium-based browsers (Google Chrome, Edge, Opera). It makes it easy for web developers to interact with users’ peripherals in their homes – if the user would of course allow them.
Web applications are adapting to face the challenges of a competitive native environment. There is a concern that the browser may connect to nearby Bluetooth devices – wondering what kind of information the site can access is a question that needs to be asked. The good news is that, as with all other APIs built into browsers like Chrome, every website has to request access. The browser shows a pop-up asking for permission to access the site in question, just as it does for messaging, site access or the webcam. If the user does not respond, the request will be denied automatically. Users can also change this permit decision at any time.
What is Web Bluetooth?
Web Bluetooth allows websites to communicate with nearby Bluetooth devices. That means no need to install any dedicated native app to connect to a beacon, heart rate monitor, smart light bulb, or any other Bluetooth Low Energy device. Using Web Bluetooth, developers can easily connect to nearby BLE devices and read/write Bluetooth characteristics. However, web Bluetooth has certain limitations when it comes to developing a complex Bluetooth application.
What is Web Serial?
A serial port is a bidirectional communication interface that allows sending and receiving data byte by byte. The Web Serial API provides a way for websites to read from and write to serial devices with JavaScript. These devices may be connected via a serial port, or by USB or Bluetooth devices that emulate a serial port.
Developing a complex Bluetooth Low Energy application for a web browser is relatively easy with Web Serial and a Bluetooth USB dongle BleuIO. The AT commands available on Bluetooth Low Energy USB dongle called Bleuio helps to do BLE operations easily. List of AT commands can be found here, https://www.bleuio.com/getting_started/docs/commands/
Another advantage of using Web Serial; there are good web serial libraries available along with BleuIO’s own JS library , which makes it easier to develop Bluetooth Low Energy applications.
We think both the API has the potential to revolutionize how companies will create the BLE devices of the future, allowing users to manage and configure these devices by simply using a browser. We also hope this becomes officially supported by more browsers.
A new AT command has been added that allows the user to see detailed response for every AT commands. This level of details can be helpful for troubleshooting problems as it explains the different error codes, disconnection reason codes and event codes. For that reason, users can take advantage of verbose mode for troubleshooting purposes and turn it off when it’s not needed.
This new mode changes the output to a more structured and unified format which includes command IDs for all command-related messages. The command-related outputs are more easily separatable from the event outputs. The idea is to make the BleuIO output more consistent, easier to use in scripts and generate more useful error messages.
The command to turn this new feature on and off is: ATV1 (on) ATV0 (off).
List of response format and code list is given below.
Response Format
Response Types
Descriton
Format
C
Command response. Assign a response index.
{“C”:Command Index,”cmd”:”command“}[Carriage Return] (ascii:\r\n hex:0x0A and 0x0D)
A
Acknowledgement response.
{“A”:Command Index,”err”:error code in hex,”errMsg”:”Error Message String“}[Carriage Return] (ascii:\r\n hex:0x0A and 0x0D)
R
Reply response. Different reply data for different commands. Not all commands have reply data.
{“R”:Command Index,Reply data}[Carriage Return] (ascii:\r\n hex:0x0A and 0x0D)
E
End response. Signify end of the command.
{“E”:Command Index,”nol”:number of lines belonging to this command (excluding scan responses))}[Carriage Return] (ascii:\r\n hex:0x0A and 0x0D)
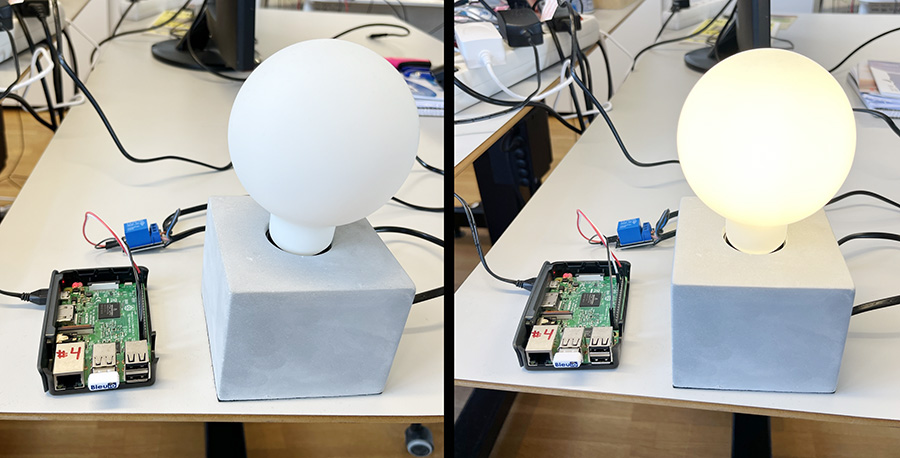
Home automation involves automating household environment equipment. To achieve that, we have created a smart bulb that can be controlled remotely using smart phone app. The aim of this project is to control different home appliances using smartphone at your home.
Introduction
This example is showing how to control a GPIO pin on a RaspberryPi remotely from a smart phone (or another BleuIO Dongle).
For this example we will need:
A RaspberryPi
A BleuIO Dongle (https://www.bleuio.com/)
Our example python script (https://github.com/smart-sensor-devices-ab/bleuio_rpi_switch_example)
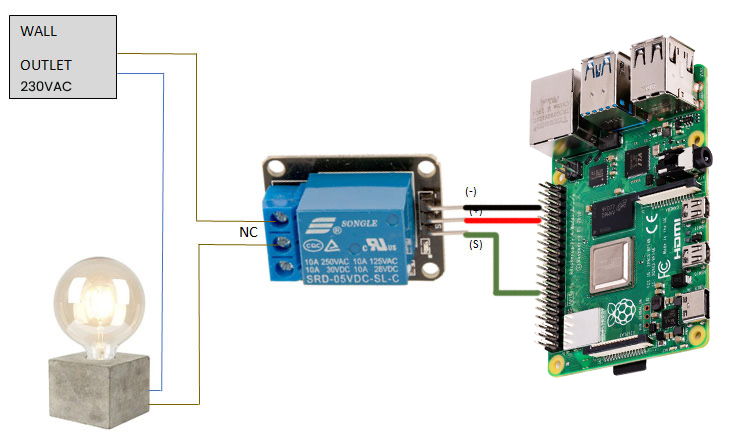
A way to connect to the GPIO Pin (Like a 5V Relay and a Lightbulb)
WARNING – THIS PROJECT INVOLVES HIGH VOLTAGES THAT CAN CAUSE SERIOUS INJURY OR DEATH. PLEASE TAKE ALL NECESSARY PRECAUTIONS, AND TURN OFF ALL POWER TO A CIRCUIT BEFORE WORKING ON IT.
Connecting the relay
Beware:
Always be very careful when experimenting with AC, electrical shock can result in serious injuries! NOTICE OF RISK; DISCLAIMER OF LIABILITY
Instructions for bleuio_rpi_switch_example.py
Connect the BleuIO Dongle to your RaspberryPi.
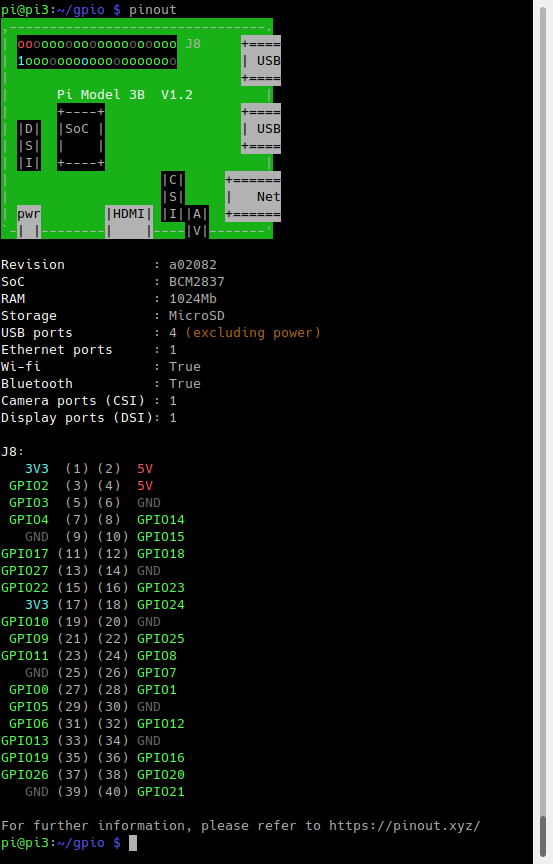
Edit the variable ‘switch’ in the script to the GPIO pin you want to use. (You can use the command pinout to get a graphical view showing you the GPIO pins for the board)
Finally just run python script and and use your phone to connect to the BleuIO Dongle and send on/off messages to controll the GPIO!
Instructions for connecting to the BleuIO from mobile
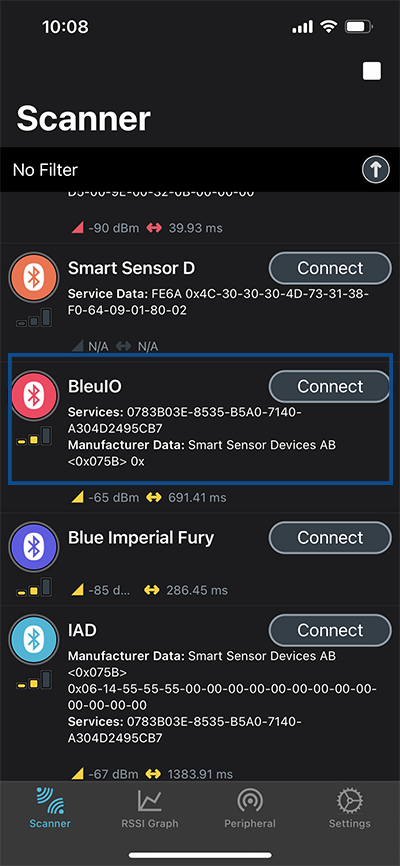
Download a BLE scanning App that can connect and read/write to a device. (Like nRFConnect or BLEScanner) Android, IOS
Look for the dongle, it will be advertising as ‘BleuIO’.
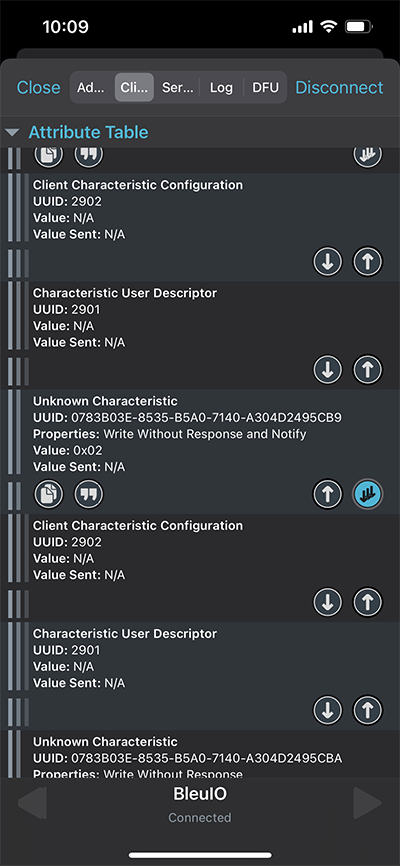
Connect to the BleuIO Dongle.
To enable BleuIO to recieve commands you must first write 0x01 to the Flow Control characteristic (UUID: 0783b03e-8535-b5a0-7140-a304d2495cb9)
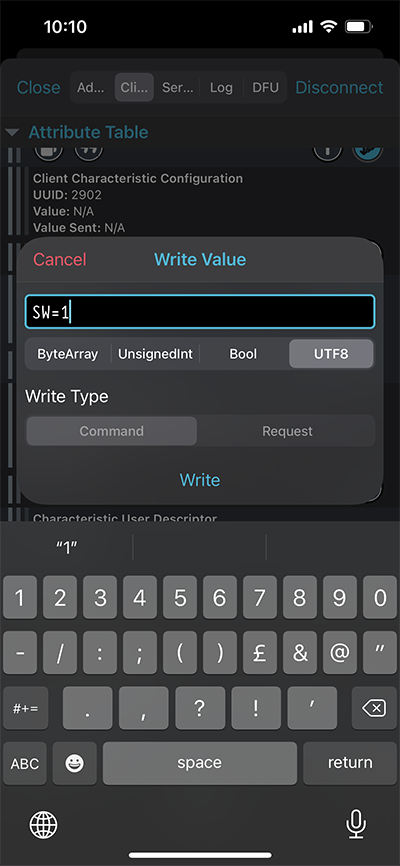
Now you can write to the Server RX Data characteristic (UUID: 0783b03e-8535-b5a0-7140-a304d2495cba) to control the GPIO. |CMD|Effect| |–|–| |“SW=1”| ON| |“SW=0”| OFF|
The script
Here is the python script that receives the messages from smart phone app and helps control the light.
#!/usr/bin/python3
# Copyright 2022 Smart Sensor Devices in Sweden AB
#
# Permission is hereby granted, free of charge, to any person obtaining a copy of this software and associated documentation files (the "Software"),
# to deal in the Software without restriction, including without limitation the rights to use, copy, modify, merge, publish, distribute, sublicense,
# and/or sell copies of the Software, and to permit persons to whom the Software is furnished to do so, subject to the following conditions:
# The above copyright notice and this permission notice shall be included in all copies or substantial portions of the Software.
#
# THE SOFTWARE IS PROVIDED "AS IS", WITHOUT WARRANTY OF ANY KIND, EXPRESS OR IMPLIED, INCLUDING BUT NOT LIMITED TO THE WARRANTIES OF MERCHANTABILITY,
# FITNESS FOR A PARTICULAR PURPOSE AND NONINFRINGEMENT. IN NO EVENT SHALL THE AUTHORS OR COPYRIGHT HOLDERS BE LIABLE FOR ANY CLAIM, DAMAGES OR OTHER LIABILITY,
# WHETHER IN AN ACTION OF CONTRACT, TORT OR OTHERWISE, ARISING FROM, OUT OF OR IN CONNECTION WITH THE SOFTWARE OR THE USE OR OTHER DEALINGS IN THE SOFTWARE.
import time
import serial.tools.list_ports
import serial
import RPi.GPIO as io
switch = 7 # Edit this to suit your setup! (7 = GPIO 04), use command pinout to graphically show you the GPIO pins for the board
io.setmode(io.BOARD)
io.setup(switch, io.OUT)
master_array = []
index = 1
dongle_port = ""
print("\nWelcome to BleuIO RaspberryPi Switch Example!\n")
print("\nPlease insert dongle...")
try:
while len(master_array) == 0:
m_ports = serial.tools.list_ports.comports(include_links=False)
for port in m_ports:
if str(port.hwid).__contains__("VID:PID=2DCF"):
master = port.device + " " + port.hwid
if master.__contains__("VID:PID=2DCF:6002"):
print("Found dongle in port: %s" % port.device)
master_array.append(master)
dongle_port = port
break
for dongle in master_array:
print("\nConnecting to BleuIO @ %s\n" % dongle)
time.sleep(0.5)
dongle_conn = serial.Serial(
dongle_port.device,
115200,
timeout=1,
)
if not dongle_conn.is_open:
dongle_conn.open()
print("Starting Advertising...")
dongle_conn.write("AT+GAPDISCONNECTALL\rAT+DUAL\rAT+ADVSTART\rATI\r".encode())
read_tries = 0
dongle_resp = ""
while read_tries < 20:
dongle_resp = dongle_conn.readline().decode()
if "Not Advertising" in dongle_resp:
dongle_conn.write("AT+ADVSTART\r")
if b"Advertising\r\n" in dongle_resp.encode():
break
read_tries += 1
time.sleep(0.01)
if dongle_resp:
print("BleuIO is %s" % dongle_resp)
else:
print("ERROR! No response...")
exit()
print(
"Going into loop, waiting for signal to turn switch on/off...\n(Press Ctrl+C to abort)"
)
while True:
try:
dongle_resp = dongle_conn.readline().decode()
if "SW=0" in dongle_resp:
print("Turn Switch off!")
io.output(switch, io.LOW)
if "SW=1" in dongle_resp:
print("Turn Switch on!")
io.output(switch, io.HIGH)
except KeyboardInterrupt:
if dongle_conn.is_open:
dongle_conn.write("AT+GAPDISCONNECTALL\rAT+ADVSTOP\r".encode())
dongle_conn.close()
io.cleanup()
print("\nBye!")
exit()
except Exception as e:
print("(ERROR: %s)" % (e))
Output
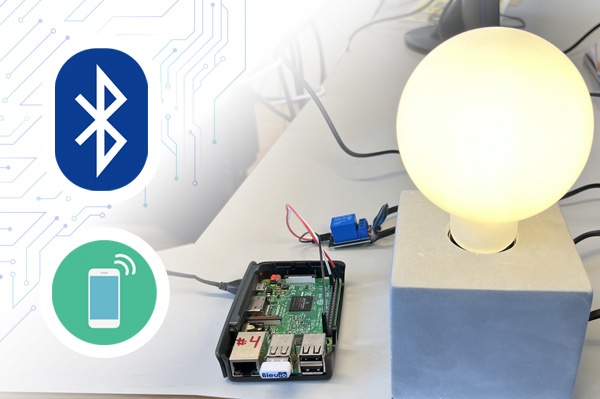
We have tested the script using nRFConnect app from both IOS and Android phone to turn on/off the light bulb. Here is the output of this project.
BleuIO continues to release firmware versions and adds new features regularly. Therefore, it is important to keep the dongle updated.
BleuIO users were able to update the dongle from Windows and Linux system. This new updater allows updating the dongle from Mac as well.
The BleuIO comes with a bootloader to allow us to update the firmware or flash our own application to the dongle. To flash the dongle we will need an image file containing the new firmware or our own application and the updater script.
BleuIO continues to release firmware versions and adds new features regularly. Therefore, it is important to update our dongle regularly.
The BleuIO comes with a bootloader to allow us to update the firmware or flash our own application to the dongle. To flash the dongle we will need an image file containing the new firmware or our own application and a host USB loader application.
To update the firmware, we need to select the correct COM port where the BleuIO dongle is connected. Keep in mind that the bootloader only opens for about 10 seconds after inserting the Dongle, then it switches to the main app and the COM port number changes. We cannot use the main app’s Serial Port number to flash the dongles!
To overcome this COM port selection process while updating a firmware, BleuIO team has developed an auto updater. This updater selects the right COM port for the dongle before updating. All we need to do is, run the updater and follow the instructions on the screen.
Here we will describe two quick ways of measuring the data throughput of the BleuIO Dongle. For both examples we are going to need a BleuIO Dongle, another Bluetooth device (like another Bleuio Dongle) and a computer with Python (minimum version: 3.6) installed.
For the first measurement example, measuring the BLE data throughput, you will need one of the following supported development kits from Nordic Semiconductor:
nRF52840 DK (PCA10056)
nRF52840 Dongle (PCA10059)
nRF52833 DK (PCA10100)
nRF52 DK (PCA10040)
nRF51 DK (PCA10028)
nRF51 Dongle (PCA10031)
The first measurement example is the actual BLE data throughput. For this we will use a BleuIO Dongle and Wireshark. (For help on how to setup Wireshark and requirements go to this link: https://infocenter.nordicsemi.com/topic/ug_sniffer_ble/UG/sniffer_ble/intro.html ). We will also utilize a simple python script that sends a set amount of data. For this measurement you can ignore the throughput print at the end of the script.
The second measurement example is for measuring the actual data being transferred over the USB as a Virtual COM port (via the CDC protocol). We will be using the same simple script that will send a set amount of data and time when the transfer starts and then stops. Then divide the amount of data with the time the transfer took to get the throughput.
Notice : Interference can be caused by other wireless networks, other 2.4 GHz frequency devices, and high voltage devices that generate electromagnetic interference. This have impact on the measurement of throughput. To avoid interference, select wireless free space or use a shield box.
Instructions for BLE data throughput
For best result place the nRF Dev Kit between the BleuIO Dongle and your target device.
Open Wireshark and double-click the ‘nRF Sniffer for Bluetooth LE’.
Make sure the target Bluetooth device is advertising and find in the the scroll-down list.
Choose ‘IO/Data’ under the ‘Analysis’ menu tab.
Click the ‘+’ button to add new graphs. Add ‘bytes per seconds’ and/or ‘bit per seconds’.
Modify the script by filling in the relevant information into the variables ‘your_com_port’, ‘target_mac_addr’ and ‘write_handle’.
Run the python script.
You can now observe the graph showing the BLE Data throughput!
Instructions for USB port data throughput
This is the second measurement example for measuring the actual point to point data transfer between the two USB ports.
Connect the dongle to your computer. (Look up the COM port your dongle uses and paste it in the script in the variable ‘your_com_port’)
Scan (Using AT+GAPSCAN) after the device you wish to send the data to. Copy the mac address of the device into the script in the variable ‘target_mac_addr’.
Connect to the device and look up the handle of the characteristic you want to write to and paste into the script in the variable ‘write_handle’.
Finally just run python script and the throughput will be displayed at the end!
The script
import datetime
import serial
import time
import string
import random
connecting_to_dongle = True
trying_to_connect = False
# Change this to the com port your dongle is connected to.
your_com_port = "COM20"
# Change this to the mac address of your target device.
target_mac_addr = "[0]40:48:FD:E5:2C:F2"
# Change this to the handle of the characteristic on your target device.
write_handle = "0011"
# You can experiment with the packet length, increasing or decreasing it and see how that effect the throughput
packet_length = 150
# 1 Megabytes = 1000000 Bytes
file_size = 0.5 * 1000000
end_when = file_size / packet_length
send_counter = 0
# Random data string generator
def random_data_generator(size=packet_length, chars=string.digits + string.digits):
return "".join(random.choice(chars) for _ in range(size))
print("Connecting to dongle...")
while connecting_to_dongle:
try:
console = serial.Serial(
port=your_com_port,
baudrate=115200,
parity="N",
stopbits=1,
bytesize=8,
timeout=0,
)
if console.is_open.__bool__():
connecting_to_dongle = False
except:
print("Dongle not connected. Please reconnect Dongle.")
time.sleep(5)
print("Connected to Dongle.")
console.write(str.encode("AT+GAPDISCONNECT\r"))
start = input("Press Enter to start.\n\r>> ")
console.write(str.encode("ATE0\r"))
console.write(str.encode("AT+DUAL\r"))
connected = "0"
while connected == "0":
time.sleep(0.5)
if not trying_to_connect:
# change to Mac address of the device you want to connect to
console.write(str.encode("AT+GAPCONNECT=" + target_mac_addr + "\r"))
trying_to_connect = True
dongle_output2 = console.read(console.in_waiting)
time.sleep(2)
print("Trying to connect to Peripheral...")
if not dongle_output2.isspace():
if dongle_output2.decode().__contains__("\r\nCONNECTED."):
connected = "1"
print("Connected!")
time.sleep(8)
if dongle_output2.decode().__contains__("\r\nDISCONNECTED."):
connected = "0"
print("Disconnected!")
trying_to_connect = False
dongle_output2 = " "
start2 = input("Press Enter to sending.\n\r>> ")
start_time = time.mktime(datetime.datetime.today().timetuple())
console.write(
str.encode(
"AT+GATTCWRITEWRB=" + write_handle + " " + random_data_generator() + "\r"
)
)
while 1:
dongle_output = console.read(console.in_waiting)
if send_counter > end_when:
end_time = time.mktime(datetime.datetime.today().timetuple())
break
# Change to the handle of the characteristic you want to write to
if "handle_evt_gattc_write_completed" in str(dongle_output):
console.write(
str.encode(
"AT+GATTCWRITEWR=" + write_handle + " " + random_data_generator() + "\r"
)
)
send_counter = send_counter + 1
try:
if not dongle_output.decode() == "":
print(dongle_output.decode())
except:
print(dongle_output)
time_elapsed = end_time - start_time
time.sleep(0.1)
print("*" * 25)
print("Transfer Complete in: " + str(time_elapsed) + " seconds")
print(str(packet_length * send_counter) + "bytes sent.")
print("*" * 25)
print(
"Throughput via USB (Virtual COM port): "
+ str((packet_length * send_counter) / time_elapsed)
+ " Bytes per seconds"
)
print("*" * 25)
We’re living in the world of connected devices. The internet of things helps us live and work smarter, as well as gain complete control over our lives. One of the latest technological advancements in IoT is the MQTT gateway, which acts as a mediator between the cloud and IoT platforms.
MQTT stands for Message Queuing Telemetry Transport. It’s among the key communication protocols for the internet of things devices and local networks. It’s an ideal protocol for communication between smart devices or machine-to-machine communication.
What Is MQTT Gateway?
Generally, the MQTT gateway can be defined as an intermediary between any internet of things platform and sensors. It works by getting data from these sensors or smart devices and translating it into MQTT. It then transmits that data to either the internet of things platform or to the MQTT broker.
The publish/subscribe pattern
The publish/subscribe pattern (also known as pub/sub) provides an alternative to a traditional client-server architecture. In the client-server model, a client communicates directly with an endpoint. The pub/sub model decouples the client that sends a message (the publisher) from the client or clients that receive the messages (the subscribers). The publishers and subscribers never contact each other directly. In fact, they are not even aware that the other exists. The connection between them is handled by a third component (the broker). The job of the broker is to filter all incoming messages and distribute them correctly to subscribers.
MQTT Broker
A broker helps in handling clients in MQTT technology. It can manage hundreds, thousands, or millions of connected MQTT clients at once, depending on the implementation. Its main functions are;
Receiving information
Decoding and filtering the messages received
Determining which client will be interested in which message
Transmitting these messages to clients depending on their interests
A build tool for Javascript (parcel) https://parceljs.org/docs/
Get the Flespi token
Create an account at Flespi.
Log into the Flespi dashboard.
Copy the token
Download source file
Get the source file from https://github.com/smart-sensor-devices-ab/ble2mqtt_bleuio.git
And run npm install
In the root folder, we will see two Html files called index.html and subscribe.html and two js files called pub.js and sub.js
Index.html file collects sensor data from a BLE Air quality monitor device called HibouAir with the help of BleuIO. It has three buttons. connect, device info and Scan and Send BLE Data.
First we need to connect a BleuIO dongle into the computer and connect to it using connect button. The device info button will show BleuIO dongle status on console log. And the Scan and Send BLE data will scan for Air quality data and send it to the cloud. For this script I am scanning and collecting a fixed device with the board id of 0578E0. You can change the value in pub.js file line number 4
After collecting advertised data, we try to decode it and get meaningful air quality data with co2, pressure, temperature, humidity, light values. Then we publish the data to Flepsi broker using topic name HibouAirTopic