Firmware Updates
Introduction
The BleuIO comes with a bootloader to allow you to update the firmware or flash your own application to the dongle.
There are three methods to update the dongle.
Latest Firmware
[2024-06-25] v2.7.4 Firmware
| Version 2.7.4 | Download | Release Notes | checksum: 3a179a9d18a51584c0a06f937af2072b |
|---|
Older Firmwares
| Version 2.7.3 | Download | Release Notes | checksum: 427c0078d2c371f14c040f15bdae399c |
|---|---|---|---|
| Version 2.7.2 | Download | Release Notes | checksum: b73f6625454440fa804f2044c21624f3 |
| Version 2.7.1 | Download | Release Notes | checksum: 0baf42c70b93c1910fbd0d6587b09020 |
| Version 2.6.1 | Download | Release Notes | checksum: 22142a3f6b4e4fcdfca6fb27ff2399a3 |
| Version 2.6.0 | Download | Release Notes | checksum: a6f42dcafaa8914855f847f63f287fdd |
| Version 2.5.0 | Download | Release Notes | checksum: ef24a9564f84cd8741c1f32f629eca3f |
| Version 2.4.0 | Download | Release Notes | checksum: 6ce379036a602ef61802a25173f58915 |
| Version 2.3.1 | Download | Release Notes | checksum: 6473e8a33967867b41048dfb2f602b92 |
| Version 2.3.0 | Download | Release Notes | checksum: 64c3b16243d7ee5bfa3d7999b4947909 |
| Version 2.2.2 | Download | Release Notes | checksum: 8251e3e950a98468188f101f11be98ac |
| Version 2.2.1 | Download | Release Notes | checksum: 39d85259ac616f94a0078bcea63cab04 |
| Version 2.2.0 | Download | Release Notes | checksum: 6fb1c47b0480f9a76da1363c06893a2e |
| Version 2.1.4 | Download | Release Notes | checksum: da5ae02ac86d9968b85ffbe9fd44b902 |
| Version 2.1.3 | Download | Release Notes | checksum: a65020d9cd4b5fef262571c6711657d1 |
| Version 2.1.2 | Download | Release Notes | checksum: 2a3e7c47dab02d65c5da011ee1e5dae3 |
| Version 2.1.1 | Download | Release Notes | checksum: ef0d9659b832de4224ca1d5086b0d7cf |
| Version 2.1.0 | Download | Release Notes | checksum: 2cd36d78a0fe4b833805203c3c45e4f7 |
| Version 2.0.9 | Download | Release Notes | checksum: c7f5d22380a0e32b47fc59811f2037f7 |
| Version 2.0.8 | Download | Release Notes | checksum: ca1c589073abe33c1f8017d8de331470 |
| Version 2.0.7 | Download | Release Notes | checksum: a3a37e8af677a288cda2852afd69454b |
| Version 2.0.6 | Download | Release Notes | checksum: efe40a5e494fb0c09f19cc54fe642623 |
| Version 2.0.5 | Download | Release Notes | checksum: 23cb8a191cdab8c8340c5fe377c649c0 |
| Version 2.0.4 | Download | Release Notes | checksum: a6daaa82f8800ac5d944dbbe16552774 |
| Version 2.0.3 | Download | Release Notes | checksum: bd5724d0f17a28477ba703acd87352af |
| Version 2.0.2 | Download | Release Notes | checksum: 72dc985dba615ee110fe9dd425f9f10b |
| Version 2.0.1 | Download | Release Notes | checksum: 12095e3be4589629223ad35c6012a49c |
| Version 2.0 | Download | Release Notes | checksum: 54658a95d217646fa00bd8aa8e7f0095 |
| Version 1.3.1 | Download | Release Notes | checksum: a882b6bd41135a256f3a2d23030becbc |
| Version 1.3.0 | Download | Release Notes | checksum: cf7b172ad769fbc74773092b378b075a |
| Version 1.2.0 | Download | Release Notes | checksum: 4b32580e6a920ce1a9735e9af4918451 |
| Version 1.1.0 | Download | Release Notes | |
| Version 1.0.9 | Download | Release Notes | |
| Version 1.0.8 | Download | Release Notes | |
| Version 1.0.7 | Download | Release Notes | |
| Version 1.0.6 | Download | Release Notes | |
| Version 1.0.5 | Download | Release Notes |
How to update your firmware
Update method 1: Using firmware updater
Supports Windows, Mac, Linux
The BleuIO comes with a bootloader to allow you to update the firmware or flash your own application to the dongle. To flash the dongle we will need an image file containing the BleuIO firmware or your own application and the updater script.
How to update a dongle
Requirements
- Python >=3.5
- pyserial 3.5
Steps
- Download and extract the updater zip file Download
- Place the firmware image file into the same folder. (list of firmware image files are available at the top).
- Open the command prompt and go to the extracted folder where bleuio_fw_updater.py is available.
- Run:
python bleuio_fw_updater.py image_file_name.img - “Success” message along with the updated firmware version will be shown on the screen once the process is completed.
Update method 2: Using SUOTA
SUOTA Instructions
Via App
Download the App Renesas SUOTA for either Android or iOS.
(Android) Google Play: https://play.google.com/store/apps/details?id=com.dialog.suota&hl=en&gl=US(iOS) App Store: https://apps.apple.com/se/app/dialog-suota/id953141262
Download the firmware file to your device (Android/iOS).
You can download the firmware directly to your smart device from here: https://www.bleuio.com/getting_started/docs/firmware/
Or you can transfer the firmware from your computer to your smart device:
For Android:
A SUOTA folder should have been created on your device when you installed the App. Simply copy the firmware image file into that folder.
For iOS:
Open iTunes and select the device to which the firmware image file is to be downloaded.
Select the SUOTA App from the File Sharing menu.
Add the firmware image file that is to be downloaded.
Press the “Done” button to downloaded the selected file to the smart device.Insert the BleuIO Dongle in the computer.
Run the AT+SUOTASTART command.
Open the Renesas SUOTA App.
When scanning you should see a device called BleuIO SUOTA.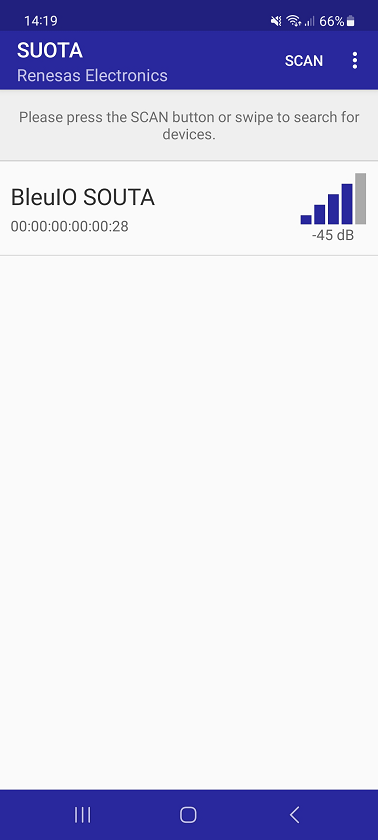
Tap BleuIO SUOTA to connect.
The device info screen will be shown.
Confirm that your current version is correct and press UPDATE DEVICE.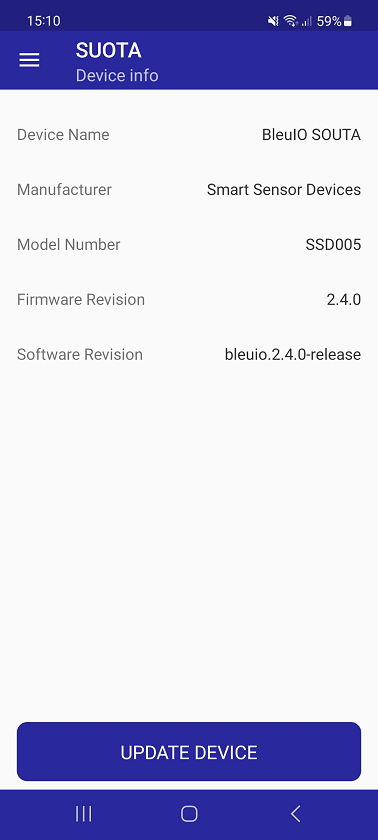
Select the image file.
If you didn't transfer the firmware from a computer or choose a different location to store the firmware click the folder icon to navigate to where the firmware is located.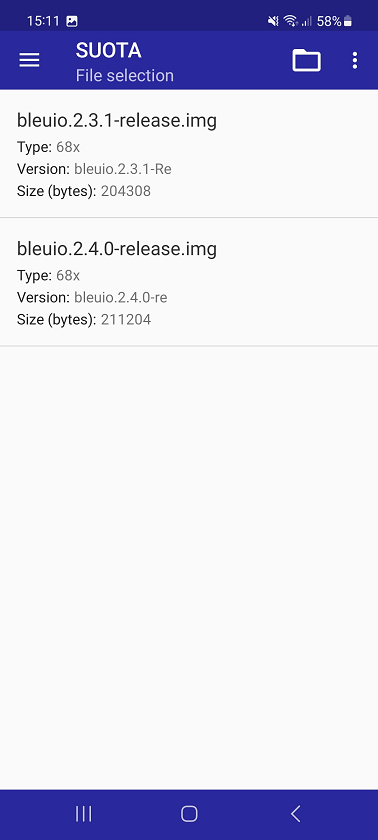
You can leave the Parameter Settings as is. They will not be used.
Just press SEND TO DEVICE.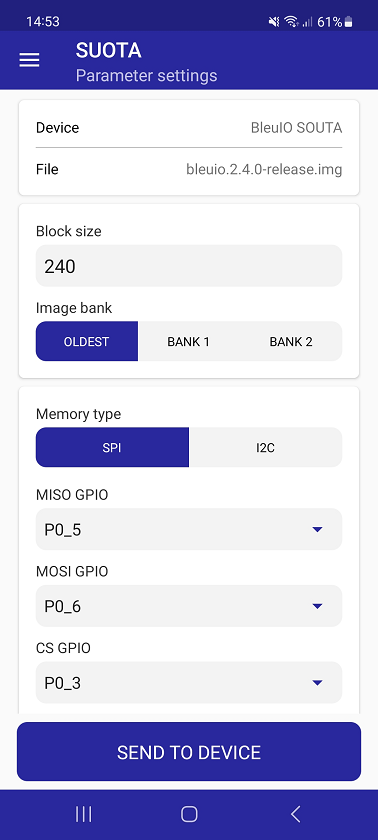
Wait for the update to finish.
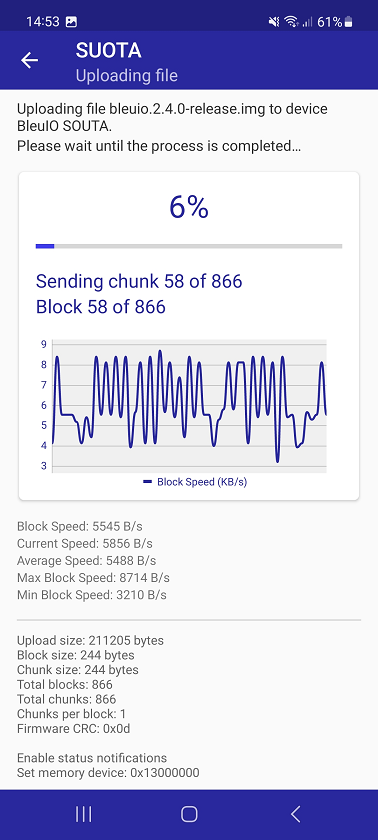
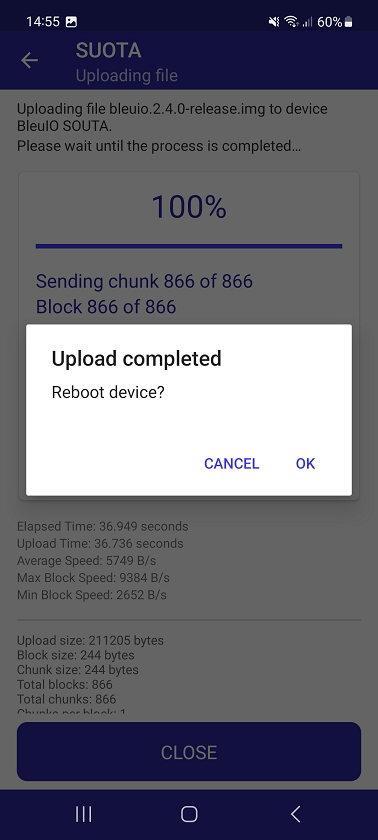
When update is finished you will be prompted if you want to reboot the device. Press OK.
Done! Confirm that the firmware version has changed by running the ATI command on the BleuIO Dongle.
Via another BleuIO + Script
Requirements
Python >= 3.5
Python library bleuio >= 1.3.0
Download script
- Get script BleuIO_SUOTA_Updater.py. Download
Steps
- Download the desired firmware from above.
It is recommended to place the firmware image file into the same folder as the script. - Open a command prompt where the script is located.
- Run: python BleuIO_SUOTA_Updater.py image_file_name.img
- Start SUOTA Mode on the dongle you wish to update by running AT+SUOTASTART command.
- The script will look for any BleuIO Dongle that is advertising in SUOTA mode and start updating the first it finds.
- “BleuIO Updated Successfully!” message will be shown on the screen once the process is completed.
- You will then be prompted "Update another BleuIO Dongle? (y/n)" if you choose y it will try to find and update another BleuIO Dongle. Choosing n will exit the script.
Arguments
| Arguments | Descriptions |
|---|---|
| -h, --help | Show this help message and exit |
| -fw | Requires SUOTA firmware img file to update BleuIO Dongle with. |
| -dbg, --debug | Shows debug messages |
| -p, --port | Choose port used by dongle used to update. If note choosen the first port found used by a BleuIO Dongle will be used. |
Update method 3: Manual update
Linux side (PC)
To flash the dongle you will need a image file containing the new firmware or your own application and a host USB loader application (that you can get HERE for Windows (host_usb_updater.zip) or HERE for Linux PC (host_usb_updaterlinux.zip)) or HERE for Linux Raspberry Pi (host_usb_updater_RPi.zip)).
- Download Linux PC Host Updated Download
- Run with
sudo ./host_usb_updater /dev/ttyACM0 ./example_firmware.img. - The/dev/ttyACM0means USB-CDC driver of Linux. It can be changed according to test machine. - Sometimes a modemmanager in Linux system like Ubuntu might interrupt the USB-CDC communication. In that case you can try disabling it.
Linux side (Raspberry Pi)
- Download Linux Raspberry Pi Host Updated Download
- Run with
sudo ./host_usb_updater /dev/ttyACM0 ./example_firmware.img. - The/dev/ttyACM0means USB-CDC driver of Linux. It can be changed according to test machine.
Windows side
Download Host USB updated Download and the latest firmware file e.g., 'blueio.1.0.9.img' in the same folder.
Preparations:
(This will need to be done once at least on every computer you use to flash dongles.)
- Open the Windows Device Manager.
- Insert a dongle.
- Look at Ports (COM & LPT)

- Notice the number 14. This is the Serial Port number the bootloader is using on my computer. You may get another COM port number. Write this number down as you will need it when flashing the dongles.
- Keep in mind that the bootloader will only be open for about 10 seconds after inserting the Dongle, then it will switch to the main app and the COM port number will change. If this happens just pull out the dongle and insert it again.
- You cannot use the main app's Serial Port number to flash the dongles!
Flashing the dongles:
- Open a terminal and go to the folder where the flash programmer and firmware file is located.
- Type host_usb_updater {number} bleuio.1.0.9.img -verbose
- Where '{number}' should be the number of the Serial Port on your computer (without the brackets {}) as described in the 'preperation' section. It's 14 in the picture above but your computer might have a diffrent number.
- Dont press enter yet.
- Insert the dongle you want to flash. Please note:You cannot have multiple dongles connected.
- Wait one or two seconds after insterting the dongle to make sure the computer recognise it then press Enter. The host_usb_updater.exe will now update the dongle.
- A successful firmware update should look like:

- Trying to flash using wrong COM Port will look like this
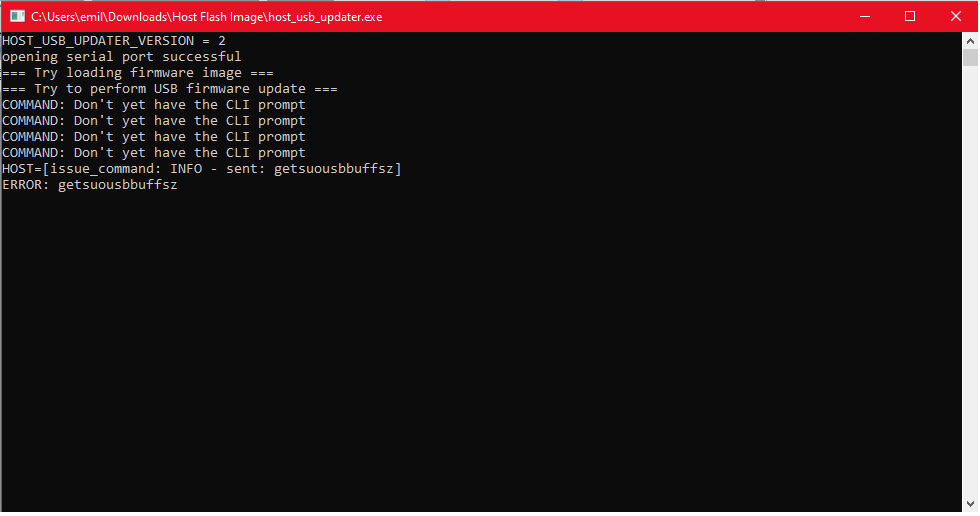
- After flasing , you can wait to get the Application started and test that the dongle has been successfully flashed with the new version number 1.0.9 by running the AT-command: ATI
NOTE: For simplicity's sake it is recommended to keep the image-file and host_usb_updater.exe in the same folder otherwise you will need to provide the path to where image file is stored relative to the host_usb_updater.exe.
