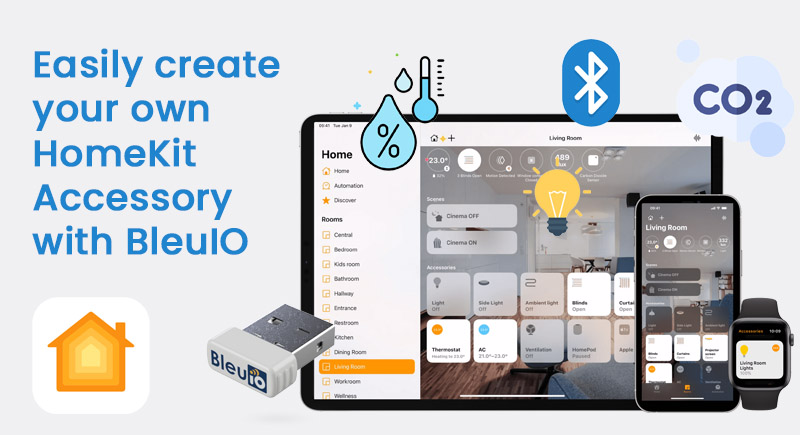
In this tutorial, we’ll walk you through the process of creating your own Apple HomeKit accessory that monitor and manage air quality data from a BLE device, specifically the HibouAir air quality monitoring device. By the end of this tutorial, you’ll have a functional BLE application that integrates with Apple’s HomeKit, demonstrating how easily you can develop BLE applications with the BleuIO dongle.
Overview of the Project
In this project, our goal is to create a BLE application that communicates with the HibouAir device, which provides air quality data. The application will:
- Connect to a BleuIO USB dongle to communicate with BLE devices.
- Scan for the HibouAir device using AT commands.
- Decode the air quality data from the HibouAir device.
- Integrate with HomeKit to display and manage the data in a smart home environment.
- Update the accessory information and continuously monitor the air quality data.
What is HomeKit?
HomeKit is Apple’s framework for home automation that allows users to control smart home devices using their Apple devices. With HomeKit, you can control a wide range of devices like lights, thermostats, locks, and sensors through the Apple Home app, Siri voice commands, and other Apple devices.
The key features of HomeKit include:
- Secure Communication: HomeKit uses end-to-end encryption to ensure that data transmitted between your devices and the Home app remains private and secure.
- Integration with Siri: HomeKit-enabled devices can be controlled using Siri voice commands, enabling hands-free control of your smart home.
- Automation: Users can create automated routines and scenes that trigger actions based on time, location, or device status. For example, you can set up a “Good Night” scene that turns off the lights and locks the door when you say goodnight to Siri.
What is HAP-NodeJS?
HAP-NodeJS is an open-source implementation of the HomeKit Accessory Protocol (HAP) written in Node.js. It allows developers to create HomeKit-compatible accessories and bridge devices that can be controlled through Apple’s HomeKit ecosystem.
Devices Required
To follow this tutorial, you will need:
- BleuIO USB Dongle: A Bluetooth Low Energy USB dongle used to interface with BLE devices.
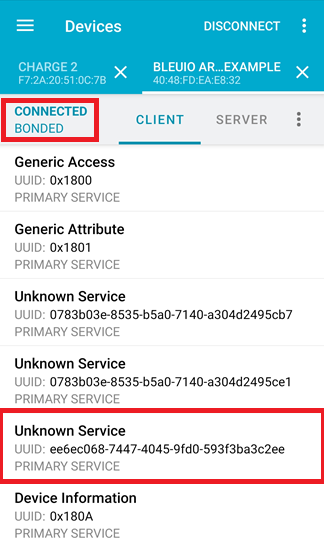
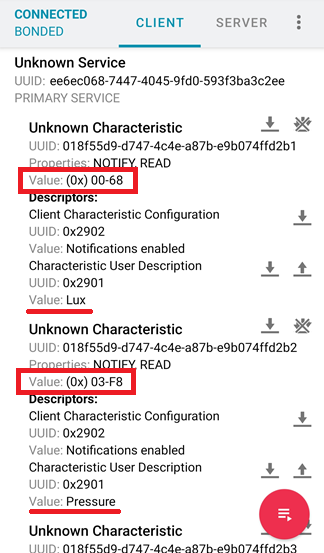
- HibouAir Device: A BLE air quality monitoring device that provides air quality metrics such as temperature, CO2 levels, humidity, and light levels.
- A Computer: Running Windows, macOS, or Linux , Raspberry Pi or any other platform that can run Node.js.
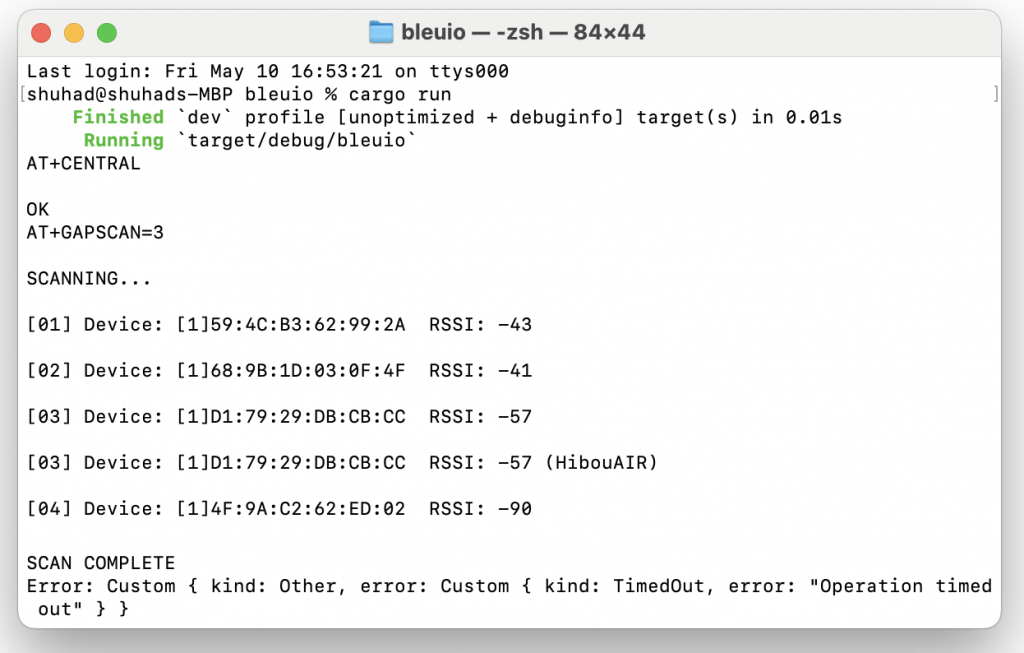
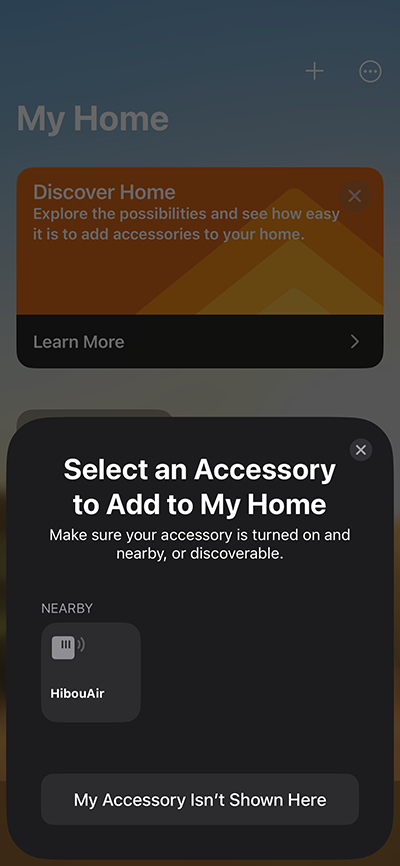
Connecting to BleuIO
To connect to the BleuIO dongle, we’ll use Node.js and the serialport package to communicate with the BLE device. The BleuIO dongle interfaces with your computer over a serial port, which allows you to send AT commands and receive data from BLE devices.
Decoding the Data
Once we receive the data from the HibouAir device, we need to decode it. The data is encoded in a specific format that we will parse and extract the relevant air quality metrics. We use a function to decode the advertisement data, which includes temperature, CO2 levels, humidity, and light levels.
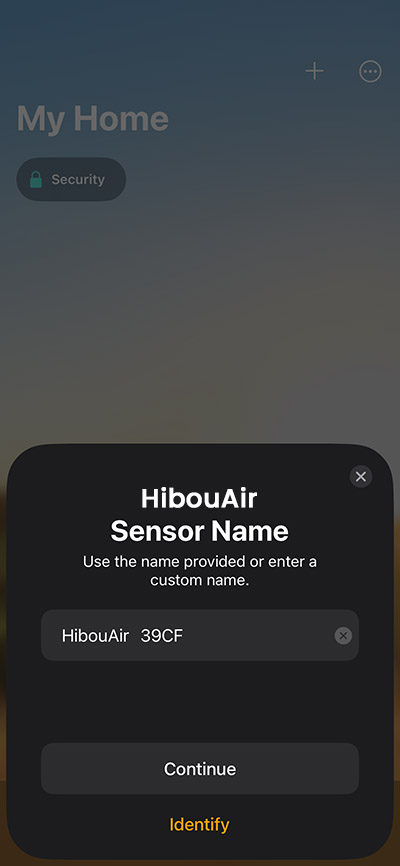
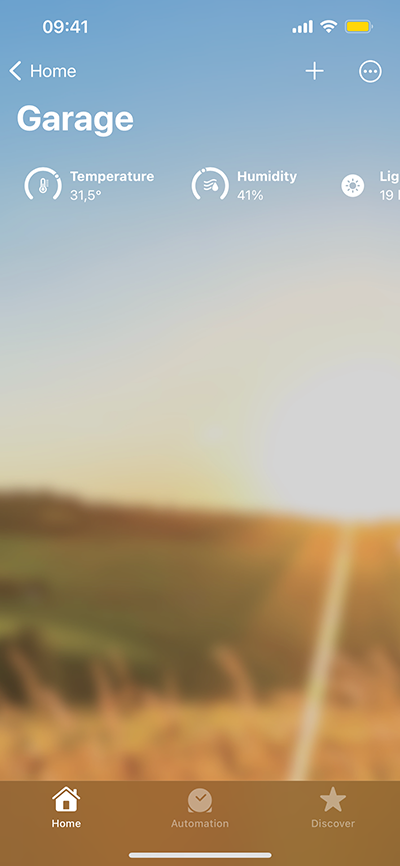
Setting Up HomeKit Environment Data
We will use the hap-nodejs library to integrate our application with HomeKit. This will allow us to create HomeKit accessories that represent our air quality metrics. We set up services for temperature, CO2 levels, humidity, and light, and update these services with real-time data from the HibouAir device.
Running the Script
Here’s a step-by-step guide on how to set up and run the script:
- Install Required Packages
First, make sure you have Node.js installed on your computer. Then, install the required npm packages by running
npm install hap-nodejs serialport - Create the Script
Save the following code ashibouair.jsor clone it from https://github.com/smart-sensor-devices-ab/bleuio-hibouair-homekit-integration
const hap = require('hap-nodejs');
const { SerialPort } = require('serialport');
const Accessory = hap.Accessory;
const Characteristic = hap.Characteristic;
const CharacteristicEventTypes = hap.CharacteristicEventTypes;
const Service = hap.Service;
// Get the device ID from the command-line arguments
const deviceId = process.argv[2];
if (!deviceId) {
console.error(
'Device ID not present. Please provide the device ID as follows:'
);
console.error('node hibouair.js <device_id>');
process.exit(1);
}
// Define the manufacturer name you're looking for
const targetManufacturer = 'Smart Sensor Devices';
// Buffers to hold the incoming data
let buffer = '';
let scanningDetected = false;
let responseFound = false;
let port; // Variable to hold the SerialPort instance
// Initialize HomeKit accessories globally
let temperature, co2, humidity, light;
async function connectAndSendCommands() {
try {
// Get a list of all serial ports
const ports = await SerialPort.list();
// Find the port with the specified manufacturer
const targetPort = ports.find(
(port) => port.manufacturer === targetManufacturer
);
if (!targetPort) {
console.log(`No port found with manufacturer: ${targetManufacturer}`);
return;
}
// Log the selected port
console.log(`Connecting to port: ${targetPort.path}`);
// Create a new SerialPort instance for the selected port
port = new SerialPort({
path: targetPort.path,
baudRate: 9600, // Adjust the baud rate as needed
});
// Event handler for when the port opens
port.on('open', () => {
console.log(
`Port ${targetPort.path} is open and ready for communication.`
);
// Write the initial command
port.write('AT+CENTRAL\r\n', (err) => {
if (err) {
console.error('Error writing initial command:', err.message);
} else {
console.log('Initial command sent: AT+CENTRAL');
}
});
// Start the periodic scanning for BLE data
setInterval(() => {
port.write(`AT+FINDSCANDATA=${deviceId}=5\r\n`, (err) => {
if (err) {
console.error('Error writing scan command:', err.message);
} else {
console.log(`Scan command sent: AT+FINDSCANDATA=${deviceId}=5`);
}
});
}, 20000); // 20000 milliseconds = 20 seconds
});
// Event handler for when data is received on the port
port.on('data', (data) => {
buffer += data.toString();
processBuffer();
});
// Event handler for when there is an error
port.on('error', (err) => {
console.error('Error:', err.message);
if (port) {
port.close(() => {
console.log('Port closed due to error.');
});
}
});
} catch (err) {
console.error('Error listing or connecting to serial ports:', err);
if (port) {
port.close(() => {
console.log('Port closed due to error.');
});
}
}
function processBuffer() {
// Split the buffer into lines
const lines = buffer.split('\r\n');
for (let i = 0; i < lines.length; i++) {
const line = lines[i].trim();
if (line === 'SCANNING...') {
scanningDetected = true;
} else if (line === 'SCAN COMPLETE') {
scanningDetected = false;
} else if (scanningDetected && line.length > 0) {
// Extract the data from the line
const dataMatch = line.match(/^\[.*?\] Device Data \[ADV\]: (.+)$/);
if (dataMatch && dataMatch[1]) {
const extractedData = dataMatch[1].trim();
console.log('Extracted data:', extractedData);
// Decode the data
const decodedData = advDataDecode(extractedData);
console.log('Decoded data:', decodedData);
responseFound = true;
buffer = ''; // Clear the buffer after finding the response
if (!temperature || !co2 || !humidity || !light) {
setupAccessory(decodedData); // Setup accessory if not already done
} else {
updateAccessory(decodedData); // Update accessory with decoded data
}
return;
}
}
}
// Keep the remaining buffer if no relevant line was found
buffer = lines[lines.length - 1]; // Retain the last part of the buffer
}
// Function to decode the advertisement data
function advDataDecode(adv) {
let pos = adv.indexOf('5B0705');
let dt = new Date();
let currentTs =
dt.getFullYear() +
'/' +
(dt.getMonth() + 1).toString().padStart(2, '0') +
'/' +
dt.getDate().toString().padStart(2, '0') +
' ' +
dt.getHours().toString().padStart(2, '0') +
':' +
dt.getMinutes().toString().padStart(2, '0') +
':' +
dt.getSeconds().toString().padStart(2, '0');
let tempHex = parseInt(
'0x' +
adv
.substr(pos + 22, 4)
.match(/../g)
.reverse()
.join('')
);
if (adv) dataShowing = true;
if (tempHex > 1000) tempHex = (tempHex - (65535 + 1)) / 10;
else tempHex = tempHex / 10;
return {
boardID: adv.substr(pos + 8, 6),
type: adv.substr(pos + 6, 2),
light: parseInt(
'0x' +
adv
.substr(pos + 14, 4)
.match(/../g)
.reverse()
.join('')
),
pressure:
parseInt(
'0x' +
adv
.substr(pos + 18, 4)
.match(/../g)
.reverse()
.join('')
) / 10,
temp: tempHex,
hum:
parseInt(
'0x' +
adv
.substr(pos + 26, 4)
.match(/../g)
.reverse()
.join('')
) / 10,
voc: parseInt(
'0x' +
adv
.substr(pos + 30, 4)
.match(/../g)
.reverse()
.join('')
),
pm1:
parseInt(
'0x' +
adv
.substr(pos + 34, 4)
.match(/../g)
.reverse()
.join('')
) / 10,
pm25:
parseInt(
'0x' +
adv
.substr(pos + 38, 4)
.match(/../g)
.reverse()
.join('')
) / 10,
pm10:
parseInt(
'0x' +
adv
.substr(pos + 42, 4)
.match(/../g)
.reverse()
.join('')
) / 10,
co2: parseInt('0x' + adv.substr(pos + 46, 4)),
vocType: parseInt('0x' + adv.substr(pos + 50, 2)),
ts: currentTs,
};
}
}
// Function to setup HomeKit accessory
function setupAccessory(data) {
const accessoryUuid = hap.uuid.generate('hap.hibouair.sensor');
const accessory = new Accessory('HibouAir', accessoryUuid);
// Create a function to initialize services
function initializeService(
serviceType,
serviceName,
initialValue,
characteristicType
) {
const service = new serviceType(serviceName);
const characteristic = service.getCharacteristic(characteristicType);
characteristic.on(CharacteristicEventTypes.GET, (callback) => {
console.log(`Queried current ${serviceName}: ${initialValue}`);
callback(undefined, initialValue);
});
accessory.addService(service);
return {
service,
characteristic,
initialValue,
};
}
// Initialize temperature, CO2, humidity, and light services
temperature = initializeService(
Service.TemperatureSensor,
'Temperature Sensor',
data.temp,
Characteristic.CurrentTemperature
);
co2 = initializeService(
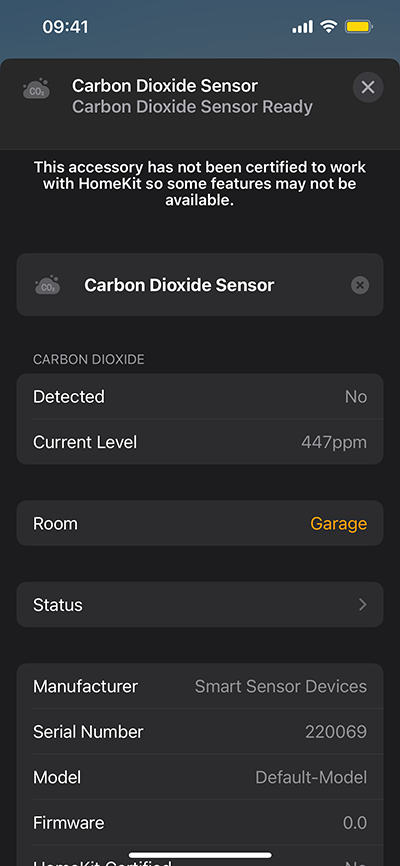
Service.CarbonDioxideSensor,
'CO2 Sensor',
data.co2,
Characteristic.CarbonDioxideLevel
);
humidity = initializeService(
Service.HumiditySensor,
'Humidity Sensor',
data.hum,
Characteristic.CurrentRelativeHumidity
);
light = initializeService(
Service.LightSensor,
'Light Sensor',
data.light,
Characteristic.CurrentAmbientLightLevel
);
// Set accessory information
accessory
.getService(Service.AccessoryInformation)
.setCharacteristic(Characteristic.Manufacturer, 'Smart Sensor Devices')
.setCharacteristic(Characteristic.SerialNumber, deviceId);
// Publish the accessory
accessory.publish({
username: '17:51:07:F4:BC:8B',
pincode: '123-45-678',
port: 47129,
category: hap.Categories.SENSOR, // value here defines the symbol shown in the pairing screen
});
console.log('Accessory setup finished!');
}
// Function to update HomeKit accessory with new data
function updateAccessory(data) {
temperature.initialValue = data.temp;
co2.initialValue = data.co2;
humidity.initialValue = data.hum;
light.initialValue = data.light;
console.log(`Updated current temperature: ${temperature.initialValue}`);
console.log(`Updated current CO2 level: ${co2.initialValue}`);
console.log(`Updated current Humidity level: ${humidity.initialValue}`);
console.log(`Updated current light level: ${light.initialValue}`);
// Update the characteristic values
temperature.service.setCharacteristic(
Characteristic.CurrentTemperature,
temperature.initialValue
);
co2.service.setCharacteristic(
Characteristic.CarbonDioxideLevel,
co2.initialValue
);
humidity.service.setCharacteristic(
Characteristic.CurrentRelativeHumidity,
humidity.initialValue
);
light.service.setCharacteristic(
Characteristic.CurrentAmbientLightLevel,
light.initialValue
);
}
// Call the function to connect and send commands
connectAndSendCommands();
Run the Script
Execute the script from your terminal by providing the device ID as an argument:
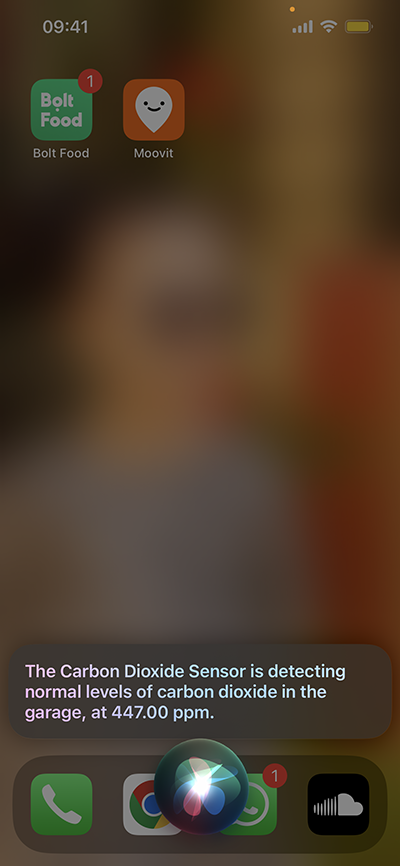
node hibouair.js 220069This command will start the script, connect to the BleuIO dongle, scan for the HibouAir device, decode the data, and set up the HomeKit accessories with the real-time data from the device.
Output
This tutorial demonstrates how easy it is to develop BLE applications using BleuIO and integrate them with HomeKit. By following these steps, you can create real-time monitoring solutions for a variety of BLE-enabled devices, enhancing the functionality of your smart home environment.