Build a Cloud Air Quality Dashboard with HibouAir, BleuIO, and TagoIO

Air quality and environmental monitoring are common IoT use cases where Bluetooth Low Energy sensors can provide useful real-time information without requiring complex infrastructure.

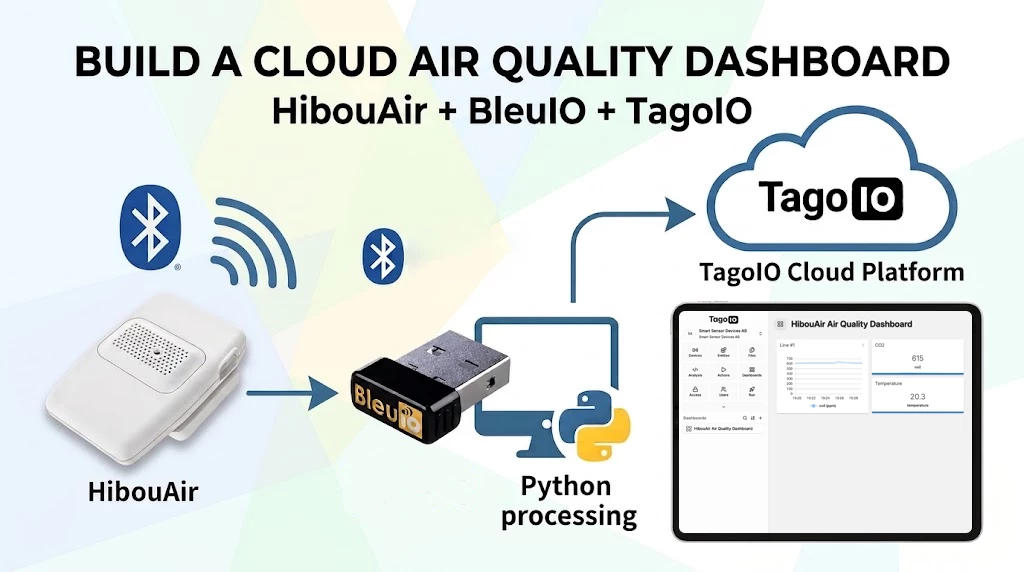
In this project, we will use HibouAir as our air quality monitoring sensor, BleuIO as the Bluetooth Low Energy interface, and a Python application to collect and decode the advertised sensor data. The decoded measurements will then be sent to TagoIO, where we can store and visualize the data using an online dashboard.

The goal is to keep the project simple. There is no need to install an IoT server, MQTT broker, database, or dashboard software locally. BleuIO handles the BLE communication, the Python application processes the sensor data collected from HibouAir, and TagoIO handles the cloud side.

Why TagoIO?

TagoIO is an IoT platform that provides tools for connecting devices, storing sensor data, and creating dashboards for visualization.

For this project, one of the main reasons for choosing TagoIO is that it is easy to get started. It provides a free plan, which is suitable for experimenting with a small number of devices and building proof-of-concept IoT applications.

This makes it particularly useful for projects such as environmental monitoring where we simply want to send sensor measurements to the cloud and visualize them without setting up our own backend infrastructure.

If the project grows later, TagoIO also provides paid subscription options with additional resources and capabilities. This means we can start with the free option while developing and testing the project, and move to a larger plan later if necessary.

Another useful feature is its dashboard builder. Once our sensor variables reach TagoIO, we can create cards, displays, gauges, and time-series charts directly from the web interface.

For our HibouAir project, this allows us to visualize measurements such as:

  • Temperature
  • Relative humidity
  • CO2

Project Requirements

For this project, we need the following hardware and software.

Hardware

BleuIO

BleuIO is a USB Bluetooth Low Energy dongle that allows us to control BLE communication using simple AT commands over a serial connection.

In this project, BleuIO scans for the BLE advertisements transmitted by HibouAir and passes the received advertisement data to our Python application.

HibouAir

HibouAir is the environmental BLE sensor used in this example.

For this project, we are using a HibouAir device advertising with the board ID:

220069

Software Requirements

Install Python 3 if it is not already available.

The project uses the following Python packages:

pyserial
requests

Install them using:

python3 -m pip install pyserial requests

You will also need a free TagoIO account.

Create an account and then create a new device in the TagoIO console.

For example:

Device Name: HibouAir Air Quality Sensor

After creating the device, TagoIO generates a Device Token.

The Device Token is used by the Python application to authenticate when sending measurements to TagoIO.

Keep this token private and do not publish it in a public GitHub repository.

How the Project Works

The project consists of three main stages.

1. Collect BLE Advertisements from HibouAir

HibouAir continuously broadcasts environmental data using Bluetooth Low Energy advertisements.

BleuIO is connected to the computer through USB and appears as a serial device.

On macOS, for example, the BleuIO dongle may appear as:

/dev/cu.usbmodemxxxxxxx

The Python application opens this serial port and communicates with BleuIO.

To locate our specific HibouAir device, the application asks BleuIO to search for advertisements containing the HibouAir board ID:

220069

Conceptually, the command looks like:

AT+FINDSCANDATA=220069=3

BleuIO scans for matching BLE advertisements and returns the advertisement data to the Python application.

The data received from BleuIO contains the raw BLE advertisement in hexadecimal format.

The Python application identifies the HibouAir environmental advertisement and extracts the relevant bytes from the payload.

The values are then decoded into useful environmental measurements.

For example:

Temperature : 24.6 °C
Humidity    : 48.2 %
CO2         : 612 ppm

Sending the Data to TagoIO

Once the HibouAir advertisement has been decoded, the Python application prepares the measurements in the format expected by TagoIO.

For example:

[
  {
    "variable": "temperature",
    "value": 24.6,
    "unit": "°C"
  },
  {
    "variable": "humidity",
    "value": 48.2,
    "unit": "%"
  },
  {
    "variable": "co2",
    "value": 612,
    "unit": "ppm"
  }
]

The application then sends the data to the TagoIO API using HTTPS.

The TagoIO Device Token is included with the request so that TagoIO knows which device the measurements belong to.

After the first successful upload, the variables automatically become available for the device in TagoIO.

In this example, the variables are:

temperature
humidity
co2

The application continues scanning for new HibouAir advertisements and periodically uploads new measurements.

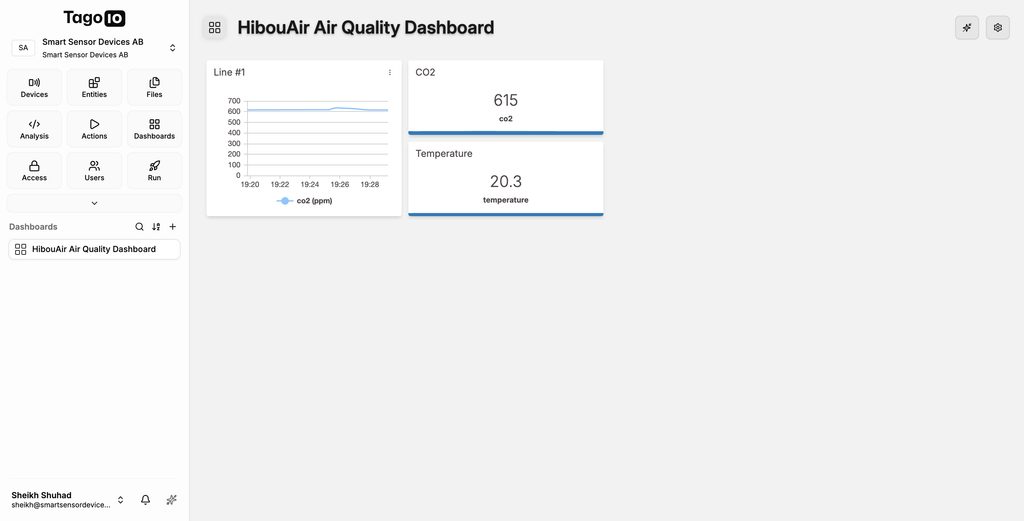
Creating the TagoIO Dashboard

Once the sensor data starts appearing in TagoIO, we can create a dashboard.

In the TagoIO console, go to:

Dashboards

Create a new dashboard and give it a name such as:

HibouAir Air Quality Dashboard

We can then add widgets using the variables sent by our Python application.

For example, we can create current-value widgets for:

Temperature
Humidity
CO2

We can also add line charts to display how each measurement changes over time.

Because TagoIO stores timestamps with the measurements, the line-chart widgets can display the sensor data as a time series.

This gives us a simple cloud-based air-quality monitoring dashboard without having to maintain our own database or web application.

Source Code

The complete source code for this project is available on GitHub:

GitHub:
https://github.com/smart-sensor-devices-ab/BleuIO-hibouair-tagoio

Configure the Application

Before running the application, update the configuration with your BleuIO serial port and TagoIO Device Token.

For example:

BLEUIO_PORT = "/dev/cu.usbmodem4048FDE52CF21"

HIBOUAIR_ID = "220069"

You will also need your TagoIO Device Token.

For development, the token can be supplied through the application configuration.

The TagoIO API endpoint also needs to match the region used by your TagoIO account.

Running the Application

Make sure:

  1. BleuIO is connected to the computer.
  2. HibouAir is powered on and advertising.
  3. Your computer has an Internet connection.
  4. Your TagoIO Device Token has been configured.

Then run:

python3 script.py

The application should first connect to BleuIO.

You should see output similar to:
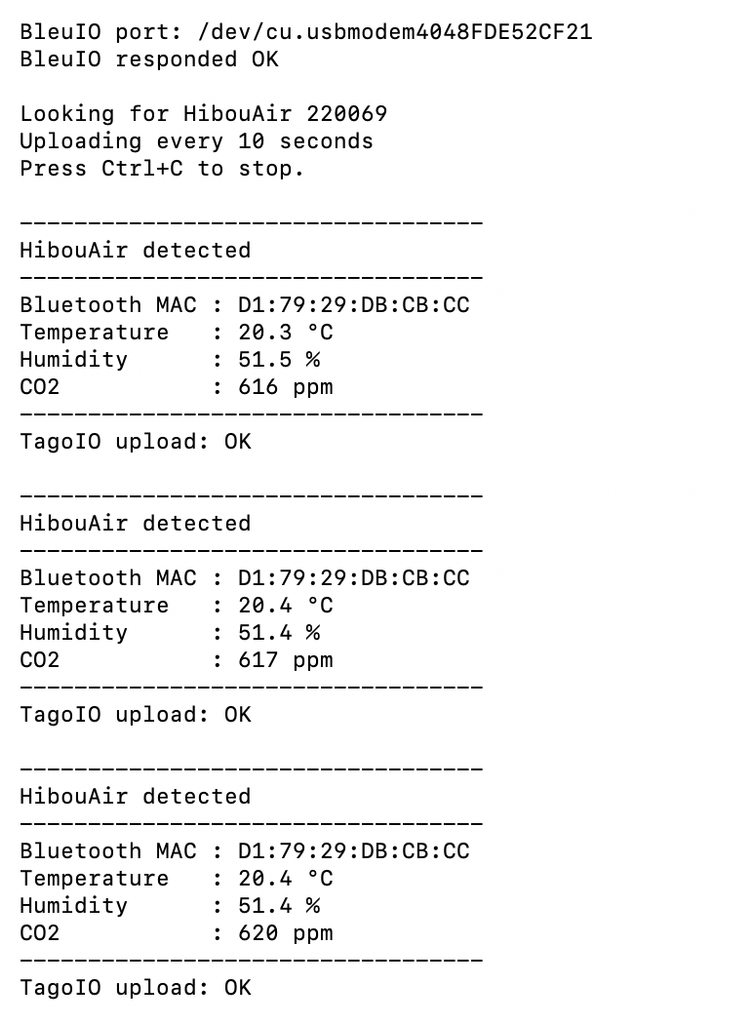
BleuIO + HibouAir + TagoIO
==========================

BleuIO port: /dev/cu.usbmodem4048FDE52CF21
BleuIO responded OK

Looking for HibouAir 220069

When a valid HibouAir advertisement is received, the decoded sensor measurements will be displayed:

----------------------------------
HibouAir detected
----------------------------------

Temperature   : 24.6 °C
Humidity      : 48.2 %
CO2           : 612 ppm

----------------------------------

TagoIO upload: OK

The application will continue scanning and uploading new readings until it is stopped.

Use:

Ctrl + C

to stop the application.

Output

After the application has been running for a while, the sensor measurements will be available from the TagoIO device page and dashboard.

The dashboard can display the latest HibouAir measurements as well as their historical changes.
In this project, we created a simple cloud-connected environmental monitoring system using HibouAir, BleuIO, Python, and TagoIO.

This project should be considered a starting point rather than a finished monitoring product.

The code can be modified or expanded in many ways. Feel free to modify, extend, or reuse the code in your own BLE and IoT applications as needed.
Share this post on :

BleuIO Firmware v2.8.0.5 Released: Improved GATT Discovery Stability

We’re excited to announce the release of BleuIO firmware v2.8.0.5. This release focuses on making GATT service and characteristic discovery more reliable, particularly when working with complex Bluetooth Low Energy peripheral devices that expose very large GATT databases.

Firmware v2.8.0.5 introduces important stability improvements, increases the number of characteristics BleuIO can handle within a service, and optimizes how discovered GATT data is processed and returned.

We recommend that all BleuIO users update to the latest firmware.

What’s New in Firmware v2.8.0.5

Improved Discovery Stability

One of the main improvements in this release addresses an issue that could cause BleuIO to unexpectedly reset while performing service and characteristic discovery on peripheral devices with exceptionally large GATT databases.

With firmware v2.8.0.5, the discovery process has been redesigned to handle these large and complex profiles much more efficiently. This means more reliable discovery when connecting BleuIO to BLE devices that expose many services, characteristics, values, and descriptors.

Support for Larger GATT Profiles

We have also increased BleuIO’s internal profile capacity.

BleuIO can now comfortably support up to 165 characteristics within an individual service, allowing it to work with significantly larger peripheral profiles without running out of memory. This is especially useful when developing or debugging applications that interact with feature-rich BLE devices containing extensive GATT structures.

A New Streaming Discovery Architecture

Behind these improvements is an important change to the way BleuIO processes GATT discovery data.

Previous firmware versions used a hierarchical caching model that temporarily stored discovered GATT information in RAM before presenting the results. With v2.8.0.5, BleuIO now uses a sequential streaming discovery model. Instead of building a large representation of the peripheral’s GATT database in memory, BleuIO processes metadata dynamically and sends discovered information to the USB interface as it becomes available.

This significantly reduces memory usage and improves connection stability when discovering large peripheral profiles.

AT Commands Affected

The new streaming architecture applies to the following GATT discovery commands:

  • AT+GETSERVICES — Performs the full sequential GATT discovery stream.
  • AT+GETSERVICESONLY — Performs a high-level service discovery pass only.
  • AT+GETSERVICEDETAILS — Performs a targeted discovery of an individual service.

If your application uses any of these commands, there is one small output-order change to be aware of.

Changes to GATT Output Order

With the new streaming discovery architecture, discovered GATT attributes are now sent to the USB interface immediately as they are parsed from the connected peripheral device. This allows BleuIO to process discovery data more efficiently without keeping the entire GATT structure in memory.

For each service block, BleuIO will first output the Service row, followed by all of its Characteristics and Characteristic Values. Once those have been processed, all Descriptors associated with that service range, including descriptors such as 0x2902 CCCDs, will be output.

As a result of this optimization, descriptor entries are now grouped together at the end of their respective service block. In previous firmware versions, descriptors could appear interleaved directly after their parent characteristic value handle. The underlying GATT information remains the same; only the order in which descriptor handles are presented has changed.

Existing parsers should remain compatible with this update. All JSON formatting fields, including handle, type, uuid, prop, and propFormat, remain unchanged in verbose mode, and the standard text mode output strings also remain identical to previous versions. Applications that rely on the exact position of descriptor entries within a service block may need to account for the updated output order.

How to Update Your BleuIO

There are two ways to update your BleuIO to firmware v2.8.0.5.

Option 1: Download and Install the Latest Firmware

You can download the latest BleuIO firmware and follow the firmware update instructions in our official documentation:

Download the latest BleuIO firmware and view the update guide

Option 2: Update Using the BleuIO Web App

You can also update your BleuIO directly through the BleuIO web application:

Update BleuIO using the web app

Update your BleuIO and start using firmware v2.8.0.5 today.

Share this post on :

Turn an RP2040 or RP2350 Board into a HibouAir Gateway with BleuIO

In this tutorial, we will look at how the BleuIO USB dongle can add Bluetooth Low Energy communication to an RP2040 or RP2350 development board.

The project uses the open-source Pico I/O Bridge firmware. It allows a supported development board to work as a USB host for BleuIO. BleuIO scans nearby HibouAir sensors, and the board displays the latest sensor data through a simple browser interface.

The board also creates a small USB network connection with the computer. This means the dashboard can be opened directly in a web browser without installing a desktop application or connecting the board to Wi-Fi. The firmware is written in Rust and exposes its interfaces through a local .local address.

This project is a useful example of how BleuIO can provide BLE communication to development boards that do not have built-in Bluetooth. The board handles USB hosting and networking, while BleuIO handles Bluetooth scanning.

Requirements

You will need:

What Does This Project Do?

The project creates a simple connection between HibouAir sensors, BleuIO and your computer.

1. HibouAir broadcasts sensor data

HibouAir sensors regularly broadcast their measurements using Bluetooth Low Energy advertising packets.

Depending on the HibouAir model, these broadcasts can contain parameters such as: Temperature, Humidity, Pressure, CO2, VOC, Noise, PM1.0, PM2.5, PM10, Ambient light

Because the project reads BLE advertising data, the HibouAir sensors do not need to be paired with the development board.

2. BleuIO receives the BLE advertisements

BleuIO is connected to the USB-A host port of the development board.

After BleuIO is detected, the firmware manages the scanning process automatically. BleuIO searches for nearby HibouAir advertisements and sends the received data to the board.

This is an important part of the project: the RP2040 or RP2350 board does not need its own Bluetooth radio. BleuIO provides the Bluetooth Low Energy functionality through USB.

3. The board decodes the HibouAir data

The firmware reads the BLE scan results from BleuIO and decodes the HibouAir manufacturer data.

It identifies the HibouAir sensor ID and sensor type before extracting the measurements supported by that particular model.

The firmware keeps the latest readings for up to eight HibouAir sensors in memory. When no sensor filter has been configured, sensors are discovered automatically.

4. The results appear in a web browser

The development board appears on the computer as a small USB Ethernet device. It provides its own local IP network and advertises a unique .local hostname.

The browser dashboard shows: BleuIO connection status, USB transfer status, Number of HibouAir sensors discovered, HibouAir sensor IDs, Sensor types, Latest measurements, Time since the last advertisement, Number of reports received

The dashboard updates automatically while BleuIO continues scanning.

How to Run the Project

The complete project is available on GitHub:

Pico I/O Bridge GitHub repository

There are two ways to run it:

  1. Flash a pre-built firmware file.
  2. Build the firmware from the Rust source code.

Using a pre-built firmware file is the easiest method.

Method 1: Use the Pre-Built Firmware

Step 1: Download the firmware

Open the project’s release page:

Pico I/O Bridge v0.2.0 release

The release contains pre-built UF2 firmware files for the supported board profiles, together with a checksum file.

Download the UF2 file that matches your board.

For this project, select the firmware for either:

Adafruit Feather RP2040 USB Host

or:

Waveshare RP2350 USB-A

Do not flash firmware intended for a different board model.

Step 2: Put the board into bootloader mode

Disconnect the board from the computer.

Put the board into its normal UF2 or BOOTSEL flashing mode. The exact button combination depends on the board, so follow the normal bootloader procedure for your development board.

When the board enters bootloader mode, it should appear on the computer as a removable USB drive.

Step 3: Flash the UF2 file

Copy the downloaded UF2 file to the board’s removable drive.

The board should restart automatically after the file has been copied.

Wait a few seconds for the firmware to start and for the USB network connection to become available.

Step 4: Connect BleuIO

Insert the BleuIO USB dongle into the USB-A host port of the development board.

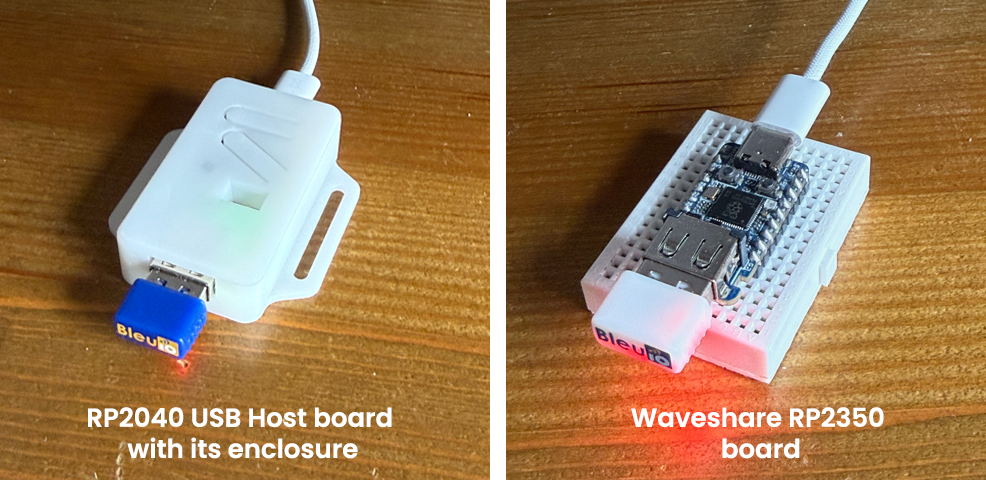
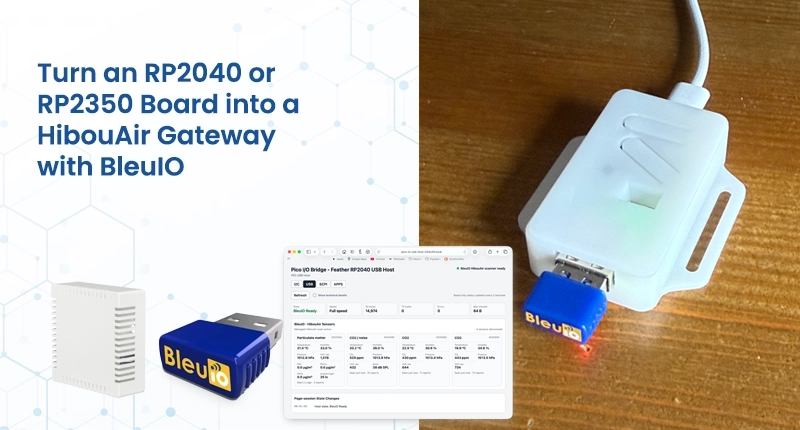
The physical connection should look like this:

Do not connect BleuIO directly to the computer for this setup. It needs to be connected to the USB host port on the development board.

Step 5: Power the HibouAir sensors

Make sure your HibouAir sensors are powered on and located within Bluetooth range of BleuIO.

No Bluetooth pairing process is required. The sensors simply need to be broadcasting their normal BLE advertisement data.

Step 6: Find the board hostname

Each board creates a unique .local hostname.

For the Adafruit Feather RP2040 USB Host, it will follow this format:

pico-io-usb-host-xxxxxx.local

For the Waveshare RP2350 USB-A, it will follow this format:

pico-io-waveshare-rp2350-xxxxxx.local

Replace xxxxxx with the unique identifier assigned to your board.

On macOS, the board can also be discovered through the built-in dns-sd utility:

dns-sd -B _http._tcp

The project advertises its web interface through mDNS and DNS Service Discovery.

On Windows, the optional mDNS Discovery utility can be used to view available mDNS and DNS-SD services.

Step 7: Open the web interface

Open a browser and enter the board hostname.

For example:

http://pico-io-usb-host-244c29.local/usb-host.html

Use your board’s actual hostname rather than the example above.

The USB-host-enabled profiles expose the USB status page at:

/usb-host.html

The web interface and the USB-host API are included whenever the firmware is built with the pio-usb-host feature.

Step 8: Wait for BleuIO to become ready

After opening the page, check the USB section.

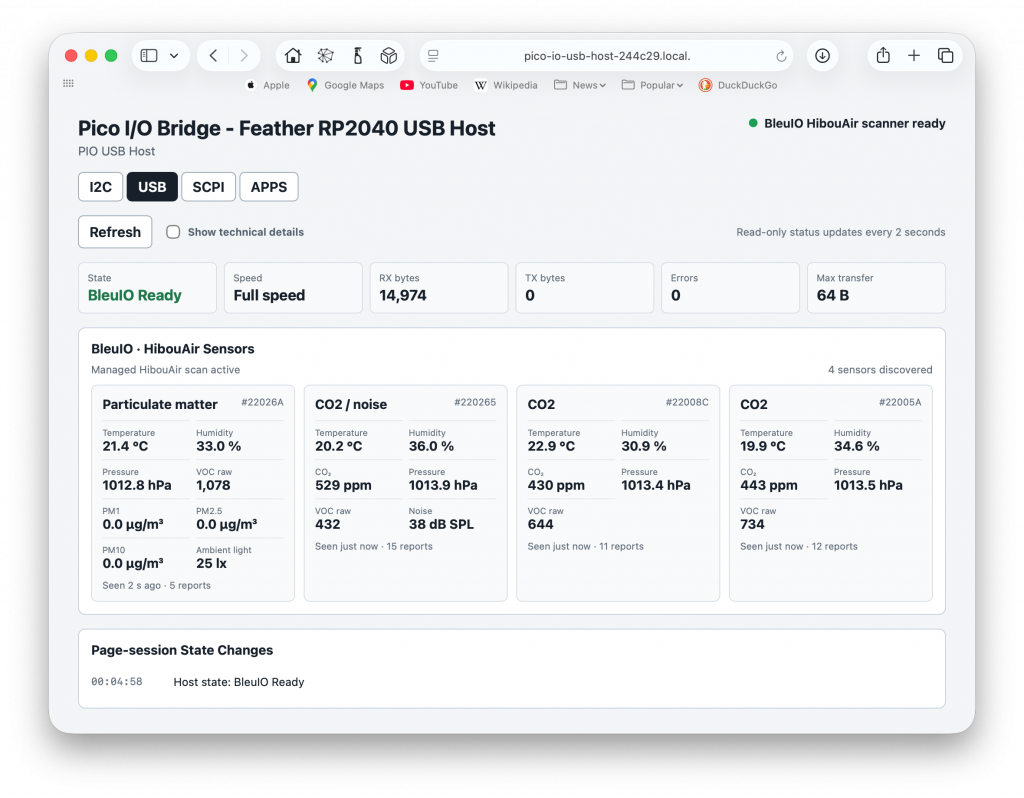
You should see a status similar to:

BleuIO Ready

You should also see:

BleuIO HibouAir scanner ready

Once BleuIO is ready, the managed HibouAir scan begins automatically.

Nearby HibouAir sensors should start appearing as individual cards. The first results may take a few seconds, depending on the sensors’ advertisement intervals.

Expected Output

The page should show each discovered HibouAir sensor with its sensor ID, sensor model and latest measurements.

Method 2: Build the Firmware from Source

Developers can also clone the complete project and build the firmware using Rust.

Clone the repository:

git clone https://github.com/ulso/pico-io-bridge.git
cd pico-io-bridge

Build for the Adafruit Feather RP2040 USB Host

cargo build --locked --release \
  --no-default-features \
  --features board-adafruit-rp2040-usb-host

Build for the Waveshare RP2350 USB-A

cargo build --locked --release \
  --target thumbv8m.main-none-eabihf \
  --no-default-features \
  --features board-waveshare-rp2350-usb-a

The RP2040 and RP2350 profiles use different Rust target configurations, so it is important to use the command intended for your board.

With the board in BOOTSEL mode, the project can also be built and flashed using the appropriate cargo run command. The repository contains the full toolchain and flashing details for developers who want to modify the firmware.

The complete source code, build instructions and examples are available in the Pico I/O Bridge GitHub repository. Additional project screenshots can be found in the Pico I/O Bridge Wiki.

Share this post on :