BlueIO, a leading provider of Bluetooth Low Energy (BLE) solutions, has recently announced the release of its latest firmware version, v2.3.0. This firmware update brings a host of new features and improvements, enabling developers to create better and more customizable applications. With a focus on flexibility and enhanced functionality, BlueIO’s new firmware empowers developers to tailor their applications to meet specific requirements while offering seamless integration with other devices.
One of the key highlights of the BlueIO v2.3.0 firmware is the ability to create a custom service. This feature provides developers with unprecedented control over their applications, allowing them to define characteristics that handle data in a way that aligns with their unique needs. The custom service can be identified by other devices using a custom UUID, ensuring seamless communication and interoperability.
Custom Service Features:
BlueIO’s custom service offers several powerful features that enable developers to build highly specialized applications:
Custom UUID for the Service: Developers can set a custom UUID for the custom service, ensuring its unique identification and compatibility with other devices.
Multiple Characteristics: Up to five characteristics can be added to the custom service, offering increased versatility and flexibility.
Custom UUID for Each Characteristic: Developers can assign custom UUIDs to individual characteristics within the service, enabling precise identification and interaction.
Read/Write Properties: Each characteristic can be configured with read/write properties, allowing bidirectional data transfer between devices.
Write Without Response: Developers can choose to configure specific characteristics with the write without response property, optimizing data transfer efficiency.
Notify or Indicate: Characteristics can be configured to notify or indicate changes, enabling real-time updates to connected devices.
Descriptor Support: Developers can add descriptors to each characteristic, providing additional information and fine-grained control.
Value Manipulation: The firmware update allows developers to change and update the values of characteristics and descriptors, supporting both ASCII and byte data formats.
Peer Notifications: When updating the characteristic value, BlueIO can automatically notify all connected devices that have subscribed to any characteristic with either Notify or Indication properties.
New Commands:
The BlueIO v2.3.0 firmware introduces a set of new commands that facilitate easy setup and control of the custom service:
AT+CUSTOMSERVICE: This command allows developers to configure and query the settings for the custom service.
AT+CUSTOMSERVICESTART: Enables the start of the custom service, initiating its functionality.
AT+CUSTOMSERVICESTOP: Stops the custom service while retaining the user-defined settings.
AT+CUSTOMSERVICERESET: Disables the custom service and clears all user settings associated with it.
The release of BlueIO’s v2.3.0 firmware marks a significant milestone in meeting the demands of developers seeking advanced BLE solutions. The BlueIO team remains committed to enhancing their offerings and will continue to provide updates and new features to support developers in their application development journey.
In the realm of Bluetooth Low Energy (BLE) development, having a reliable tool for testing, debugging, and creating BLE applications is crucial. BLE simulators serve as virtual environments that mimic real-world BLE devices, enabling developers to streamline the development process. BleuIO, a Bluetooth Low Energy USB dongle, offers a versatile and user-friendly solution for harnessing the power of BLE simulation. In this article, we will explore the significance of BLE simulators, discuss why they are needed, and delve into the various ways BleuIO can assist developers in building robust BLE applications.
Why Do We Need a BLE Simulator? Testing and debugging BLE applications can be a complex and time-consuming process. Deploying real BLE devices for every development iteration is not only impractical but also resource-intensive. BLE simulators provide an efficient way to replicate various scenarios, allowing developers to validate their applications without relying on physical hardware. By emulating multiple BLE devices and their interactions, developers can thoroughly assess the reliability, compatibility, and functionality of their applications in a controlled environment. This not only reduces costs but also accelerates the development cycle.
How BleuIO Can Be Helpful BleuIO offers a range of features and functionalities that make it an invaluable tool for BLE application development:
BLE Simulation Capabilities: BleuIO acts as a powerful BLE simulator, allowing developers to create and control multiple virtual BLE devices within a single environment. This flexibility enables comprehensive testing of various use cases, such as connecting to multiple peripherals, exploring different communication scenarios, and validating application behavior under different signal strengths and environmental conditions.
User-Friendly : BleuIO helps to simplify the process of setting up and managing simulated BLE devices. Developers can easily configure device attributes, services, characteristics, and descriptors, all through AT commands. These commands provide developers with a means to interact with the device programmatically. This ease of use significantly reduces the learning curve and enhances productivity.
Real-Time Data Monitoring: With BleuIO, developers can monitor real-time data exchanged between virtual BLE devices and their applications. This feature is particularly useful for debugging purposes, as it allows developers to inspect data packets, analyze communication output, and identify potential issues or inconsistencies. By closely monitoring data flow, developers can refine their applications for optimal performance.
Cross-Platform Compatibility: BleuIO supports various operating systems, making it compatible with a wide range of development environments. Whether you are working on Windows, macOS, or Linux, BleuIO seamlessly integrates into your preferred development workflow, ensuring versatility and accessibility.
Basic Functions of BleuIO
BleuIO offers several fundamental functions that aid in BLE application development:
Device Configuration: Developers can easily configure the properties and behavior of virtual BLE devices using BleuIO. This includes setting device names, MAC addresses, advertising intervals, supported services, and characteristics. This flexibility enables developers to simulate diverse scenarios and test application behavior under different configurations.
Advertising and Scanning BleuIO enables the simulation of advertising and scanning functionalities, allowing developers to emulate device discovery and connection processes. This feature is crucial for testing application behavior when interacting with various devices and ensuring seamless connectivity.
GATT Server and Client: BleuIO supports both GATT server and client roles, enabling developers to simulate and test both peripheral and central devices. This versatility allows for comprehensive testing of the application’s functionality in different roles and scenarios.
BleuIO can be served as a powerful BLE simulator that streamlines the testing, debugging, and creation of Bluetooth Low Energy applications. By providing an intuitive AT commands, comprehensive simulation capabilities, real-time data monitoring, and cross-platform compatibility, BleuIO empowers developers to build robust and reliable BLE applications efficiently. With its flexibility and ease of use, BleuIO significantly reduces development time, accelerates the testing process, and enhances the overall quality of Bluetooth Low Energy applications.
The BleuIO team is excited to announce the release of their latest firmware version, v2.2.2, packed with new features and improvements for Bluetooth Low Energy (BLE) developers. This firmware update aims to provide an enhanced development experience and empower developers with more control over their BLE applications.
What’s new in this firmware :
One of the notable additions in this release is the inclusion of a new command that allows developers to set or query the maximum MTU (Maximum Transmission Unit) size used in MTU negotiation upon connecting to a device. This feature provides flexibility in adjusting the MTU size, enabling better optimization and efficiency in data transmission between devices.
Additionally, the BleuIO firmware v2.2.2 introduces a powerful filtering mechanism for scan results. A new command has been added to apply filters on the outcomes from AT+FINDSCANDATA and AT+GAPSCAN commands. This feature allows filtering based on three different parameters: Local Name, Service UUID, and Manufacturer Specific ID.
It enables the flexibility to activate one filter, two filters in combination, or all three filters simultaneously. Results will only be displayed if the selected filter value is present in the advertising or scan response data. For example, a filter can be set to exclusively show data packets from devices with the Local Name “BleuIO” (either Complete or Shortened) by executing the command AT+SCANFILTER=NAME=BleuIO.
By leveraging these filtering capabilities, developers can easily focus on specific devices or data packets that meet their criteria, streamlining the development and testing process.
To explore the full range of features and improvements introduced in BleuIO firmware v2.2.2, developers are encouraged to visit the official BleuIO documentation at https://www.bleuio.com/getting_started/docs/firmware/. The comprehensive documentation provides detailed information on firmware updates and guides on how to leverage these new features effectively.
The BleuIO team is committed to continuously enhancing the BLE development experience and providing tools needed to build robust and innovative applications. With each firmware release, BleuIO demonstrates its dedication to empowering developers and enabling seamless Bluetooth Low Energy development.
Stay tuned for future updates from the BleuIO team, as they continue to introduce new features and improvements to meet the evolving needs of the BLE developer community.
BleuIO, a leading provider of Bluetooth Low Energy (BLE) solutions, has recently released a new Node.js library for developers. This library is available on NPM, making it easy for developers to access and use it for their projects. With this library, developers can create BLE applications quickly and easily.
The BleuIO Node.js library provides a simple and straightforward way for developers to communicate with BLE devices. It supports a range of BLE protocols. This library is designed to work seamlessly with Node.js, making it easy to integrate into existing projects.
One of the primary advantages of using the BleuIO Node.js library is its ease of use. Developers do not need to have extensive knowledge of Bluetooth technology to use this library. The library provides a high-level API that simplifies the communication process, allowing developers to focus on their application’s functionality rather than the underlying BLE protocols.
Another advantage of the BleuIO Node.js library is its flexibility. The library can be used to create a range of BLE applications, from simple IoT devices to complex mobile applications. This flexibility is made possible by the library’s support for a range of BLE devices and protocols.
The BleuIO Node.js library is also highly customizable. Developers can configure the library to meet their specific requirements, such as setting up a custom scan interval or configuring the advertising payload. This flexibility allows developers to create applications that are tailored to their specific needs.
To use the BleuIO Node.js library, developers must have a BleuIO device or module. BleuIO devices are small, low-cost modules that can be integrated into a range of applications, from simple IoT devices to complex mobile applications. These devices provide a reliable and secure way to communicate with BLE devices.
Installation and how to use this library can be found on BleuIO’s getting started guide.
BleuIO Python library is updated and supports firmware version 2.2.1 .This update utilizes the new Verbose mode of the dongle and make it a lot simpler to work with Bluetooth Low Energy with Python. Now the AT commands returns an object with 4 members
Command
Acknowledge
Response
End
Each contains a JSON object, except Response. The Response contains a list of JSON objects since a command can have several responses.
This new update of the library makes it easier to get the relevant information without building your own parser. Status variables : Helpful status variables has been added which helps to keep track of the dongle status ; whether it is scanning, advertising or connected along with the dongle role. Callback function : A callback function should be registered for both scan results and events. The callback functions will run every time a new event or scan result is detected.
Using the library
List of AT commands are available at https://www.bleuio.com/getting_started/docs/commands/
and how to access these AT commands using python library can be found at https://pypi.org/project/bleuio/
Before starting to install our library, make sure you have the latest python installed on your system.
If you have never installed a library from PyPI, you must install the pip tool enabling you to download and install a PyPI package. There are several methods that are described on this page.
Now Install the library by running
pip install bleuio
pip automatically downloads and installs the most recent library on your system in the correct directory. To check that the installation went well, you can launch a Python interpreter and run the following lines:
from bleuio_lib.bleuio_funcs import BleuIO
my_dongle = BleuIO()
print(my_dongle.ati().Rsp)
Good luck on creating amazing Bluetooth Low Energy application using BleuIO and Python.
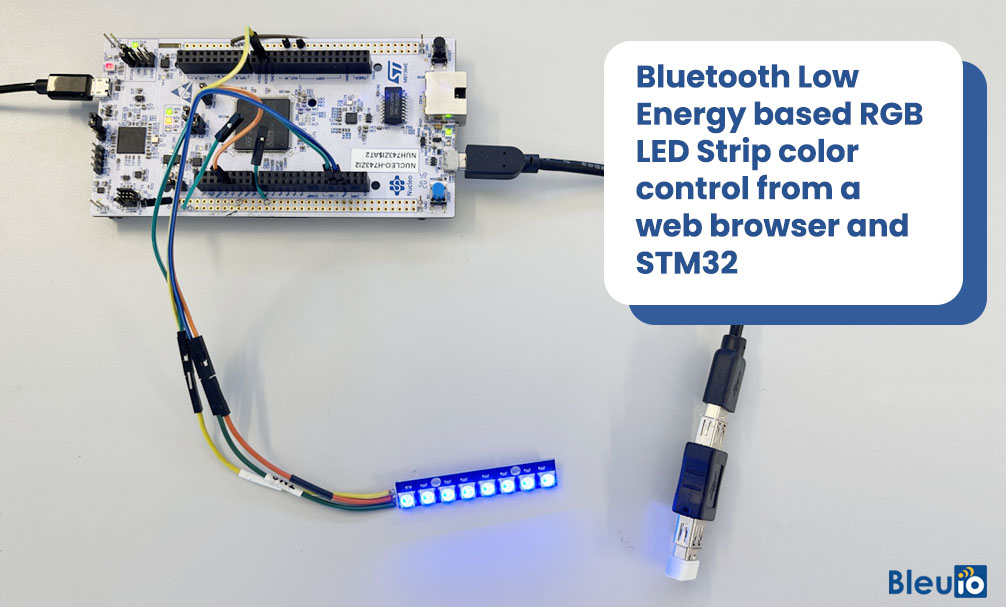
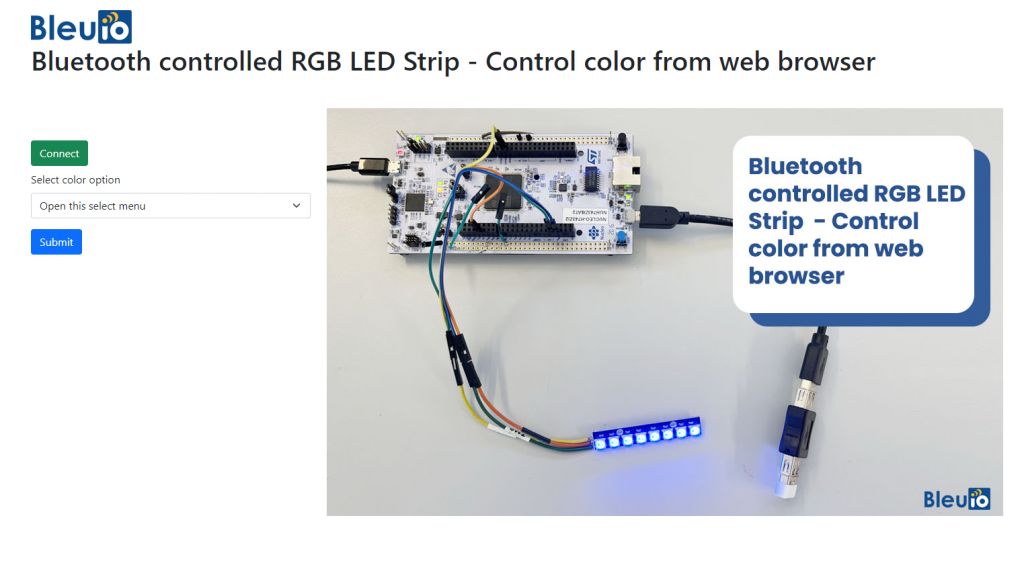
This project is about Bluetooth Low Energy based RGB LED Strip Color Control from a web browser and STM 32. The LEDs light strip can also be controlled wirelessly via a BLE scanning App using IOS or Android. With the received data, we decide which color of the RGB strip to activate.
You will need two dongles, one connected to the Nucleo board and one connected to a computer to control from web browser. The web script is also available on GitHub.
When the BleuIO Dongle is connected to the Nucleo boards USB port the STM32 will recognize it and directly start advertising. This allows the other Dongle to connect to it.
It will also accept 3 different inputs from the UART:
input
result
0
Send ATI (Request device information) command to BlueIO Dongle.
1
Manually turn the LED on
2
Manually turn the LED off
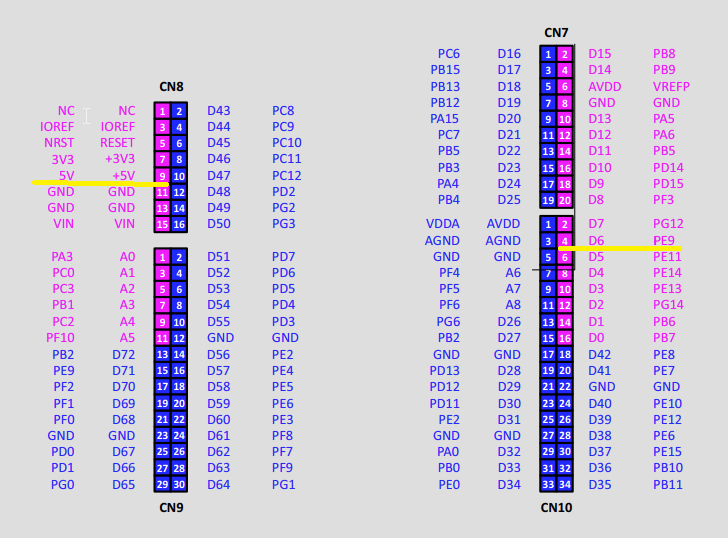
We have used a STM32 Nucleo-144 development board with STM32H743ZI MCU (STM32H743ZI micro mbed-Enabled Development Nucleo-144 series ARM® Cortex®-M7 MCU 32-Bit Embedded Evaluation Board) and the WS2812, a intelligent control LED light source, for this example.
Connect the LED to the Nucleo Board by connecting:
4-7 VDC to 5V
GND to any GND
DIN to PE9
On the Nucleo NUCLEO-H743ZI2:
Note : If you want to use another setup you will have to make sure it support USB Host and beware that the GPIO setup might be different and may need to be reconfigured in the .ioc file.
This project is based on another STM32 project (https://github.com/smart-sensor-devices-ab/stm32_bleuio_example) with the interface to the WS2812 Interface WS2812 with STM32 by Controllers Tech
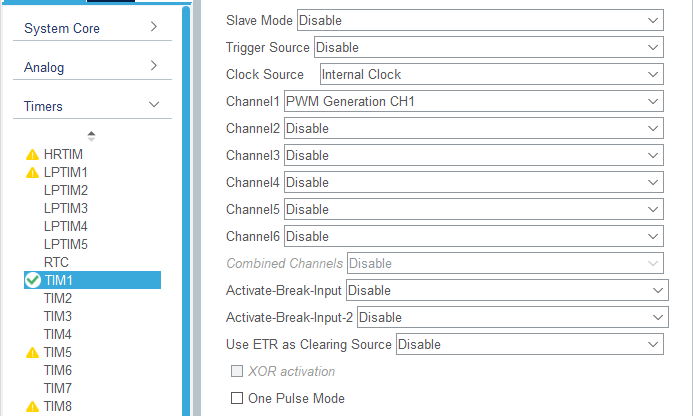
The DIN pin will be connected to TIM1 which need to be enabled in to the .ioc file:
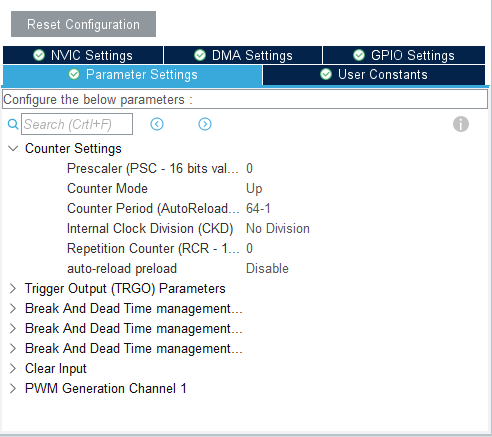
Parameter Settings:
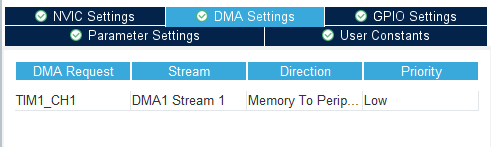
DMA for TIM1 will also be enabled:
In main.c we will need to add a callback for TIM PWM Pulse Finished:
Either clone the project, or download it as a zip file and unzip it, into your STM32CubeIDE workspace.
4.2 Importing as an Existing Project
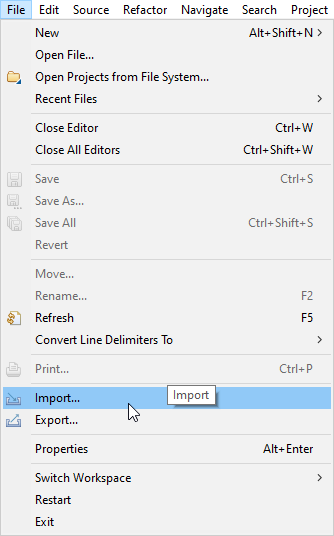
From STM32CubeIDE choose File>Import…
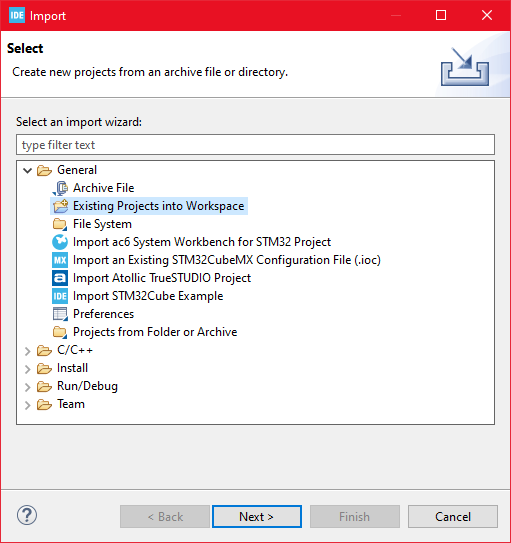
Then choose General>Existing Projects into Workspace then click ‘Next >’
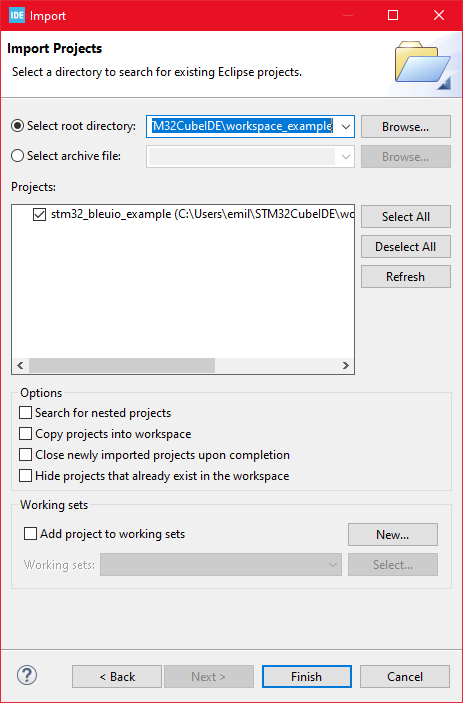
Make sure you’ve choosen your workspace in ‘Select root directory:’
You should see the project “stm32_bleuio_rgb_led_example”, check it and click ‘Finish’.
5. Running the example
In STMCubeIDE click the hammer icon to build the project.
Open up the ‘STMicroelectronics STLink Viritual COM Port’ with a serial terminal emulation program like TeraTerm, Putty or CoolTerm.
Serial port Setup:
Baudrate: 115200
Data Bits: 8
Parity: None
Stop Bits: 1
Flow Control: None
Connect the BleuIO Dongle before running the example
In STMCubeIDE click the green play button to flash and run it on your board. The first time you click it the ‘Run Configuration’ window will appear. You can just leave it as is and click run.
You should be greeted by this welcome message:
Welcome to STM32 BleuIO RGB LED Example!
Press 0 to run the ATI command
Press 1 to manually turn on LED
Press 2 to manually turn off LED
The LED will turn on briefly when starting up.
Wait until the message: “[BleuIO Dongle Ready]” is shown.
The LEDs should now turn off and you can now connect with the other dongle using the script.
You can also use the uart commands (0, 1 or 2):
Press 0 to get device information.
1 to turn on LED.
2 to turn off LED.
Dongle response will be printed to UART.
Control the colors from a web browser
Connect the BleuIO dongle to the computer. Run the web script to connect to the other BleuIO dongle on the STM32. The web script is available inside the source file. Now we can control the colors wirelessly.
Create a simple Html file called index.html which will serve as the frontend of the script. This Html file contains some buttons that help connect and read advertised data from the remote dongle, which is connected to stm32.
<!DOCTYPE html>
<html lang="en">
  <head>
    <meta charset="UTF-8" />
    <meta http-equiv="X-UA-Compatible" content="IE=edge" />
    <meta name="viewport" content="width=device-width, initial-scale=1.0" />
    <link
      href="https://cdn.jsdelivr.net/npm/bootstrap@5.1.3/dist/css/bootstrap.min.css"
      rel="stylesheet"
      integrity="sha384-1BmE4kWBq78iYhFldvKuhfTAU6auU8tT94WrHftjDbrCEXSU1oBoqyl2QvZ6jIW3"
      crossorigin="anonymous"
    />
    <title>
      Bluetooth controlled RGB LED Strip - Control color from web browser
    </title>
  </head>
  <body class="mt-5">
    <div class="container mt-5">
      <img
        src="https://www.bleuio.com/blog/wp-content/themes/bleuio/images/logo.png"
      />
      <h1 class="mb-5">
        Bluetooth controlled RGB LED Strip - Control color from web browser
      </h1>

      <div class="row">
        <div class="col-md-4 pt-5">
          <button class="btn btn-success mb-2" id="connect">Connect</button>
          <form method="post" id="sendMsgForm" name="sendMsgForm">
            <div class="mb-3">
              <label for="msgToSend" class="form-label"
                >Select color option</label
              >
              <select
                class="form-select"
                aria-label="Default select example"
                name="msgToSend"
                id="msgToSend"
                required
              >
                <option selected>Open this select menu</option>
                <option value="L=0">LED Off</option>
                <option value="L=1">LED On</option>
                <option value="L=RED">Set LED lights red</option>
                <option value="L=GREEN">Set LED lights green</option>
                <option value="L=BLUE">Set LED lights blue</option>
                <option value="L=RAINBOW">
                  Set LEDs lights to different colors
                </option>
              </select>
            </div>

            <button type="submit" class="btn btn-primary">Submit</button>
          </form>
        </div>
        <div class="col-md-8">
          <img
            src="https://www.bleuio.com/blog/wp-content/uploads/2022/09/bluetooth-controlled-rgb-led-strip-collor-control.jpg"
          />
        </div>
      </div>
    </div>

    <script src="script.js"></script>
  </body>
</html>
Create a js file called script.js and include it at the bottom of the Html file. This js file uses the BleuIO js library to write AT commands and communicate with the other dongle.
import * as my_dongle from 'bleuio'
const dongleToConnect='[0]40:48:FD:E5:2F:17'
document.getElementById('connect').addEventListener('click', function(){
  my_dongle.at_connect()
  document.getElementById("connect").disabled=true;
  document.getElementById("sendMsgForm").hidden=false;
})

document.getElementById("sendMsgForm").addEventListener("submit", function(event){
    event.preventDefault()


    my_dongle.ati().then((data)=>{
        //make central if not
        if(JSON.stringify(data).includes("Peripheral")){
            console.log('peripheral')
            my_dongle.at_central().then((x)=>{
                console.log('central now')
            })
        }
    })
    .then(()=>{
        // connect to dongle
        my_dongle.at_getconn().then((y)=>{
            if(JSON.stringify(y).includes(dongleToConnect)){
                console.log('already connected')
            }else{
                my_dongle.at_gapconnect(dongleToConnect).then(()=>{
                    console.log('connected successfully')
                })
            }
        })
        .then(()=>{
            var theVal = document.getElementById('msgToSend').value;
            console.log('Message Send  '+theVal)
            // send command to show data
            my_dongle.at_spssend(theVal).then(()=>{
                console.log('Message Send '+theVal)
            })
        })

    })
  });
The script has a button to connect to COM port on the computer. After connecting to the dongle , we should be able to control the colors of the LED strip.
To connect to the BleuIO dongle on the STM32, make sure the STM32 is powered up and a BleuIO dongle is connected to it.
Get the MAC address
Follow the steps to get the MAC address of the dongle that is connected to STM32
- Open this site https://bleuio.com/web_terminal.html and click connect to dongle.
- Select the appropriate port to connect.
- Once it says connected, type ATI. This will show dongle information and current status.
- If the dongle is on peripheral role, set it to central by typing AT+CENTRAL
- Now do a gap scan by typing AT+GAPSCAN
- Once you see your dongle on the list ,stop the scan by pressing control+c
- Copy the ID and paste it into the script (script.js) line #2
Run the web script
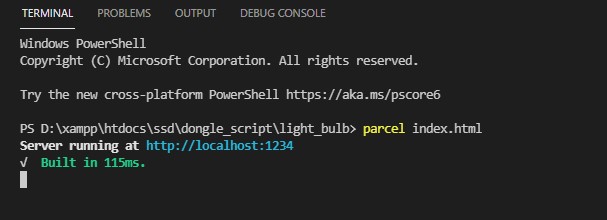
You will need a web bundler. You can use parcel.js
Once parcel js installed, go to the root directory of web script and type “parcel index.html”. This will start your development environment.
Open the script on a browser. For this example we opened http://localhost:1234
You can easily connect to the dongle and update the LED strip.
We live in a day where wireless data transfer is a rather common phenomenon. From offering location services or audio streaming to maintaining device networks and data transfers, all is made possible due to wireless communication technologies and Bluetooth is one of them. Bluetooth is a short-range wireless technology which helps exchange data between connected devices over short radiuses.
Bluetooth Low Energy is essential for IoT networks due to its ability to preserve battery power on devices. Major use cases of Bluetooth Low Energy technology include:
Use Cases
Mobile payments at retail outlets.
Wireless charging for multiple devices.
Keep track of traveller luggage at the airport by using smart tags.
Monitor air quality of the indoor environment by using BLE-powered sensors.
Remote monitoring of patient’s health conditions
Autonomous vehicles with intelligent seats and steering wheels, intelligent proximity reporting etc
Smart Home automation systems with sensors for tracking fire breakouts, water leakages, or motion in case of robbery.
Advantages of Bluetooth Low Energy technology
Sends an ID number via BLE advertising channels
The 2.4 GHz frequency controls interference in signals.
Determines the location of users within its range
Longer battery life by keeping the radio off when not required
Uninterrupted broadcast using Bluetooth beacon
The devices are able to establish connections and faster data transfer.
Small size (maximum up to 255 bytes) data transfer which is helpful for IoT-based applications
The 128-bit AES algorithm ensures the safety of data transfer.
Low power consumption compared to other wireless technologies.
Comparatively lower cost of deployment and maintenance of chipsets and modules.
The BleuIO is Bluetooth low energy USB dongle that can be used to create Bluetooth low energy application. Just use the AT Commands available on the device for faster development. The BleuIO is a fully integrated solution, providing MCU and Bluetooth® radio in one chip, based on Dialog Semiconductor latest Bluetooth chip DA14683. The FLASH based device permits field or boot upgradable, while application is stored on FLASH memory. Projects and tutorials with source code can be found at https://www.bleuio.com/blog/?bleprojects
Bluetooth Low Energy (BLE) is one of the most widely applicable low-power connectivity standards. Its purpose is to connect devices over a fairly short range. BLE was developed with IoT applications in mind, which has special implications for its design.
Integration of Bluetooth technology within Embedded Systems facilitates an expansive range of Application Domains to support devices at various design levels. Engaging Bluetooth into an embedded system creates value in device capability for specific needs, via the implementation of Bluetooth Profiles that can help the data transfer between compatible devices. Recent introductions to Bluetooth LE Audio in the SMART phone market deliver revolutions in Bluetooth audio capability, enabling users to share audio from a single device to multiple wireless headsets.
Bluetooth Low Energy is used almost everywhere, which is one of its core strengths compared to other low-power networks. This is one of the reasons why everyone looking into BLE when designing their solutions. Because of the well-established name of Bluetooth Classic, BLE had an easier time gaining trust among developers. All these factors combined made it the obvious choice for many consumer IoT applications and much more.
On the other hand, Bluetooth Low Energy is constantly being developed and perfected to meet the most current demands of the market, therefore, it is one of the top choices for embedded system developers to integrate BLE in their solutions.
The BleuIO is Bluetooth low energy USB dongle that can be used in embedded system solutuions. Just use the AT Commands available on the device for faster development. The BleuIO is a fully integrated solution, providing MCU and Bluetooth® radio in one chip, based on Dialog Semiconductor latest Bluetooth chip DA14683. The FLASH based device permits field or boot upgradable, while application is stored on FLASH memory. Projects and tutorials with source code can be found at https://www.bleuio.com/blog/?bleprojects
Python has a lot of GUI frameworks, but Tkinter is the only framework that’s built into the Python standard library. Tkinter has several strengths. It’s cross-platform, so the same code works on Windows, macOS, and Linux. Visual elements are rendered using native operating system elements, so applications built with Tkinter look like they belong on the platform where they’re run.
Tkinter is lightweight and relatively painless to use compared to other frameworks. This makes it a compelling choice for building GUI applications in Python, especially for applications where a modern sheen is unnecessary, and the top priority is to quickly build something functional and cross-platform.
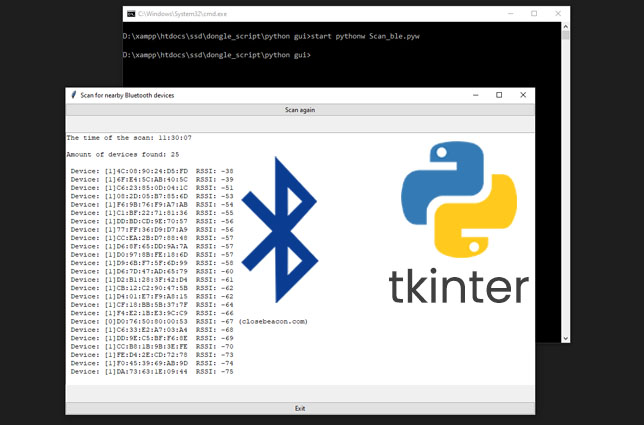
In this article, we will try to create a simple Python GUI application that can scan for nearby Bluetooth devices using Pyserial and shows the list on the screen.
Connect the BleuIO to your computer. The script uses pyserial to connect to the Bluetooth USB dongle BleuIO.
Update the script and write the correct COM port (line 25), where the dongle is connected.
After connecting to the dongle, we put the dongle into the central role using AT+CENTRAL so that it can scan for nearby Bluetooth devices.
Then we do a simple Gap scan using AT+GAPSCAN=3 command to scan for nearby Bluetooth devices for 3 seconds.
After that, we read the output from the serial port and filter the device to get the unique number of devices.
Then we add a timestamp when the scan was completed.
Finally, we sort the result by RSSI value before printing it out on screen.
‘Scan again’ button will do the whole process again.
Here is the final script file.
# Gjort av William
# 2022-06-16
# Smart Sensors Devices AB
#
# libraries that is necessary for tkinter to work
import tkinter as tk
from tkinter import  ttk

# this is imported for the dongle and also for the "time.sleep()" commands
import serial
import time

# this is the library that is uesd to check the current time
import datetime
now = datetime.datetime.now()

# this is what creates the main window
main_window = tk.Tk()

#changes the titel of the window
main_window.title('Scan for nearby Bluetooth devices')


# sets your port for the dongle
your_com_port = "COM18"
connecting_to_dongle = True

#changes the size of the screens window
window_width = 900
window_height = 500

# get the screen dimension
screen_width = main_window.winfo_screenwidth()
screen_height = main_window.winfo_screenheight()
# find the center point
center_x = int(screen_width/2 - window_width / 2)
center_y = int(screen_height/2 - window_height / 2)
# set the position of the window to the center of the screen
main_window.geometry(f'{window_width}x{window_height}+{center_x}+{center_y}')

# apply the grid layout
main_window.grid_columnconfigure(1, weight=1)
main_window.grid_rowconfigure(1, weight=1)


# create the text widget
text = tk.Text(main_window, height=30, width=30)
text.grid(row=1, column=1, sticky=tk.EW)


# this is the part of the code that communicates whit the dongle
print("Connecting to dongle...")
while connecting_to_dongle:
    try:
        console = serial.Serial(
            port=your_com_port,
            baudrate=57600,
            parity="N",
            stopbits=1,
            bytesize=8,
            timeout=0,
        )
        if console.is_open.__bool__():
            connecting_to_dongle = False
    except:
        print("Dongle not connected. Please reconnect Dongle.")
        time.sleep(5)
print("Connected to Dongle.")

console.write(str.encode("AT+CENTRAL"))
console.write("\r".encode())
print("Putting dongle in Central role.")
time.sleep(0.1)

console.write(str.encode("AT+GAPSCAN=3"))
console.write("\r".encode())
time.sleep(0.1)
print("Looking for nearby Bluetooth devices ...")
dongle_output2 = console.read(console.in_waiting)
time.sleep(3)
print("Scan Complete!")
filtered = []

for dev in dongle_output2.decode().splitlines():
    if len(dev)>20:
        filtered.append(dev.split(maxsplit=1)[1])

seen = set()
out = []
for elem in filtered:
    prefix = elem.split(' ')[1]
    if prefix not in seen:
        seen.add(prefix)
        out.append(elem)

# sort list
out.sort(key=lambda x:int(x.split()[3]), reverse=True)

# writes out the amount of bluetooth devices found on the main screen
text.insert('0.5', 'Amount of devices found: ' + str(len(out)) + '\n\n')

# funktion to get the current time
def get_time():
    return now.strftime('%H:%M:%S')

# prints out the time of the scan on the main screen
text.insert('1.0','The time of the scan: ' + str(get_time()) + '\n\n')

# writes out the results on the main screen
for i in range(0,len(out)):
    position = f'{i+5}.{len(out[i])}'
    tempStr = out[i] + "\n"
    text.insert(position,f' {tempStr}')

# is supposed to delet everyting on the list
out.clear()

#the funktion for the scan button
def button_clicked():
    # enables the programe to change the results on the main screen to the new ones after the user presses the scan button
    text['state'] = 'normal'
    # update the current time.
    now = datetime.datetime.now()
    # funktion to get the current time
    def get_time():
        return now.strftime('%H:%M:%S')
    # this simply puts a emty row betwen the results and the rest of the output on kommandotolken
    print()
    # this delets the previous output that is on the main screen
    text.delete('0.0', tk.END)

    # this is the part of the code that communicates whit the dongle
    console.write(str.encode("AT+GAPSCAN=3"))
    console.write("\r".encode())
    time.sleep(0.1)

    dongle_output2 = console.read(console.in_waiting)
    time.sleep(3)
    filtered = []

    for dev in dongle_output2.decode().splitlines():
        if len(dev)>20:
            filtered.append(dev.split(maxsplit=1)[1])

    seen = set()
    out = []
    for elem in filtered:
        prefix = elem.split(' ')[1]
        if prefix not in seen:
            seen.add(prefix)
            out.append(elem)

    # sort list
    out.sort(key=lambda x:int(x.split()[3]), reverse=True)


    #writes out the time of the scan on the main screen
    text.insert('1.0','The time of the scan: ' + str(get_time()) + '\n\n')

     # writes out the amount of bluetooth devices found on the main screen
    text.insert('0.0', 'Amount of devices found: ' + str(len(out)) + '\n\n')

    # writes out the results on the main screen
    for i in range(0,len(out)):
        position = f'{i+5}.{len(out[i])}'
        tempStr = out[i] + "\n"
        text.insert(position,f' {tempStr}')

    # makes it so that you cant edite the results on the main screen
    text['state'] = 'disabled'

#what calls the function for the scan button. also fixes what the user will see as the buttons name.
main_button = ttk.Button(
    main_window,
    text='Scan again',
    command=lambda: button_clicked()
)
# creat the scan button
main_button.grid(row=0, column=1, sticky=tk.EW)

# just an exit button.
exit_button = ttk.Button(
    main_window,
    text='Exit',
    command=lambda: main_window.quit()
)
# this determens were the exit button is located
exit_button.grid(row=2, column=1, sticky=tk.EW)

# makes it so that you cant edite the results on the main screen
text['state'] = 'disabled'

# keeps the main window open
main_window.mainloop()

time.sleep(1)
console.close()
Source code is available at https://github.com/smart-sensor-devices-ab/python_gui_tkinter_bluetooth.git
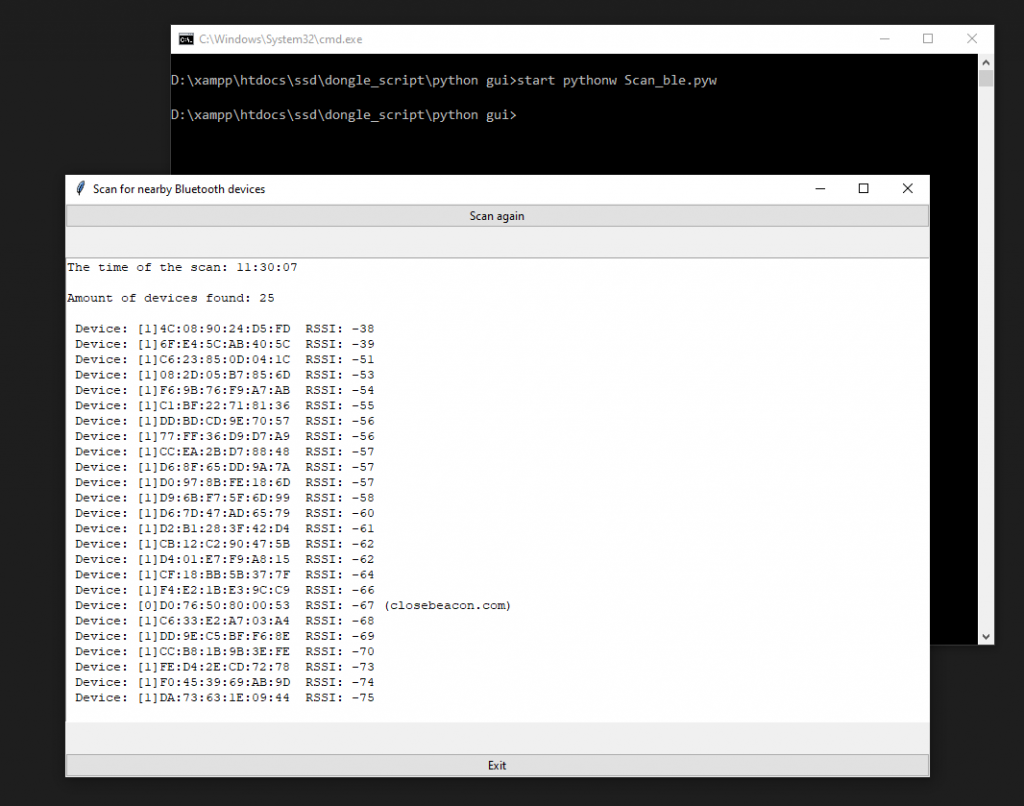
Run the script
To run the script we use start
pythonw Scan_ble.pyw
Note : Scan_ble.pyw is the file name
Output
After running the script, we see a total 25 devices found nearby. We can scan again using the ‘Scan again’ button
Bluetooth Low Energy (BLE) is a low-power wireless technology used for connecting devices with each other. It is a popular communication method, especially in the era of the Internet of Things. Several devices around the house have a built-in Bluetooth transceiver and most of them provide useful capabilities to automate jobs. For that reason, it is really interesting to create a desktop application using C# that connects to the devices around the house and manages them.
In this example, we are going to create a simple C# windows form application that scans and shows a list of nearby Bluetooth devices.
Let’s start
As a first step let’s create a new project in visual studio and select C# windows form application from the list.
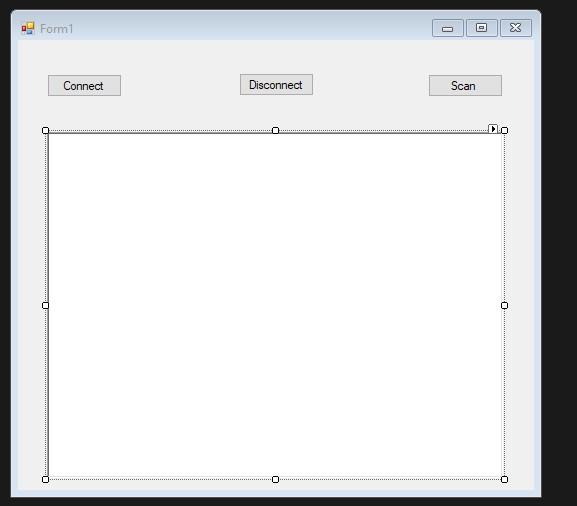
Choose a suitable name for your project. Once the project is created, we will see a blank form screen where we will add buttons and labels to communicate with BleuIO graphically through the serial port.
We will have buttons that connect and disconnects from the dongle. We create a button called Scan. And a text area will display a list of Bluetooth devices. The form will look like this
The .cs file associated to this will have the following code. Source code is available at https://github.com/smart-sensor-devices-ab/c-sharp-scan-bluetooth-device.git
using System;
using System.IO.Ports;
using System.Linq;
using System.Text;
using System.Windows.Forms;

namespace Scan_BLE_devices
{
    public partial class Form1 : Form
    {
        SerialPort mySerialPort = new SerialPort("COM18", 57600, Parity.None, 8, StopBits.One);
        public Form1()
        {
            InitializeComponent();
            mySerialPort.DataReceived += new SerialDataReceivedEventHandler(mySerialPort_DataReceived);
            mySerialPort.Open();

        }

        //print response from the dongle
        private void mySerialPort_DataReceived(object sender, SerialDataReceivedEventArgs e)
        {
            SerialPort sp = (SerialPort)sender;
            string s = sp.ReadExisting();
            output_data.Invoke(new EventHandler(delegate { output_data.Text += s + "\r\n"; }));
            //lbl_output.Invoke(this.myDelegate, new Object[] { s });
        }


        private void Form1_Load(object sender, EventArgs e)
        {

        }

        private void btn_disconnect_Click_1(object sender, EventArgs e)
        {
            mySerialPort.Close();
            Environment.Exit(0);
        }

        private void button1_Click_1(object sender, EventArgs e)
        {
            lbl_test.Text = "Connected";
        }

        private void submit_cmd_Click_1(object sender, EventArgs e)
        {
            output_data.Text = "";
            byte[] bytes = Encoding.UTF8.GetBytes("AT+CENTRAL");
            var inputByte = new byte[] { 13 };
            bytes = bytes.Concat(inputByte).ToArray();
            mySerialPort.Write(bytes, 0, bytes.Length);

            System.Threading.Thread.Sleep(1000);
            output_data.Text = "";
            byte[] bytes2 = Encoding.UTF8.GetBytes("AT+GAPSCAN=3");
            var inputByte2 = new byte[] { 13 };
            bytes2 = bytes2.Concat(inputByte2).ToArray();
            mySerialPort.Write(bytes2, 0, bytes2.Length);
            //System.Threading.Thread.Sleep(3000);
        }

        private void output_data_TextChanged(object sender, EventArgs e)
        {

        }
    }
}
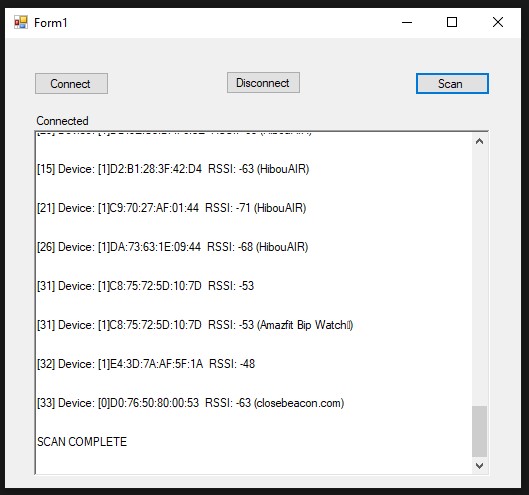
As you can notice I wrote COM18 to connect to serial port because BleuIO device on my computer is connected to COM18. You can check your COM port from device manager. Lets run the project and click on connect button.
Once we are connected to BlueIO dongle through serial port, we will be able to scan for nearby Bluetooth device. Clicking on Scan button will show a list of nearby Bluetooth device on the screen.