Introducing BleuIO Firmware v2.7.4: Enhanced Scanning Capabilities

We are thrilled to announce the release of the latest firmware update for our popular Bluetooth Low Energy USB dongle, BleuIO. With version 2.7.4, we continue our commitment to providing the most versatile and user-friendly BLE solutions for developers. This update brings a host of new features designed to simplify and enhance your BLE application development process.

What’s New in Firmware v2.7.4?

Enhanced Scanning Functionality

In our ongoing effort to provide comprehensive BLE solutions, we’ve added several new commands that significantly improve the scanning capabilities of the BleuIO dongle. These updates allow developers to have more control over their BLE environment and extract more detailed information from nearby devices.

1. Device Name and Manufacturer Specific ID in Scan Results

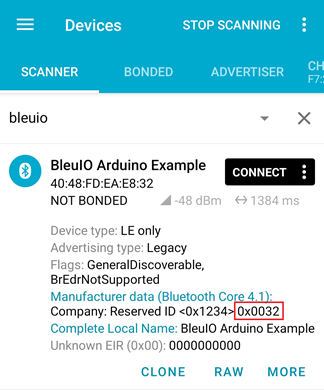
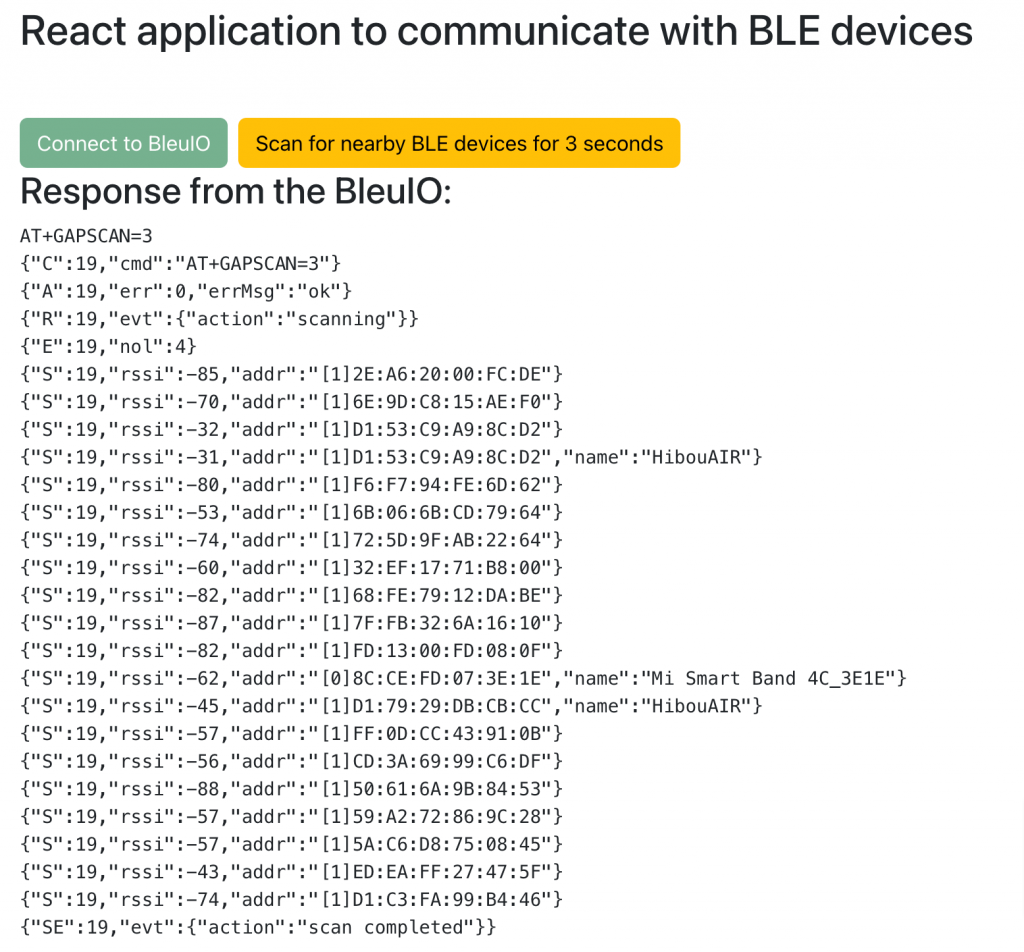
The new firmware includes commands that enable the display of device names and manufacturer-specific IDs (Company IDs) in the advertising data or scan response. This feature is applicable to all modes of scans, including AT+GAPSCAN, AT+FINDSCANDATA, and AT+SCANTARGET. With these enhancements, identifying and differentiating between devices becomes more straightforward and efficient.

ATASSN: Toggle showing device names on or off in scans using AT+FINDSCANDATA and AT+SCANTARGET.

ATASSM: Toggle showing manufacturer-specific IDs on or off in scans using AT+GAPSCAN, AT+FINDSCANDATA, and AT+SCANTARGET.

2. Customizable Scan Interval and Scan Window

To provide more flexibility during connections, we’ve introduced a command to set the scan interval and scan window parameters. This feature ensures that you can fine-tune your scanning behavior to match the specific needs of your application, optimizing both power consumption and performance.

AT+CONNSCANPARAM: Set the scan interval and scan window used in connections.

3. Comprehensive Scan Parameter Configuration

We’ve also added a command to configure various scan parameters, allowing you to tailor the scanning process to your precise requirements. This includes settings for scan mode, scan type, scan interval, scan window, and filter duplicates, applicable across all scanning commands.

AT+SCANPARAM: Set scan parameters for AT+GAPSCAN, AT+FINDSCANDATA, and AT+SCANTARGET.

Benefits of the New Features

These enhancements are designed to offer several key benefits:

Improved Device Identification: Easily identify devices by their names and manufacturer IDs, making it simpler to manage and interact with multiple BLE devices.

Customizable Performance: Adjust scan intervals and windows to optimize for either speed or power efficiency based on your application’s needs.

Greater Control: Fine-tune scanning parameters to ensure you capture the most relevant data, minimizing noise and maximizing the efficiency of your BLE operations.

How to Update

Updating your BleuIO dongle to firmware version 2.7.4 is straightforward. Simply follow the instructions provided in our firmware update guide.

Get Started with the New Commands

To help you get started with the new features, we’ve updated our AT command reference guide with detailed explanations and examples for each of the new commands.

Share this post on :

Integrating BleuIO with Adafruit Feather RP2040 for Seamless BLE Applications (noise sensor) : Part 4

Introduction

This example is going to showcase how to connect a PDM MEMS Microphone to a Adafruit Feather RP2040, together with a BlueIO to create a background noise sensor that measures and advertisises the current sound level in decibel (dB).
This example is very similar to Integrating BleuIO with Adafruit Feather RP2040 for Seamless BLE Applications Part 2 but instead of reading sensor data over SPI every few seconds, we’re using the arduino PDM interface to continuously fill a buffer with data then everytime the buffer is full we’re going to translate the data into the current sound level in dB.
The buffer size of 8000 bytes (2 bytes per sample) and the sample rate of 16kHz means we record 250ms each time we fill the buffer.

Requirements

Connecting PDM Microphone.

  • Connect four wires from the PDM Microphone (3V, GND, DAT, CLK) to the following pins on the Feather Board:
  • 3V to 3.3V to power the device, then GND to GND.

  • And CLK to SCL, and DAT to SDA.

Running the example

  • Make sure the BleuIO Dongle is connected to the Feather RP2040 Board.
  • Connect the Feather RP2040 Board to your computer using the USB cable.
  • Make sure the Feather RP2040 Board is selected as well as the correct COM port in the drop-down menu.
  • (Optional) Change the frequency the advertising message is updated with the dB value, in the code
    // How often we update the advertising message (in seconds) #define READ_UPDATE_FREQUENCY 1
  • Click the Upload button.
  • Done! The dongle should now be advertising the sensor values. (If you just plugged in the Feather it may take about 10 seconds before advertising starts as the BleuIO bootloader opens and closes)
  • (Optional) Open Serial Monitor. You can open the Serial Monitor from the menu: Tools>Serial Monitor
    You should now see the output from the project.

Scanning the results

To see the results you can use any BLE scanner app.
Here we use nRF Connect:


The data in the red box is our sensor values:
0x0032

When we parse the hex into decimal values we get:
0x0032 = 50 dB

Share this post on :

BleuIO Firmware Update v2.7.3: Enhancing Connectivity and Usability

The latest firmware update for BleuIO, version 2.7.3, brings a suite of new functionalities and commands designed to enhance the performance and user experience of this Bluetooth Low Energy (BLE) USB dongle. With continuous firmware updates, BleuIO ensures that users can develop BLE applications quickly and efficiently. Here’s a detailed look at what the new update offers:

New Functionalities in v2.7.3

  1. Bonded Device Connectivity Improvement:
    • A new command has been introduced to scan for and connect to bonded devices, even if these devices are using a Private Random Resolvable Address. This improvement ensures that devices can maintain secure connections and improve overall reliability in various use cases.
  2. Toggle Resolved Addresses in Scan Results:
    • Users now have the option to toggle on or off the display of resolved addresses in scan results. This feature can be activated when using the AT+GAPSCAN command, providing greater control over the information displayed during device scans.
  3. Index-based Connection Command:
    • The AT+GAPCONNECT command has been enhanced to allow the use of an index from scan results obtained via the AT+GAPSCAN command. This simplifies the connection process by removing the need to input the full MAC address.
  4. Verbose Mode Index Display:
    • A new command allows users to toggle on or off the display of indexes from AT+GAPSCAN scan results in verbose mode. This feature is particularly useful for developers who need detailed scan information for debugging and development purposes.

New Commands Added

  1. AT+CONNECTBOND:
    • This command facilitates connection with already bonded devices, even if these devices are advertising using a Private Random Resolvable Address. It streamlines the reconnection process and enhances device management.
  2. ATSRA:
    • This command enables the display of resolved addresses in the scan results. It is a useful tool for users who need to view detailed addressing information during device scans.
  3. ATSIV:
    • This command allows users to show indexes in the verbose mode scan results. It provides an additional layer of information that can be crucial for in-depth analysis and debugging.

The v2.7.3 firmware update for BleuIO brings significant enhancements that improve both connectivity and usability. By adding new commands and functionalities, BleuIO continues to support developers in creating robust and efficient BLE applications. Whether you’re working on a new project or maintaining an existing application, these updates offer valuable tools and improvements to streamline your development process.

The new firmware can be downloaded from our getting started guide.

Share this post on :

Building a BLE Application with ReactJS and BleuIO

In this tutorial, we’ll explore how to create a Bluetooth Low Energy (BLE) application using ReactJS and the BleuIO BLE USB dongle. BleuIO is a versatile BLE device that makes developing BLE applications fast and easy with its user-friendly AT commands.

Introduction

Bluetooth Low Energy (BLE) technology is widely used for short-range communication, particularly in IoT applications. BleuIO, with its easy-to-use AT commands, simplifies the process of integrating BLE functionality into your applications. In this tutorial, we’ll demonstrate how to create a BLE application using ReactJS. Specifically, we will show you how to scan for nearby BLE devices for three seconds and display the results on the screen, highlighting the capabilities of BleuIO.

Prerequisites

Before we start, make sure you have the following:

  • A BleuIO USB dongle
  • A computer with a Chromium-based browser (like Chrome or Edge)
  • Node.js and npm installed
  • Basic knowledge of ReactJS

Setting Up the Project

First, let’s create a new React project. If you haven’t already installed create-react-app, you can do so with the following command:

npx create-react-app ble-react-app
cd ble-react-app
npm start

This will create a new React application and start the development server.

Creating the Serial Port Component

We’ll create a component to handle the serial port communication with the BleuIO dongle. Create a new file called SerialPortComponent.js in the src directory and add the following code:

import React, { useState, useEffect } from 'react';

const SerialPortComponent = () => {
const [port, setPort] = useState(null);
const [output, setOutput] = useState('');
const [reader, setReader] = useState(null);
const [writer, setWriter] = useState(null);

const connectToSerialPort = async () => {
try {
// Request a port and open a connection.
const selectedPort = await navigator.serial.requestPort();
await selectedPort.open({ baudRate: 9600 });
setPort(selectedPort);

const textDecoder = new TextDecoderStream();
const readableStreamClosed = selectedPort.readable.pipeTo(
textDecoder.writable
);
const reader = textDecoder.readable.getReader();
setReader(reader);

const textEncoder = new TextEncoderStream();
const writableStreamClosed = textEncoder.readable.pipeTo(
selectedPort.writable
);
const writer = textEncoder.writable.getWriter();
setWriter(writer);

// Read data from the serial port.
readSerialData(reader);
} catch (error) {
console.error('There was an error opening the serial port:', error);
}
};

const readSerialData = async (reader) => {
try {
while (true) {
const { value, done } = await reader.read();
if (done) {
// Allow the serial port to be closed later.
reader.releaseLock();
break;
}
// Convert the received data to a string and update the state.
setOutput((prevOutput) => prevOutput + value);
}
} catch (error) {
console.error('Error reading from the serial port:', error);
}
};

const writeToSerialPort = async () => {
setOutput('');
try {
if (writer) {
// Send AT+CENTRAL command
await writer.write('AT+CENTRAL\r');
setOutput((prevOutput) => prevOutput + 'AT+CENTRAL\r\n');

// Wait for a short while to ensure the command is processed
await new Promise((resolve) => setTimeout(resolve, 500));

// Send AT+GAPSCAN=3 command
await writer.write('AT+GAPSCAN=3\r');
setOutput((prevOutput) => prevOutput + 'AT+GAPSCAN=3\r\n');

// Wait for scan to complete and read response
await new Promise((resolve) => setTimeout(resolve, 3000));

// Read and process data from the serial port
let scanData = '';
while (true) {
const { value, done } = await reader.read();
if (done) {
break;
}
scanData += value;
}
setOutput((prevOutput) => prevOutput + scanData);
} else {
console.error('Writer not available');
}
} catch (error) {
console.error('Error writing to the serial port:', error);
}
};

useEffect(() => {
return () => {
// Cleanup function to close port when component unmounts
if (port) {
port.close();
}
if (reader) {
reader.releaseLock();
}
if (writer) {
writer.releaseLock();
}
};
}, [port, reader, writer]);

return (
<div className="mt-5">
<button
className="btn btn-success me-2"
onClick={connectToSerialPort}
disabled={!!port}
>
Connect to BleuIO
</button>
<button
className="btn btn-warning me-2"
onClick={writeToSerialPort}
disabled={!writer}
>
Scan for nearby BLE devices for 3 seconds
</button>

{output && (
<div>
<h3>Response from the BleuIO:</h3> <pre>{output}</pre>
</div>
)}
</div>
);
};

export default SerialPortComponent;

Explanation of the Code

  1. Connecting to the Serial Port: The connectToSerialPort function requests access to the serial port and opens a connection. It initializes the text encoder and decoder streams for reading and writing data.
  2. Reading Serial Data: The readSerialData function reads data from the serial port continuously and updates the output state with the received data.
  3. Writing to the Serial Port: The writeToSerialPort function sends AT commands to the serial port. It first sends the AT+CENTRAL command to put the device in central mode, then sends the AT+GAPSCAN=3 command to scan for nearby BLE devices for 3 seconds. It reads and displays the response from the serial port after the scan completes.
  4. Cleanup: The useEffect hook ensures that the serial port is properly closed and resources are released when the component is unmounted.

Using the Component in Your App

Update your App.js to include the new SerialPortComponent.

// src/App.js
import React from 'react';
import SerialPortComponent from './SerialPortComponent';

function App() {
return (
<div className="App">
<header className="App-header">
<h1>BLE Application with React and BleuIO</h1>
<SerialPortComponent />
</header>
</div>
);
}

export default App;

Running the Application

Make sure your BleuIO USB dongle is connected to your computer. Start your React application:

npm start

Open your browser and navigate to http://localhost:3000. You should see the application with two buttons: “Connect to BleuIO” and “Scan for nearby BLE devices for 3 seconds“.

  • Connect to BleuIO: Click this button to connect to the BleuIO USB dongle. The browser will prompt you to select the serial port.
  • Scan for nearby BLE devices for 3 seconds: After connecting, click this button to send the AT+CENTRAL and AT+GAPSCAN=3 commands to the BleuIO dongle. The output area will display the response from the device.

Output

In this tutorial, we’ve demonstrated a basic usage of BleuIO AT commands by creating a BLE application using ReactJS and the BleuIO USB dongle. By leveraging the Web Serial API and the straightforward AT commands provided by BleuIO, you can quickly develop BLE applications that run on any platform. You can expand on this example to develop your own applications using BleuIO’s comprehensive set of AT commands. Read more about the AT commands in our documentation.

BleuIO simplifies BLE development and, combined with the popularity and versatility of ReactJS, allows developers to create powerful and cross-platform BLE applications with ease. Whether you’re building IoT devices, wearable tech, or any BLE-enabled application, BleuIO is a reliable and efficient choice.

Share this post on :