At BleuIO, we aim to provide versatile, easy-to-use Bluetooth Low Energy (BLE) solutions that can run across a wide range of platforms. Today, we’re excited to showcase a new environment where BleuIO works perfectly: the CoreMP135 from M5Stack Technology Co., Ltd.
We tested running our BLE sniffer script on this compact Linux industrial controller — and it worked seamlessly.
You can find the BleuIO Pro USB Dongle available for purchase here on DigiKey.
About CoreMP135
The CoreMP135 is a highly integrated Linux-based industrial control host powered by the STM32MP135DAE7 chip. It features a single-core ARM Cortex-A7 processor running at up to 1 GHz and is equipped with 4Gb (512MB) of DDR3L SDRAM.
Key highlights include:
Dual Gigabit Ethernet interfaces
USB 2.0-A and USB-C ports
CAN FD, RS485, and Grove I2C/UART connectivity
2.0-inch IPS capacitive touchscreen
1W speaker for audio output
Low-power design with a built-in RTC and rechargeable battery support
Pre-installed Debian Linux system on MicroSD — ready for development right out of the box
DIN rail mounting support for industrial installations
You can find the CoreMP135 available for purchase here on DigiKey.
Running BleuIO on CoreMP135
Using one of the CoreMP135’s USB ports, we connected the BleuIO dongle. After installing Python and the required libraries, the device immediately recognized BleuIO as a USB serial device.
We ran our BLE sniffer script without any issues.
Steps to Setup:
Plug the BleuIO dongle into one of the USB-A ports.
It’s lightweight, fast, and ideal for quick deployments or prototyping BLE-based solutions.
Output
Use Cases: Why Run BleuIO on CoreMP135?
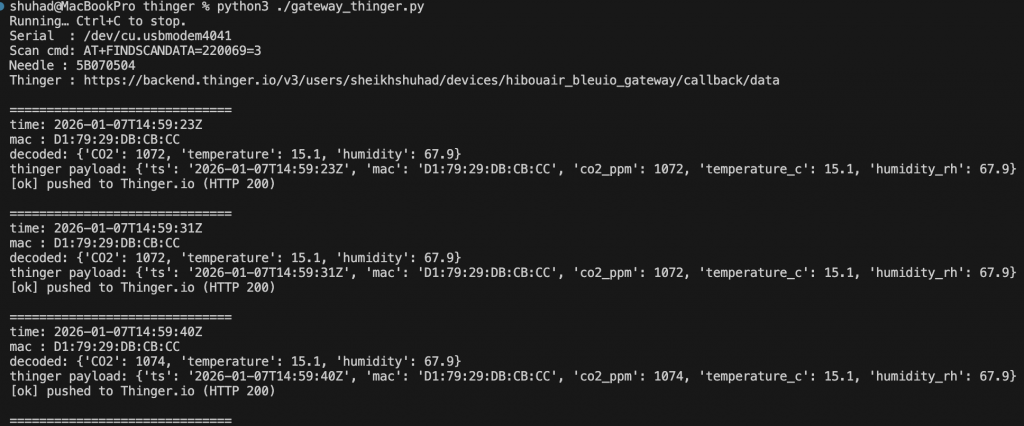
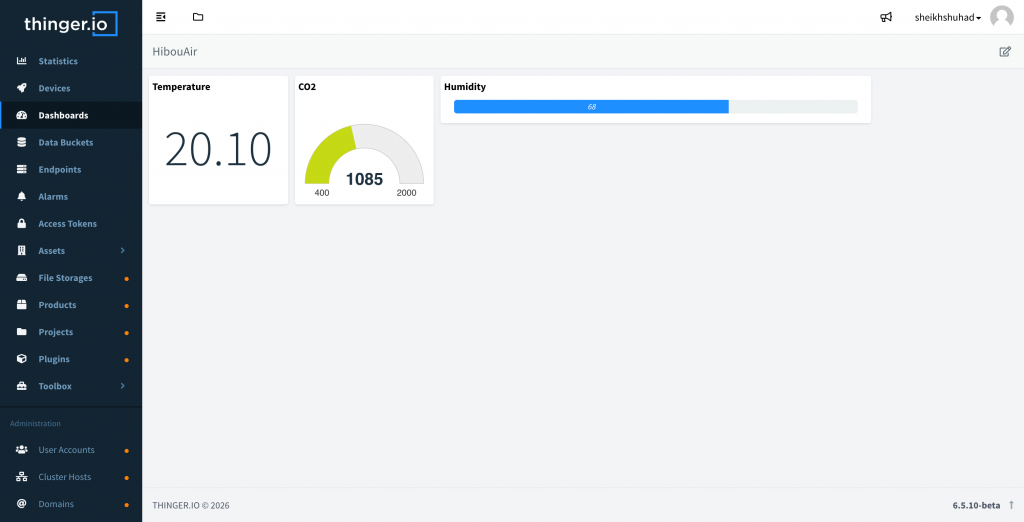
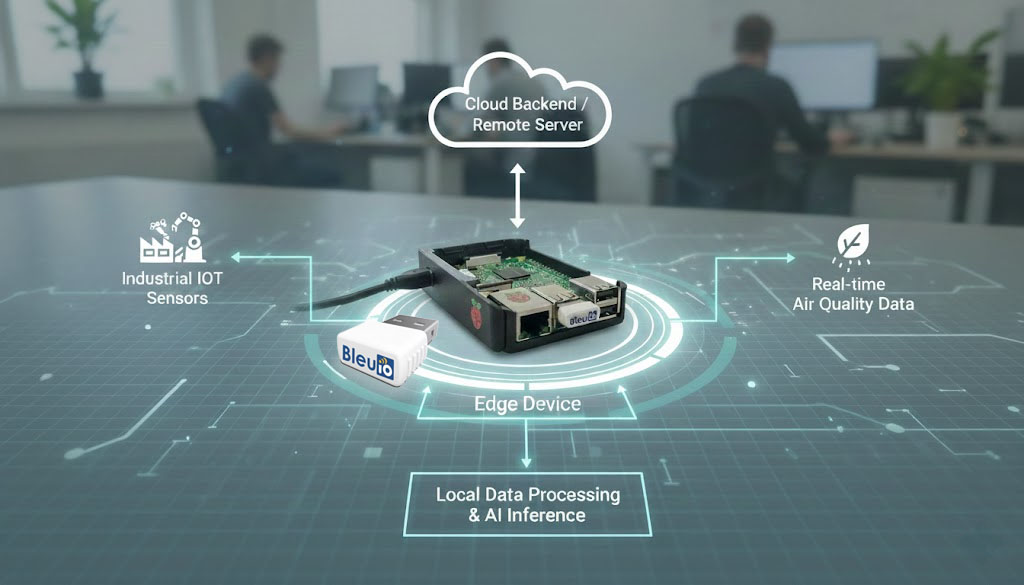
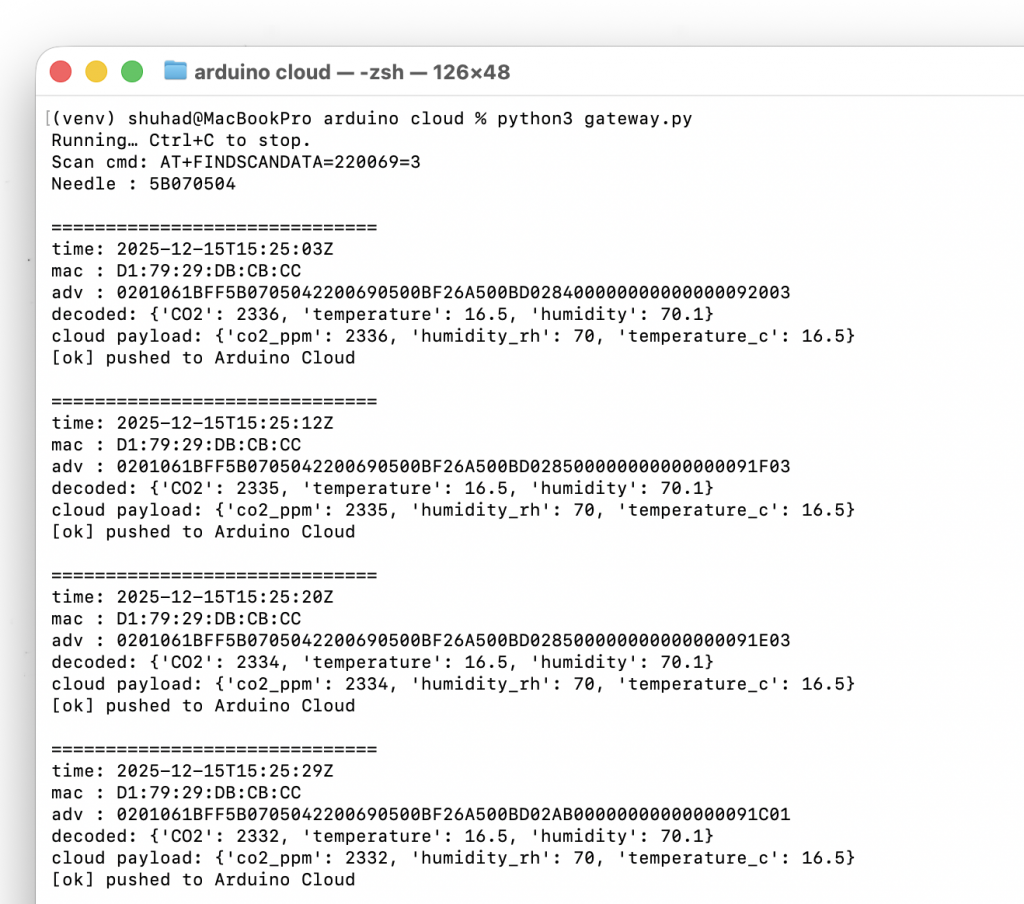
Pairing BleuIO with the CoreMP135 opens up a range of practical applications across industries. In industrial environments, the setup can be used for continuous BLE monitoring, where devices like temperature or air quality sensors broadcast data that can be captured and logged locally. With its dual Gigabit Ethernet ports and USB connectivity, CoreMP135 serves well as a lightweight BLE-to-cloud gateway, collecting data from nearby BLE devices and forwarding it to cloud platforms for further analysis or real-time dashboards.
This setup also proves valuable for conducting Bluetooth security audits, allowing developers and testers to passively capture BLE advertisements and analyze potential vulnerabilities in connected devices such as wearables, beacons, or smart home equipment. For IoT developers, it provides a rapid prototyping platform where BLE applications can be built and tested without needing bulky workstations or cloud servers. And in the smart home space, CoreMP135 can act as a local BLE hub that listens for sensor data—such as motion, humidity, or presence—then triggers automation workflows through integrated edge logic.
The CoreMP135 from M5Stack is a powerful, compact Linux host, perfect for running BleuIO-based applications. This platform proves that BleuIO can operate smoothly not just on desktops or laptops, but also on rugged, embedded, and industrial devices.
Whether you’re building a smart factory solution, a BLE gateway, or simply experimenting with Bluetooth technology, the combination of BleuIO and CoreMP135 provides flexibility, reliability, and ease of deployment.
Controlling your computer wirelessly might sound complex — but with the power of Bluetooth Low Energy (BLE) and the BleuIO dongle, it’s surprisingly simple. In this guide, we’ll walk through a creative example where you can control the brightness of your Windows PC using BLE commands sent from your mobile phone using BLE app.
What This Project Does
Using a BleuIO dongle connected to a Windows PC, we enable BLE communication using the Serial Port Service (SPS). When a BLE-enabled phone connects to the dongle and sends a value (from 1 to 10), the PC receives this data and adjusts its screen brightness accordingly — all in real-time.
It’s a simple and powerful demonstration of BLE-to-system integration, and it’s only the beginning of what’s possible with BleuIO.
This project uses the BleuIO dongle in SPS Server mode, which allows it to receive data over Bluetooth Low Energy (BLE) from a connected device — in our case, a smartphone using the nRF Connect app.
Here’s a breakdown of how everything works together:
Initialize the Dongle on the PC ( SPS)
When you run the Python script on Windows, it sends the following commands to the BleuIO dongle via serial:
AT+ADVSTART → Starts advertising the dongle so it becomes discoverable over BLE.
Connect to BleuIO from Your Phone (Using nRF Connect)
On your mobile device, open the nRF Connect app:
Tap “Scan” and look for a device named “BleuIO”
Tap “Connect” to establish a BLE connection
Once connected, you’ll see a list of services and characteristics provided by the BleuIO dongle.
Identify the Correct BLE Characteristic to Send Data
In the attribute table:
Look for a writable characteristic under one of the unknown services.
You’ll often see one with the following properties:
Write Without Response
(Optionally also Notify)
The UUID will look like: 0783B03E-8535-B5A0-7140-A304D2495CBA
Send the SPS Command from the App
Now that you’re connected and have found the correct characteristic:
Tap the write icon (↥) on that characteristic
Choose “UTF-8 string” as the format (not hex!)
In the message field, enter something like: AT+SPSSEND=5
Tap “Send”
This sends a Bluetooth message to the BleuIO dongle, which forwards it via the SPS protocol to the Python script on your PC.
Python Script Reads and Acts on the Message
On the PC, the Python script reads the incoming SPS message and extracts the number from the AT+SPSSEND= command. It then adjusts your screen brightness using the screen-brightness-control library.
For example:
Sending AT+SPSSEND=1 → brightness set to 10%
Sending AT+SPSSEND=5 → brightness set to 50%
Sending AT+SPSSEND=10 → brightness set to 100%
Repeating
You can send new values anytime while connected — and your computer will respond instantly by updating the brightness accordingly.
Full Python Script
Here’s the script used in the project:
import serial
import time
import screen_brightness_control as sbc
BLEU_IO_PORT = "COM4" # Update this to match your BleuIO COM port
BAUD_RATE = 9600
def set_brightness(level):
brightness = int(max(10, min(100, level * 10)))
try:
sbc.set_brightness(brightness)
print(f"Brightness set to {brightness}%")
except Exception as e:
print(f"Failed to set brightness: {e}")
def setup_bleuio(ser):
commands = [
b'AT+SPS=1\r\n',
b'AT+ADVSTART\r\n'
]
for cmd in commands:
ser.write(cmd)
time.sleep(0.5)
print("BleuIO is in Peripheral + SPS mode, now advertising...")
def read_message(ser):
buffer = ""
while True:
if ser.in_waiting:
data = ser.read(ser.in_waiting).decode("utf-8", errors="ignore")
buffer += data
while "\r\n" in buffer:
line, buffer = buffer.split("\r\n", 1)
yield line.strip()
else:
time.sleep(0.1)
def process_message(msg):
if not msg or msg.startswith("AT+") or "Invalid" in msg or "CONNECTED" in msg or "ADVERTISING" in msg:
return
print(f"Received message: '{msg}'")
try:
if "=" in msg:
_, value = msg.split("=", 1)
else:
value = msg
val = int(value.strip())
if 1 <= val <= 10:
set_brightness(val)
else:
print("Value out of range (1–10)")
except ValueError:
print("Invalid message format")
def main():
try:
with serial.Serial(BLEU_IO_PORT, BAUD_RATE, timeout=1) as ser:
setup_bleuio(ser)
print("Waiting for BLE messages via SPS from your phone...")
for msg in read_message(ser):
process_message(msg)
except serial.SerialException as e:
print(f"Serial error: {e}")
except KeyboardInterrupt:
print("Exiting...")
if __name__ == "__main__":
main()
What is SPS on BleuIO?
SPS stands for Serial Port Service, a custom BLE profile supported by BleuIO to send and receive data like a UART over BLE.
Key SPS AT Commands:
AT+SPSSEND=message → Sends data via BLE from client to host or vice versa
In our case, the mobile phone is the BLE client sending data to BleuIO, which is the peripheral/server.
Use Cases & Future Ideas
This project is just the beginning! Here are more ways to expand on it:
Control volume using BLE
Send commands to launch apps or toggle Wi-Fi
Build a BLE-based authentication system for login or locking/unlocking the screen
Lock/sleep windows computer
Controlling your computer via Bluetooth from a phone is now as easy as a few lines of Python and a BLE dongle like BleuIO. This project is a great foundation for building more interactive, wireless automation solutions — from IoT control panels to personal smart systems.
Bluetooth is commonly used in many products — from smartwatches and fitness trackers to wireless speakers, beacons, air quality sensors, and beyond. As developers, engineers, or even curious tech enthusiasts, we often would like to analyze what is being transmitted in the air interface between devices.
That’s where a Bluetooth sniffer comes into play.
What is a Bluetooth Sniffer?
A Bluetooth sniffer is a hardware or software tool that captures and monitors Bluetooth communication between devices. Think of it as a network traffic analyzer, but for Bluetooth instead of Wi-Fi or Ethernet.
It works by listening to Bluetooth advertisement packets or data exchanges, decoding them, and presenting the raw data in a human-readable format. These sniffers can help you:
Discover nearby Bluetooth Low Energy (BLE) devices
Monitor BLE advertisement packets
Analyze signal strength (RSSI)
Debug BLE applications
Reverse engineer custom BLE services
There are high-end Bluetooth sniffers on the market — like those from Ellisys or Teledyne LeCroy — which are powerful but often cost hundreds or thousands of dollars.
But what if you could build your own for under $30?
BleuIO – BLE USB Dongle
BleuIO is a compact USB dongle that turns your computer into a Bluetooth Low Energy sniffer and data communication tool. It’s built on Dialog Semiconductor’s DA14683 chip and supports AT command communication over a virtual COM port.
You can plug it into any USB port and control it using a terminal or a script.
Price:$24.99 Platform support: Windows, macOS, Linux Protocols supported: Bluetooth Low Energy (BLE) Programming Language Support: Supports almost all major programming languages including C++, C#, Python, Javascript etc
Plug the dongle into a USB port. On Windows, it’ll appear as something like COM3. On macOS/Linux, it will show up as /dev/tty.usbmodemXXXX or /dev/ttyACM0.
Step 3: Write the BLE Sniffer Script
import serial
import time
import re
from bluetooth_numbers import company
import binascii
# Replace with your actual serial port
#SERIAL_PORT = 'COM3' # Windows
SERIAL_PORT = '/dev/cu.usbmodem4048FDE52DAF1' # For Linux/macOS
BAUD_RATE = 9600
def scan_devices(duration=3):
device_list = []
try:
with serial.Serial(SERIAL_PORT, BAUD_RATE, timeout=1) as ser:
ser.write(f'AT+DUAL\r\n'.encode())
print(f"\nStarting BLE scan for {duration} seconds...\n")
ser.write(f'AT+GAPSCAN={duration}\r\n'.encode())
time.sleep(duration + 1)
print("Discovered Devices:\n" + "-"*50)
while ser.in_waiting:
line = ser.readline().decode('utf-8', errors='ignore').strip()
print(">>", line)
match = re.match(r"\[\d+\] Device: \[(\d)\]([0-9A-F:]{17})\s+RSSI:\s*-?\d+(?:\s+\((.+?)\))?", line)
if match:
addr_type = int(match.group(1))
mac = match.group(2)
name = match.group(3) if match.group(3) else ""
device_list.append((addr_type, mac, name))
return device_list
except serial.SerialException as e:
print("Serial error:", e)
return []
def scan_target_device(mac_address, address_type=1, duration=3):
try:
with serial.Serial(SERIAL_PORT, BAUD_RATE, timeout=1) as ser:
print(f"\nScanning target device {mac_address} (Type: {address_type}) for {duration} seconds...\n")
cmd = f'AT+SCANTARGET=[{address_type}]{mac_address}={duration}\r\n'
ser.write(cmd.encode())
time.sleep(duration + 1)
print("Advertisement Data:\n" + "-"*50)
adv_data = None
while ser.in_waiting:
line = ser.readline().decode('utf-8', errors='ignore').strip()
print(">>", line)
if "Device Data [ADV]:" in line and adv_data is None:
parts = line.split("Device Data [ADV]:")
if len(parts) == 2:
adv_data = parts[1].strip()
if adv_data:
print("\nDecoding Advertisement Payload...\n")
decode_ble_adv(adv_data)
else:
print("No ADV data found to decode.")
except serial.SerialException as e:
print("Serial error:", e)
AD_TYPE_NAMES = {
0x01: "Flags",
0x02: "Incomplete 16-bit UUIDs",
0x03: "Complete 16-bit UUIDs",
0x08: "Shortened Local Name",
0x09: "Complete Local Name",
0x0A: "TX Power Level",
0x16: "Service Data",
0xFF: "Manufacturer Specific Data"
}
# Flag bit definitions
FLAGS_MAP = {
0x01: "LE Limited Discoverable Mode",
0x02: "LE General Discoverable Mode",
0x04: "BR/EDR Not Supported",
0x08: "Simultaneous LE and BR/EDR (Controller)",
0x10: "Simultaneous LE and BR/EDR (Host)"
}
def decode_ble_adv(hex_str):
data = bytearray.fromhex(hex_str)
index = 0
object_count = 1
print(f"Decoding ADV Data: {hex_str}\n{'-'*50}")
while index < len(data):
length = data[index]
if length == 0 or (index + length >= len(data)):
break
ad_type = data[index + 1]
ad_data = data[index + 2: index + 1 + length]
type_name = AD_TYPE_NAMES.get(ad_type, f"UNKNOWN")
print(f"\nData Object {object_count}:")
print(f"Length: {length}")
print(f"Type: 0x{ad_type:02X} ({type_name})")
if ad_type == 0x01: # Flags
flags = ad_data[0]
print("Flags:")
for bit, label in FLAGS_MAP.items():
if flags & bit:
print(f" - {label}")
print("Device Type Inferred:", end=" ")
if flags & 0x04:
print("LE Only")
elif flags & (0x08 | 0x10):
print("Dual Mode (LE + BR/EDR)")
else:
print("BR/EDR Only or Unknown")
elif ad_type == 0xFF: # Manufacturer Specific Data
if len(ad_data) >= 2:
company_id = ad_data[0] | (ad_data[1] << 8)
company_name = company.get(company_id, "Unknown")
print(f"Company Identifier: 0x{company_id:04X} ({company_name})")
manufacturer_data = ad_data[2:]
if manufacturer_data:
print("Manufacturer Data:", binascii.hexlify(manufacturer_data).decode())
else:
print("Malformed Manufacturer Specific Data")
elif type_name == "UNKNOWN":
print(f"This script is currently unable to decode this type.")
print("Raw Data:", "0x" + binascii.hexlify(ad_data).decode())
else:
print("Raw Data:", "0x" + binascii.hexlify(ad_data).decode())
index += length + 1
object_count += 1
if __name__ == "__main__":
devices = scan_devices()
if devices:
print("\nSelect a device to scan further:")
for idx, (addr_type, mac, name) in enumerate(devices):
label = f"{mac} ({name})" if name else mac
print(f"[{idx}] {label} ")
choice = input("Enter device number (e.g. 0): ").strip()
try:
selected = devices[int(choice)]
scan_target_device(selected[1], selected[0])
except (IndexError, ValueError):
print("Invalid selection. Exiting.")
else:
print("No devices found.")
Note: Make sure to update the SERIAL_PORT variable in the script to match your system’s COM port — for example, COM3 on Windows or /dev/tty.usbmodemXXXX on macOS/Linux.
How It Works
Step 1: Sends the AT+GAPSCAN command to BleuIO, which returns a list of nearby BLE devices with MAC addresses and signal strength.
Step 2: Parses the output and allows the user to select one device.
Step 3: Sends the AT+SCANTARGET=[address_type]MAC=3 command to scan the selected device and retrieve its advertisement payload.
Step 4: Displays the detailed advertising data broadcasted by the device — which can include device name, UUIDs, manufacturer data, and sensor readings.
Step 5: Attempts to decode all fields in the BLE advertisement payload, showing both known fields (like Flags, Manufacturer Data) and unknown ones with raw data formatting
Decoding Advertisement Data
Every BLE advertisement is made up of TLV (Type-Length-Value) structures. This script extracts each one and attempts to decode:
Flags (Type 0x01): e.g., LE Only, Dual Mode
Manufacturer Specific Data (Type 0xFF): Extracts company ID and raw payload
Unknown types: Clearly marked and printed as raw hex for future analysis
Even if the script can’t interpret a block, you’ll still see it listed with length, type, and raw content — helping with reverse engineering or debugging unknown BLE devices.
Sample Output
Starting BLE scan for 3 seconds...
Discovered Devices:
>> AT+DUAL
>> AT+GAPSCAN=3
>> SCANNING...
>> [01] Device: [1]D1:53:C9:A9:8C:D2 RSSI: -56 (HibouAIR)
>> [02] Device: [1]C4:AD:CB:84:A5:73 RSSI: -83
>> [03] Device: [1]D1:79:29:DB:CB:CC RSSI: -52 (HibouAIR)
>> [04] Device: [1]C0:8C:23:2E:1A:E5 RSSI: -59
>> SCAN COMPLETE
Select a device to scan further:
[0] D1:53:C9:A9:8C:D2 (HibouAIR)
[02] C4:AD:CB:84:A5:73
[03] D1:79:29:DB:CB:CC (HibouAIR)
[104] C0:8C:23:2E:1A:E5
Enter device number (e.g. 0): 03
Scanning target device D1:79:29:DB:CB:CC (Type: 1) for 3 seconds...
Advertisement Data:
--------------------------------------------------
>> AT+SCANTARGET=[1]D1:79:29:DB:CB:CC=3
>> SCANNING TARGET DEVICE...
>> [D1:79:29:DB:CB:CC] Device Data [ADV]: 0201061BFF5B0705042200696D009F26B60082023D00000000000000024C02
>> [D1:79:29:DB:CB:CC] Device Data [RESP]: 110750EADA308883B89F604F15F30100C98E09094869626F75414952
>> SCAN COMPLETE
Decoding Advertisement Payload...
Decoding ADV Data: 0201061BFF5B0705042200696D009F26B60082023D00000000000000024C02
--------------------------------------------------
Data Object 1:
Length: 2
Type: 0x01 (Flags)
Flags:
- LE General Discoverable Mode
- BR/EDR Not Supported
Device Type Inferred: LE Only
Data Object 2:
Length: 27
Type: 0xFF (Manufacturer Specific Data)
Company Identifier: 0x075B (Smart Sensor Devices AB)
Manufacturer Data: 05042200696d009f26b60082023d00000000000000024c02
Source Code on GitHub
You can find the full, open-source implementation of this BLE sniffer — including the Python script and all improvements — on GitHub:
Now we have a working BLE sniffer that not only scans for nearby devices but also lets you interactively select a target and read its detailed advertisement data.
Here are some cool extensions we can build from here:
Display air quality sensor data from BLE beacons like HibouAir
Export scan logs to CSV for analysis
Build a desktop or web UI using Electron or Flask
Trigger alerts based on proximity or signal strength
Improve decoding support for more AD types (TX Power, Local Name, Services)
Show scan response (RESP) data alongside advertisement (ADV)
Display or log RSSI values for signal analysis
Bluetooth sniffers don’t have to be complicated or expensive. With BleuIO, a bit of Python, and a USB port, you can begin exploring the hidden world of BLE devices all around you — right from your own machine.
This setup is perfect for developers working on BLE apps, IoT product engineers, or tech enthusiasts who want to learn how devices communicate wirelessly.
This project demonstrates how to turn a BLE advertisement-based air quality sensor—in this case, the HibouAir—into a fully integrated Apple Home accessory. By combining the flexibility of the BleuIO USB BLE dongle and the simplicity of Lua scripting, we’ve created a bridge that reads raw BLE advertisement packets, decodes the environmental data, and makes it available to the Apple Home app through Homebridge.
Unlike most HomeKit integrations that rely on cloud APIs or native HomeKit devices, this setup is completely offline and works on any platform. The use of BleuIO allows BLE communication to be handled reliably across macOS, Linux, or Windows—something most native BLE libraries struggle to achieve consistently across platforms. Lua adds a lightweight, embeddable scripting engine perfect for decoding raw advertisement data in real time. Together, they make a fast, minimalist, and cross-platform solution for BLE-to-HomeKit integration.
What This Project Does
At a high level, the system continuously scans BLE advertisements from the HibouAir sensor using BleuIO. The data is decoded using Lua, which extracts temperature and humidity values. These values are then served via a local HTTP server, and finally read by Homebridge using the homebridge-http-temperature-humidity plugin. This enables you to view real-time air quality data directly in the Apple Home app on your iPhone, iPad, or Mac.
Start by plugging in your BleuIO USB dongle. On macOS or Linux, find its serial port using:
ls /dev/tty.usb*
Once you’ve identified the port (e.g., /dev/tty.usbmodemXXXXXX), update the Python script accordingly.
2. Create bleuio_scan.py
This script will initiate a BLE scan using BleuIO’s AT command interface and capture the raw advertisement data from the HibouAir sensor. It filters for packets containing a specific manufacturer ID and writes the first match to a file.
import serial
import time
import re
# Update this with your actual port
port = "/dev/tty.usbmodem4048FDE52DAF1"
ser = serial.Serial(port, 9600, timeout=1)
ser.write(b"AT+FINDSCANDATA=5B07050=2\r\n")
time.sleep(4)
data = ser.read_all().decode()
ser.close()
print("RAW OUTPUT:\n", data)
# Extract first adv line
matches = re.findall(r"Device Data \[ADV\]: ([0-9A-F]+)", data)
if matches:
with open("adv_data.txt", "w") as f:
f.write(matches[0])
print("✅ Wrote ADV data:", matches[0])
else:
print("❌ No HibouAir data found.")
3. Parse the BLE Data Using Lua
Lua is ideal for embedded processing due to its speed and small footprint. We use it here to decode the hex-formatted BLE advertisement string into readable sensor values.
Create a file named parse_ble_adv.lua with the following:
local http = require("socket.http")
local ltn12 = require("ltn12")
local json = require("dkjson")
-- Reverse byte order (e.g., "1234" -> "3412")
local function reverse_bytes(hexstr)
local bytes = {}
for i = 1, #hexstr, 2 do
table.insert(bytes, 1, hexstr:sub(i, i+1))
end
return table.concat(bytes)
end
-- Parse HibouAir BLE advertisement data
local function parse_adv_data(adv)
local pos = string.find(adv, "5B070504")
if not pos then return nil end
pos = pos - 1 -- Lua is 1-indexed
local function read_val(start, len, divide_by, signed)
local hex = reverse_bytes(adv:sub(start, start+len-1))
local val = tonumber(hex, 16)
if signed and val > 0x7FFF then
val = val - 0x10000
end
return divide_by and val / divide_by or val
end
return {
temp = read_val(pos+23, 4, 10, true),
hum = read_val(pos+27, 4, 10),
pressure = read_val(pos+19, 4, 10),
voc = read_val(pos+31, 4),
pm1 = read_val(pos+35, 4, 10),
pm25 = read_val(pos+39, 4, 10),
pm10 = read_val(pos+43, 4, 10),
co2 = tonumber(adv:sub(pos+47, pos+50), 16),
vocType = tonumber(adv:sub(pos+51, pos+52), 16),
ts = os.date("%Y-%m-%d %H:%M:%S")
}
end
-- Example BLE advertisement data (replace with real data from BleuIO scan)
-- local adv_data = "0201061BFF5B070504220069130010273A0160017E0000000000000001B703"
local file = io.open("adv_data.txt", "r")
local adv_data = file:read("*a")
file:close()
local data = parse_adv_data(adv_data)
-- Write latest data to file
print("DEBUG: Writing this to latest_data.json")
print("Temperature:", data.temp)
print("Humidity:", data.hum)
local file = io.open("latest_data.json", "w")
file:write(json.encode({
temperature = data.temp,
humidity = data.hum,
}))
file:close()
if not data then
print("Failed to parse advertisement data")
return
end
print("Parsed BLE Data:")
for k, v in pairs(data) do
print(k, v)
end
4. Automate Scanning and Parsing
To keep your data fresh, use a simple shell script to run both the scanner and parser every 10 seconds.
Create run_everything.sh:
#!/bin/bash
while true; do
echo "Scanning and updating Homebridge..."
python3 bleuio_scan.py && lua parse_ble_adv.lua
sleep 10
done
Make it executable with:
chmod +x run_everything.sh
Run it in the background or with tmux to keep it alive.
5. Create the HTTP Server in Lua
This server reads from the JSON file and exposes it via an HTTP endpoint (/temp) that Homebridge can read.
local copas = require("copas")
local socket = require("socket")
local json = require("dkjson")
-- Start TCP server on port 8081
local server = socket.bind("*", 8081)
copas.addserver(server, function(c)
c = copas.wrap(c)
local request = c:receive("*l")
if request and request:match("GET /temp") then
-- Read latest temp/hum from file
local file = io.open("latest_data.json", "r")
local temp_hum = { temperature = 0, humidity = 0 }
if file then
local contents = file:read("*a")
file:close()
local decoded, _, err = json.decode(contents)
if decoded then
temp_hum = decoded
end
end
local body = json.encode(temp_hum)
local response = {
"HTTP/1.1 200 OK",
"Content-Type: application/json",
"Content-Length: " .. #body,
"",
body
}
c:send(table.concat(response, "\r\n"))
else
c:send("HTTP/1.1 404 Not Found\r\n\r\n")
end
end)
print("Lua HTTP server running on http://localhost:8081")
copas.loop()
Use the Homebridge UI (usually on http://localhost:8081) to add the bridge to your Apple Home app by scanning the QR code. Once added, you’ll see temperature and humidity from your HibouAir sensor as real HomeKit accessories.
Output
This project showcases how BleuIO and Lua can be used to create a fast, simple, and platform-independent BLE integration with Apple Home. Unlike heavyweight setups or cloud-connected devices, this approach is minimal, local-first, and highly customizable. With BleuIO’s cross-platform compatibility and Lua’s tiny footprint, you can integrate BLE advertisement data into almost any platform—from macOS to Raspberry Pi to embedded Linux. This is just the beginning. You can extend this setup to support more metrics like VOC, CO₂, pressure, light.
In this tutorial, we will walk through the process of building an Android application that connects to the BleuIO USB dongle via a serial port using Capacitor 6, Angular, and TypeScript. This application allows users to send and receive AT commands to configure and interact with BLE (Bluetooth Low Energy) devices directly from an Android device.
BleuIO is a powerful BLE USB dongle that enables communication with Bluetooth devices, making it an excellent tool for developing, debugging, and testing BLE applications. With this project, we can use an Android device to send AT commands to BleuIO over a serial connection, making it possible to configure and manage BLE operations without requiring a PC. This project works both on BleuIO and BleuIO Pro
Why Use Capacitor, Angular, and TypeScript?
This project is built using Capacitor 6, which provides seamless access to native device functionality, including USB serial communication. Angular is chosen for its structured approach, and TypeScript ensures type safety and better maintainability.
Capacitor plugins allow us to communicate with hardware like USB devices, and in this project, we use the @adeunis/capacitor-serial plugin to establish the serial communication with the BleuIO dongle.
Project Features
Establish a serial connection with BleuIO on an Android device.
Send AT commands to BleuIO and read responses.
Scan for nearby BLE devices directly from the Android app.
Built with Angular + TypeScript for scalability and maintainability.
Uses Capacitor 6 for direct hardware interaction.
Prerequisites
Before starting, ensure you have the following installed:
OTG cable (to connect BleuIO to your Android device)
Cloning the Repository & Setting Up the Project
1. Clone the Repository
First, clone the GitHub repository and navigate to the project folder:
git clone https://github.com/smart-sensor-devices-ab/bleuio-serial-android-angular-typescript.git cd bleuio-serial-android-angular-typescript
2. Install Dependencies
Run the following command to install all required dependencies:
npm install
3. Build the Angular Application
Next, build the Angular app for production:
ng build --configuration production
4. Sync with Capacitor for Android
After building the Angular app, we need to sync it with Capacitor so it can run on an Android device:
npx cap sync android
5. Open the Project in Android Studio
To launch the project in Android Studio, run:
npx cap open android
6. Run the Application on an Android Device
Connect your Android device via USB.
Enable USB debugging in Developer Options.
Click Run in Android Studio to install and launch the app.
Using the Application
1. Connect to BleuIO
Press the Connect to BleuIO button.
The app will request USB permissions for BleuIO.
Once granted, a serial connection is established.
2. Send AT Command
Press the Send ATI Command button.
This command retrieves device information from BleuIO.
The response will be displayed on the screen.
3. Scan for BLE Devices
Press the Scan BLE Devices button.
This will send the AT+CENTRAL command, followed by AT+GAPSCAN=3.
The list of nearby BLE devices will be displayed.
Understanding the Code
1. Serial Service (Handling Communication with BleuIO)
The SerialService handles serial communication with BleuIO. It requests USB permissions, opens the connection, sends AT commands, and processes responses.
Key Methods
connectToSerial(): Requests OTG permission, establishes a serial connection, and listens for incoming data.
sendATCommand(): Sends AT commands and processes the response.
scanBLEDevices(): Sends the BLE scanning commands and displays detected devices.
2. App Component (User Interface Logic)
The AppComponent connects the UI with the SerialService to handle user interactions.
Key Features
Calls connectToSerial() when the user clicks Connect to BleuIO.
Calls sendATCommand() when the user clicks Send ATI Command.
Calls scanBLEDevices() when the user clicks Scan BLE Devices.
3. UI (HTML & Styling)
The application provides three buttons:
<button (click)="connect()">Connect to BleuIO</button> <button (click)="sendATCommand()">Send ATI Command</button> <button (click)="scanBLEDevices()">Scan BLE Devices</button>
A response area is updated dynamically:
<pre>{{ responseText }}</pre>
Troubleshooting & Common Issues
1. USB Permission Denied
Ensure that you grant permissions when prompted.
If the issue persists, check OTG support on your Android device.
2. App Not Detecting BleuIO
Verify that the OTG cable is properly connected.
Ensure that the BleuIO dongle is recognized by your Android device.
3. npx cap sync android Fails
Make sure that Android Studio and Java 17 are installed.
Run npm install again to ensure all dependencies are installed.
This project demonstrates how to connect and communicate with BleuIO using Capacitor 6, Angular, and TypeScript on an Android device. By leveraging the @adeunis/capacitor-serial plugin, we can send AT commands, retrieve device information, and even scan for BLE devices directly from an Android app.
With this foundation, developers can expand the application by adding custom AT commands, integrating data logging, or even building more advanced BLE applications. The full source code is available on GitHub for further customization and enhancements.
This project demonstrates how to use the BleuIO USB dongle as a serial port on an Android device via OTG (On-The-Go) USB. With Capacitor 6 and the @adeunis/capacitor-serial plugin, we establish a serial connection, send AT commands, and read responses in real time. This project works with both BleuIO and BleuIO Pro.
This tutorial provides a step-by-step guide to setting up serial communication with BleuIO on Android. The project connects to BleuIO via a serial port, sends basic ATI commands, and displays the received response on the screen. This example serves as a starting point for creating, testing, and debugging Bluetooth Low Energy (BLE) applications. It can be expanded to support additional commands and functionalities based on specific needs. The full source code is available for customization and further development.
Use Cases
The BleuIO USB dongle can be used in various applications that require serial communication on Android. One of the most common applications is Bluetooth Low Energy (BLE) development, where developers need to configure and test BLE modules by sending and receiving AT commands. This project allows for mobile debugging and real-time configuration of BLE devices without needing a PC.
Additionally, this setup is valuable for IoT and embedded systems, where devices communicate over a serial connection. With an Android phone acting as a serial terminal, engineers and developers can test, monitor, and debug hardware components in the field without requiring a laptop. Another important use case is USB-to-serial debugging, where embedded system engineers need to send commands and receive logs directly from an Android device using OTG.
For those working with sensor modules, microcontrollers, or custom embedded systems, this project simplifies the process of sending commands and reading responses directly from a mobile device. It also serves as an excellent starting point for developing Android applications that require serial communication through Capacitor.
Why Do We Need This?
Android devices do not natively support USB-to-serial communication. Unlike computers, which come with built-in serial drivers and terminal software, Android does not provide a direct way to communicate with serial devices over USB. This makes it difficult for developers, engineers, and embedded system designers to interact with BLE modules, sensors, and microcontrollers.
By using Capacitor 6 with the @adeunis/capacitor-serial plugin, we can bridge this gap and allow Android devices to function as serial terminals. This is especially useful when working with devices like BleuIO, where real-time communication is essential for configuring, testing, and debugging Bluetooth applications.
This project removes the need for external adapters or complex Android development, leveraging Capacitor’s web-based approach. It offers a simple and scalable way to integrate serial communication into mobile applications without requiring in-depth knowledge of Android’s USB APIs or native development tools.
Requirements
To use this project, you need a few essential components to establish serial communication between an Android device and BleuIO.
BleuIO or BleuIO Pro – The USB dongle used for Bluetooth Low Energy (BLE) communication. This project is designed to interact with BleuIO over a USB serial connection.
Android Device – A smartphone or tablet that supports USB OTG (On-The-Go), allowing it to function as a USB host and communicate with external devices.
OTG Cable or Adapter – Required to connect BleuIO to the Android device. Since most smartphones have USB-C or Micro-USB ports, an OTG adapter is needed to interface with the USB-A connector of BleuIO.
Installation & Setup
Install Node.js & Capacitor 6
BleuIO communication requires the @adeunis/capacitor-serial plugin, which is only compatible with Capacitor 6.
This project demonstrates how to use the BleuIO USB dongle as a serial communication device on an Android phone. By leveraging Capacitor 6 and the @adeunis/capacitor-serial plugin, we successfully established a serial connection, sent AT commands, and received responses via USB OTG.
This project is also available in typescript. Here is the source code with typescript
With the growing demand for mobile-first development and hardware interaction via smartphones, this project provides a solid foundation for further expanding serial communication capabilities on Android.
BleuIO, a leading Bluetooth Low Energy (BLE) USB dongle, continues to evolve with its latest firmware updates —version 2.7.8 for BleuIO and version 1.0.3 for BleuIO Pro. This new release builds upon the Auto Execution feature introduced in our previous firmware release by adding a powerful Auto Execution Loop, allowing users to automate repetitive tasks seamlessly. With this enhancement, developers can set up loops in the AUTOEXEC list, enabling continuous execution of commands without manual intervention.
What is Auto Execution Loop?
The Auto Execution feature allows users to store and run AT commands automatically upon startup, making BLE development faster and more efficient. With the new Auto Execution Loop, you can now create loops within the AUTOEXEC list, All auto-execute commands between the loop start and loop end will continue running indefinitely until manually stopped by clearing the auto-execute list using AT+CLRAUTOEXEC.
This feature is particularly useful for scenarios where continuous execution of BLE tasks is required, such as:
Beacon advertising with dynamic data updates
Changing BLE characteristics periodically
Automated device-to-device communication
Repeating sensor data transmission
How to Use the Auto Execution Loop
Setting up a loop in the AUTOEXEC list is simple and requires only a few steps:
(Optional) Add any commands that should run once before the loop starts using AT+AUTOEXEC=*command*.
Define the start of the loop using AT+AUTOEXECLOOP=START.
Add the commands that should execute repeatedly with AT+AUTOEXEC=*command*.
Mark the end of the loop using AT+AUTOEXECLOOP=END.
Restart the BleuIO dongle to see the commands execute automatically on startup. Alternatively, plug it into any power source, like a power bank or USB adapter, and let it run autonomously.
To clear the AUTOEXEC list and stop an ongoing loop, simply use AT+CLRAUTOEXEC. This ensures that any active command sequence is halted.
Real-World Use Cases
1. Dynamic BLE Beacon
Start-up: Disables scan response message and starts advertising.
In loop: Sets the advertising name in advertising data to ‘BleuIO’, waits 10 seconds, sets advertising name to ‘CAT’, waits 10 seconds.
Test: Scan the dongle to see the name change every 10 seconds.
Start-up: Creates a custom service with a characteristic with the notify property. Starts advertising.
In loop: Changes the characteristic value to ‘First Value’, waits 10 seconds, changes the value to ‘Second Value’, waits 10 seconds.
Test: Connect to the dongle and subscribe to the notification characteristic to see it toggle between the two values every 10 seconds.
Commands:
AT+AUTOEXEC=AT+CUSTOMSERVICE=0=UUID=72013640-2f23-49bb-8edd-6636969a2545
AT+AUTOEXEC=AT+CUSTOMSERVICE=1=UUID=72013641-2f23-49bb-8edd-6636969a2545
AT+AUTOEXEC=AT+CUSTOMSERVICE=1=PROP=RWN
AT+AUTOEXEC=AT+CUSTOMSERVICE=1=PERM=RW
AT+AUTOEXEC=AT+CUSTOMSERVICE=1=LEN=20
AT+AUTOEXEC=AT+CUSTOMSERVICE=1=VALUE=Value
AT+AUTOEXEC=AT+CUSTOMSERVICESTART
AT+AUTOEXEC=AT+ADVSTART
AT+AUTOEXECLOOP=START
AT+AUTOEXEC=AT+CUSTOMSERVICE=1=VALUE=First Value
AT+AUTOEXEC=AT+WAIT=10
AT+AUTOEXEC=AT+CUSTOMSERVICE=1=VALUE=Second Value
AT+AUTOEXEC=AT+WAIT=10
AT+AUTOEXECLOOP=END
3. Device-to-Device Communication
Start-up: Enables verbose mode.
In loop: Connects to another dongle, waits 10 seconds to ensure connection, sends an SPS message ‘HELLO’, waits 10 seconds before disconnecting, then waits 60 seconds.
Test: Set up a second dongle to advertise and run AT+GETMAC on it to obtain the MAC address. Use that address in the first dongle’s AUTOEXEC list when adding the AT+GAPCONNECT command. Monitor the terminal on the second dongle to see the first dongle connecting and sending ‘HELLO’ every minute.
The introduction of Auto Execution Loop in BleuIO v2.7.8 brings a new level of automation and efficiency to BLE development. With this feature, you can:
Reduce manual intervention by automating repetitive tasks
Increase reliability by ensuring commands execute consistently
Enable standalone BLE applications without needing a host device
Enhance development workflow by quickly testing different BLE behaviors
For developers building BLE applications, this feature opens up exciting possibilities, from autonomous sensor monitoring to seamless device interactions.
BleuIO’s Auto Execution Loop is a game-changer for BLE automation, making it easier than ever to set up continuous execution of commands. Whether you’re developing a smart beacon, a data-logging device, or a BLE-based automation system, this feature allows you to achieve more with less effort.
How to Upgrade:
To take advantage of these enhancements, make sure to update your BleuIO dongle to firmware version 2.7.8. You can find the firmware update and detailed instructions on the official BleuIO website. Click here to know more about firmware updates.
In this tutorial, we demonstrate how to use the Renesas EK-RA4M2 MCU, the Renesas RRH62000 All-in-One Air Quality Sensor Module, and the BleuIO Bluetooth Low Energy (BLE) USB Dongle to collect and transmit air quality data wirelessly. The RRH62000 sensor module measures key environmental parameters such as:
eCO₂ (Equivalent Carbon Dioxide)
Humidity (%)
Temperature (°C)
Particulate Matter (PM1, PM2.5, PM10) (µm/cm³)
Total Volatile Organic Compounds (TVOC) (mg/m³)
Indoor Air Quality Index (IAQ)
The EK-RA4M2 MCU reads data from the sensor via I²C, processes the information, and transmits it over BLE using the BleuIO USB dongle. The advertised data can be monitored using BLE scanning applications, and the sensor values can also be displayed in RTTViewer on a connected PC.
Requirements
Before getting started, ensure you have the following hardware and software:
You can download the complete example project here: ➡️ GitHub Repository
Hardware Setup
Connecting EK-RA4M2 and BleuIO Dongle
Connect EK-RA4M2 to your PC using a micro-USB cable via the J10 (Debug1) port.
Plug the BleuIO dongle into a USB OTG cable and connect it to J11 (USB Full Speed) on the EK-RA4M2 board.
Set jumpers:
Place J12 on pins 1-2.
Remove J15 completely.
Reference Diagram:
Connecting RRH62000 Air Quality Sensor
Connect the RRH62000 sensor module to EK-RA4M2 as follows:
Power: Connect 5V and GND from RRH62000 to 5V and GND on EK-RA4M2.
I²C Communication:
SCL (Clock) → SCL on EK-RA4M2
SDA (Data) → SDA on EK-RA4M2
GND → GND on EK-RA4M2
Reference Diagrams:
Importing the Project into e² Studio
Open e² Studio IDE and choose a workspace. Click Launch.
Download or clone the project from GitHub and place the “bleuio_ra4m2_rrh62000_example” folder inside your workspace.
Go to File → Import and select Existing Projects into Workspace under the General tab.
Click Browse… and locate the project folder.
Select the project and click Finish to import it.
Importing Example Project:
Building and Running the Example
Build the project by clicking the build icon.
Set up debugging:
Click the down arrow next to the Debug icon and select Debug Configurations…
Under Renesas GDB Hardware Debugging, choose bleuio_ra4m2_sensor_rrh62000_example Debug_Flat and click Debug.
Run the program:
Open RTTViewer and connect using the following settings:
Connection to J-Link: USB
Target Device: R7FA4M2AD
Interface & Speed: SWD, 4000 kHz
RTT Control Block Address: 0x200009dc
In e² Studio, click Resume twice to start execution.
The program starts running:
All LEDs turn on for 1 second, then only the red LED remains on.
The red LED turns off when BleuIO is initialized.
The green LED turns on when advertising starts.
Sensor data is displayed in RTTViewer.
Scanning and Decoding BLE Advertising Data
Scan the Dongle using nRF Connect
Use a BLE scanning app like nRF Connect to view the advertised data:
Decoding the Advertising Message
Example raw BLE advertisement:
02010619FF3600016491803010300030105060306080192
All air quality sensor values except eCO2 is split into two bytes. The first byte is the whole number and the second byte is the decimal. For example 1649 is the temperature value. The whole number is 16 and the decimal is 49. Converting it from hex gives us: 23.73 °C
The eCO2 value is 2 bytes, big endian.
Breaking it down:
Data
Description
Decoded Value
020106
Advertising flag (connectable)
–
19
Message size
–
FF
Manufacturer Specific Data
–
3600
Renesas Manufacturer ID (Little Endian)
–
Air Quality Advertised Data
1649
Temperature (°C)
23.73°C
1803
Humidity (%RH)
24.3% RH
0103
IAQ Index
1.3
0003
TVOC (mg/m³)
0.3 mg/m³
0105
PM1 (µm/cm³)
1.5
0603
PM2.5 (µm/cm³)
6.3
0608
PM10 (µm/cm³)
6.8
0192
eCO₂ (ppm)
402 ppm
This project successfully demonstrates how to use the BleuIO Bluetooth dongle, EK-RA4M2 MCU, and Renesas RRH62000 sensor to wirelessly monitor air quality. The BLE advertisements can be scanned and decoded to extract real-time air quality data.
Indoor air quality is crucial for maintaining a healthy living and working environment. HibouAir is a powerful air quality monitoring device that provides real-time data on CO2 levels, temperature, humidity, and air pressure.
This project demonstrates how BleuIO enables communication with HibouAir, allowing real-time environmental data to be retrieved, while Google’s Gemma model processes and analyzes the data to provide meaningful, easy-to-understand responses through a chat interface.
Users can interact with HibouAir’s smart assistant and ask questions such as:
By leveraging Google’s lightweight Gemma model, this project ensures efficient and intelligent analysis of air quality data, making it accessible for various applications, from smart homes to research.
Features of This Project
Live CO2, Temperature, Humidity, and Pressure Monitoring
Google-Powered Analysis for Meaningful Insights
Conversational Chat Interface (“Chat with HibouAir”)
For this project, we chose Gemma, a lightweight, open-source model developed by Google, because it aligns with Google’s ecosystem and provides efficient, real-time insights for environmental data.
Why Use Google’s Gemma?
Optimized for Efficiency – Runs well on low-power machines without requiring cloud resources.
Google-Backed & Open Source – Developed by Google DeepMind, ensuring high-quality performance with full transparency.
No API Costs & Fully Local – No need for an internet connection or paid APIs, making it a cost-effective solution.
Designed for Meaningful Responses – Processes real-time air quality data and provides insightful, structured feedback.
Other Model Alternatives
Phi-2 – Even lighter but lacks detailed contextual understanding.
Llama3 – More powerful but requires more computational resources.
Mistral – Previously used, efficient, but not part of the Google ecosystem.
Connecting HibouAir via Bluetooth (BleuIO)
HibouAir continuously broadcasts CO2, temperature, humidity, and pressure via Bluetooth. We use BleuIO to scan and retrieve these values in real-time.
Setting Up the Chat Interface
Users can type questions like:
“What is the temperature?”
“What is my CO2 level?”
“How is the air quality?”
The system fetches real-time sensor data from HibouAir and provides Google-powered analysis and recommendations.
app.py (Backend)
This script:
Scans for HibouAir data
Extracts CO2, temperature, humidity, and pressure
Uses Google’s Gemma model for intelligent responses
Serves the chat interface via Flask
def chat():
"""Handles user input, fetches air quality data if needed, and returns response."""
user_input = request.json.get("message", "").lower()
with Manager() as manager:
air_data = manager.dict({"co2": 0, "pressure": 0, "temperature": 0, "humidity": 0})
process = Process(target=scan_for_air_quality_process, args=(air_data,))
process.start()
process.join()
# Check for specific sensor queries
if "temperature" in user_input:
if air_data["temperature"] > 0:
response = f"The current temperature in your room is {air_data['temperature']}°C."
else:
response = "⚠️ Unable to retrieve temperature data. Ensure HibouAir is in range."
return jsonify({"response": response})
elif "humidity" in user_input:
if air_data["humidity"] > 0:
response = f"The current humidity level in your room is {air_data['humidity']}%."
else:
response = "⚠️ Unable to retrieve humidity data. Ensure HibouAir is in range."
return jsonify({"response": response})
elif "pressure" in user_input:
if air_data["pressure"] > 0:
response = f"The current air pressure in your room is {air_data['pressure']} hPa."
else:
response = "⚠️ Unable to retrieve air pressure data. Ensure HibouAir is in range."
return jsonify({"response": response})
elif "co2" in user_input:
if air_data["co2"] > 0:
response = f"The current CO2 in your room is {air_data['co2']} ppm."
else:
response = "⚠️ Unable to retrieve co2 data. Ensure HibouAir is in range."
return jsonify({"response": response})
elif "air quality" in user_input :
if air_data["co2"] > 0:
prompt = (
f"The current air quality readings are:\n"
f"- CO2 Level: {air_data['co2']} ppm\n"
f"- Temperature: {air_data['temperature']}°C\n"
f"- Humidity: {air_data['humidity']}%\n"
f"- Pressure: {air_data['pressure']} hPa\n"
f"First give all the data. This is my room data. Give me short analysis on this data. and give me short suggestions "
)
else:
return jsonify({"response": "⚠️ Unable to retrieve air quality data. Ensure HibouAir is in range and try again."})
else:
# Normal response for non-air quality queries
prompt = user_input
ai_response = subprocess.run(
["ollama", "run", "gemma", prompt],
capture_output=True,
text=True
).stdout.strip()
return jsonify({"response": ai_response})
This project showcases how HibouAir and BleuIO can be integrated to provide real-time air quality analysis in a way that is easy to understand. Instead of requiring users to interpret raw sensor data, the chat interface translates complex air quality values into clear, meaningful insights. Powered by Google’s Gemma model, it delivers simple and actionable responses—helping users understand their indoor air quality without needing to be experts.
In modern web development, Bluetooth Low Energy (BLE) integration is becoming increasingly important for IoT applications. With the Web Serial API, we can now directly communicate with hardware devices like BleuIO using just a browser, eliminating the need for native drivers or middleware.
In this tutorial, we will demonstrate how to use Angular 19 and TypeScript to communicate with a BleuIO USB Dongle via Web Serial API. We will build a simple web application that connects to BleuIO, sends AT commands, and displays responses in real time.
This approach is beneficial because:
No additional backend services are required—everything runs directly in the browser.
Simplicity—Web Serial API allows communication with serial devices in JavaScript/TypeScript without native code.
Cross-platform compatibility—Works on any OS with Google Chrome or Microsoft Edge.
Why Use Angular & TypeScript?
Angular is a powerful framework for building scalable, maintainable, and modern web applications. TypeScript, which is the foundation of Angular, brings type safety and better tooling, making development smoother and reducing runtime errors.
By using Angular 19, we ensure that our application is built on the latest and most optimized framework version, taking advantage of standalone components and improved performance features.
Setting Up the Angular Project
To get started, ensure you have Node.js and Angular CLI installed.
Create an Angular Project
Run the following command to generate a new Angular 19 project:
new angular-bleuio --strict cd angular-bleuio
Choose No for routing and CSS as the styling option.
Want a simple, browser-based way to communicate with BleuIO.
Need a cross-platform solution that works on Windows, macOS, and Linux.
Are building IoT applications that require BLE communication.
Want to use Angular & TypeScript for a scalable frontend solution.
This tutorial demonstrates how to use Angular 19, TypeScript, and the Web Serial API to communicate with BleuIO. The project is lightweight, scalable, and works entirely in the browser—perfect for IoT applications!