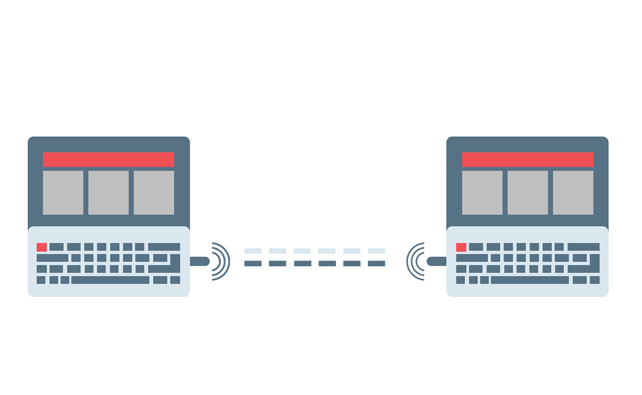
In this project, we will demonstrate how two Bluetooth dongles can be paired together and share data between them. To pair two Bluetooth dongle, one of them needs to be configured as Central and other needs to be configured as Peripheral. We already wrote a Python script that sends data back and forth between dongles.
In short :
One dongle will take on the Central role and the other will take on the Peripheral role.
Then they will connect to each other.
The Central dongle will then start off sending a message; “Echo”.
The Peripheral dongle will then receive the message and send it back to the Central dongle which in turn will receive it and send it back and so forth until the script is stopped.
Step 1 : Install Python on both laptop and connect a USB Dongle on each of them.
Step 2 : For a quick setup, copy the following script and save it on your local directory as sps_example.py . You can also get the source code from our GITHUB PAGE.
Step 3: Change the COM-port in the script on both computers to match the ones your dongles is actually connected to. For the one that will be set up as the Central dongle you will also need to change the target_dongle_mac_address variable to the MAC address of your Peripheral dongle. You can get the MAC address by scanning for the other dongle while it’s advertising. To learn more about how to scan check out our scanning tutorial.
Step 4: Open up the command prompt, on both computers, in the directory where the script is located. Start the script by typing python sps_example.py and press Enter.
Step 5: You should now be prompted to enter 1 or 2 depending on what role the dongle should have. Set one as Peripheral and the other as Central. It is advisable to setup the Peripheral first as the Central will need someone to connect to.
You should now see in the terminal how the dongles send and recieve data to and from each other.
The script will run until you stop it.
And that is an example of how we can send data between two dongles. If you want to stop the script, you can simply press control C.
Here is a tutorial on how to plot a real-time graph of values to Google Chrome from Hibou Air Quality Monitor using BleuIO and javascript library chartjs.
For this project, I am using Bluetooth Low Energy USB dongle called BlueIO, which will act as a central device to retrieve data. Hibou Air Quality Monitor which will serve as a peripheral device to transmit the data. The script is simple to use and can be used for other purposes such as showing real-time air quality data; temperate, humidity, pressure, particle matters etc.
The data could be later stored on a cloud service of choice.
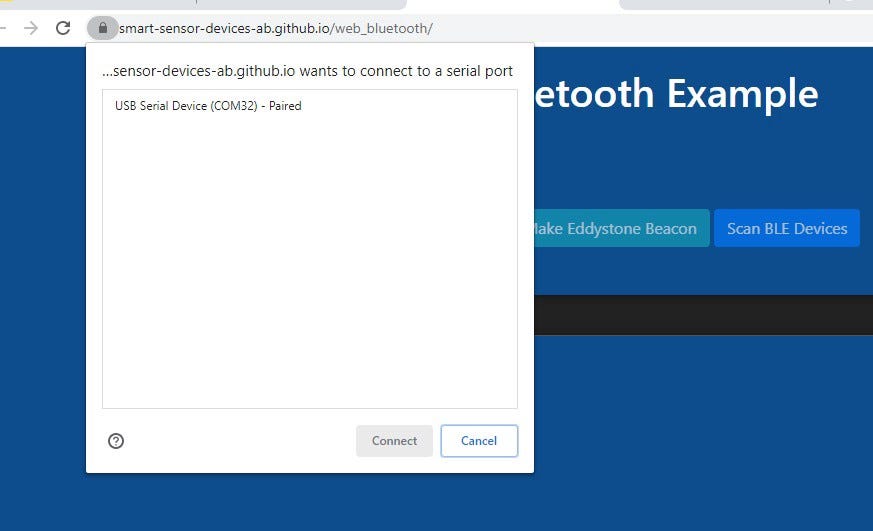
The article assumes you have some general knowledge of how Bluetooth Low Energy (BLE) work. Since the Chrome Serial specification on Google Chrome is not finalized yet, you will have to go to enable the highlighted flag, and restart Chrome.
open chrome://flags/#enable-experimental-web-platform-features in chrome browser.
In this example, we are going to use JavaScript + html (and some CSS for styling) to setup the BleuIO and quickly start scanning.
Step 1:
Create a file called index.html and paste the following codes. This gives you basic layout of the page with connect, scan, and get data buttons.
// Zooming directions. Remove the appropriate direction to disable // Eg. 'y' would only allow zooming in the y direction mode: 'x', } } }, tooltips: { mode: 'nearest', intersect: false }, hover: { mode: 'nearest', intersect: false } } }; var colorNames = Object.keys(chartColors);
/** * @name connect * Opens a Web Serial connection to a serial device such as a Smart USB Dongle 2.0 and sets up the input and * output stream. */ async function connect() { // - Request a port and open a connection. port = await navigator.serial.requestPort(); // - Wait for the port to open. await port.open({ baudRate: 9600 });
let decoder = new TextDecoderStream(); inputDone = port.readable.pipeTo(decoder.writable); inputStream = decoder.readable.pipeThrough( new TransformStream(new LineBreakTransformer()) );
/** * @name disconnect * Closes the Web Serial connection. */ async function disconnect() { // Close the input stream (reader). if (reader) { await reader.cancel(); await inputDone.catch(() => {}); reader = null; inputDone = null; } // Close the output stream. if (outputStream) { await outputStream.getWriter().close(); await outputDone; outputStream = null; outputDone = null; } // Close the port. await port.close(); port = null; log.textContent = "Dongle Disconnected!"; }
/** * @name clickConnect * Click handler for the connect/disconnect button. * Checks if port != null * If true: Checks if any beacons is advertising or scans are running and stops the advertsing or scan if so. Then runs disconnect() and set toggleUIConnected to false. * if false: Runs connect() then set toggleUIConnected to true. */ async function clickConnect() { log.textContent = ""; if (port) {
// If disconnected while scanning the dongle will restart if (isScanning) { writeCmd("\x03"); butScan.textContent = "Scan BLE Devices"; isScanning = false; } await disconnect(); toggleUIConnected(false); return; } await connect(); toggleUIConnected(true); }
function getSelectedDevice(selectObject) { var selectedDevice = selectObject.value; localStorage.setItem("selectedDevice", selectedDevice); }
/** * @name clickScan * Click handler for the Scan button. * Checks if a scan is already running by checking the boolean isScanning. * If isScanning = true: Stops scanning and goes back to peripheral mode, changes the button text and shows the beacon buttons. Finally sets isScanning = false. * If isScanning = false: Goes into Central mode and starts scanning for ble devices. Also changes button text and hides the beacon buttons. Finally sets isScanning = true. */ function clickScan() { console.log("SCAN BUTTON PRESSED"); if (isScanning) { writeCmd("\x03"); // Ctrl+C to stop the scan setTimeout(() => { writeCmd("AT+PERIPHERAL"); // Set the dongle in Peripheral mode needed for advertising. }, 500); // Waiting half a bit to make sure each command will get through separately. isScanning = false; butGetData.removeAttribute("disabled"); butScan.textContent = "Scan BLE Devices";
return; } hibouDevices = []; writeCmd("AT+CENTRAL"); // Set the dongle in Central mode needed for scanning. setTimeout(() => { writeCmd("AT+GAPSCAN=3"); }, 500); // Waiting half a bit to make sure each command will get through separately.
/** * @name clickGetData * Click handler for the 'Get Data' button. * Checks if a getData scan is already running by checking the boolean isGettingData. * If isGettingData = true: Stops scanning and goes back to peripheral mode, changes the button text and shows the scan button. Finally sets isGettingData = false. * If isGettingData = false: Goes into Central mode and starts scanning for ble devices data. Also changes button text and hides the scan button. Finally sets isGettingData = true. */ function clickGetData() { console.log("GET DATA BUTTON PRESSED"); if (isGettingData) { writeCmd("\x03"); // Ctrl+C to stop the scan setTimeout(() => { writeCmd("AT+PERIPHERAL"); // Set the dongle in Peripheral mode needed for advertising. }, 500); // Waiting half a bit to make sure each command will get through separately. isGettingData = false; if(window.myChart){ window.myChart.destroy(); } butScan.removeAttribute("disabled"); butGetData.textContent = "Get Data"; return; } writeCmd("AT+CENTRAL"); // Set the dongle in Central mode needed for scanning. setTimeout(() => { writeCmd("AT+FINDSCANDATA=FF5B07"); // Will just scan for adv data that contains 'FF5B07' which is the tag for Manufaturing Specific Data (FF) and our Company ID (5B07). }, 500); // Waiting half a bit to make sure each command will get through separately.
let lineValueArray = value.split(" "); if(!rightDevice) { // The advdata is spread on two lines, the first identifies it, if (lineValueArray[0] === localStorage.getItem("selectedDevice") && lineValueArray[3] === "[ADV]:") { rightDevice = true; //console.log("CONSOLE.LOG= "+value); } } else if (rightDevice) { // Second line contains the actual advdata string we need to parse scannedSensorData = parseSensorData(lineValueArray[1]); log.textContent = "\n" + "SensorData= " + JSON.stringify(scannedSensorData) + "\n"; //console.log(scannedSensorData.p) //console.log("CONSOLE.LOG= "+value); rightDevice = false; }
} if (done) { console.log("[readLoop] DONE", done); reader.releaseLock(); break; } } } /** * @name writeCmd * Gets a writer from the output stream and send the command to the Smart USB Dongle 2.0. * @param {string} cmd command to send to the Smart USB Dongle 2.0 */ function writeCmd(cmd) { // Write to output stream const writer = outputStream.getWriter(); console.log("[SEND]", cmd);
writer.write(cmd); // Ignores sending carriage return if sending Ctrl+C if (cmd !== "\x03") { writer.write("\r"); // Important to send a carriage return after a command } writer.releaseLock(); }
/** * @name LineBreakTransformer * TransformStream to parse the stream into lines. */ class LineBreakTransformer { constructor() { // A container for holding stream data until a new line. this.container = ""; }
flush(controller) { // Flush the stream. controller.enqueue(this.container); } }
/** * @name toggleUIConnected * Changes the text on butConnect depending on the action it actually will preform in the current state. * @param {boolean} connected true if connected, false if disconnected. */ function toggleUIConnected(connected) { let lbl = "Connect"; if (connected) { lbl = "Disconnect"; butGetData.removeAttribute("disabled"); butScan.removeAttribute("disabled"); } butScan.classList.toggle("disabled", !connected); butGetData.classList.toggle("disabled", !connected); butConnect.textContent = lbl; }
You can download the complete script from here.https://github.com/smart-sensor-devices-ab/Web-Hibou-Sensor-Plotter.git
Step 4:
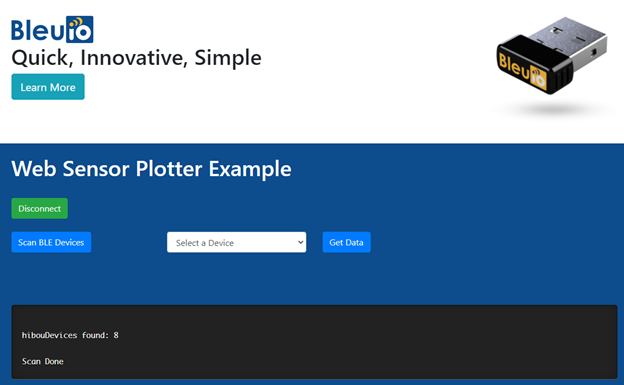
Once you have everything ready, open the index.html file. Your page should look like this
Now connect your BleuIO device to your computer and click connect. Wait for your device to show up on the port screen.
Select your device and press connect.
Once the device is connected, you can scan for nearby devices. For this project I have added a filter so that it will only look for Hibou BLE devices. You will see a list of devices on the dropdown menu. We have a small console on the page that shows scan status and number of devices found. Now you can select a device from the dropdown and start getting data from the device.
Once you click on get data after selecting a device, it will start to generate graphs using chartjs using real-time data from Hibou Air Quality Monitor.
In my script I am showing Pressure, Temperature, ALS, VOC, Humidity, PM2.5
You can customize your own chart by updating values. All the codes for charts are available on script.js
Done
Here is our real time chart showing on web browser.
Bluetooth is a wireless technology that enables the transfer of data between Bluetooth enabled devices within a short distance. The Bluetooth® community is making significant improvement in wireless innovation every year.
Bluetooth Low Energy
Bluetooth Low Energy is known under many names: BLE, Bluetooth LE or Bluetooth Smart. The strength of Bluetooth Low Energy is indeed its very low energy consumption which is cost-effective with a significant battery lifetime. The BLE technology provides an easy and reliable interface, which is hugely appreciated by mobile application developers, consumer electronics manufacturers and engineers. It is an industry-specific technologywhich has become suitable for the Internet of Things (IoT) allowing a quick transfer of low-consuming data such as movement, humidity or temperature.
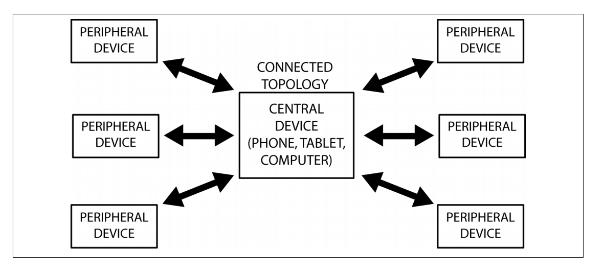
Usually, Bluetooth is used to pair mobile devices with other mobile or fixed devices. This could be your car, your earbuds, your smartwatch or your smart light. We have seen a lot of native app available that can interact with Bluetooth enabled devices, but how about connecting using a web browser? Yes, you can communicate with nearby Bluetooth devices using a web site in a secure and privacy-preserving way.
A BLE device may have two roles, central or peripheral:
Central: Central device manages the overall process by doing the scanning and connection to peripheral devices.
Peripheral: Peripheral device provides connections and data transfer with the Central device periodically.
In this article, we will try to connect BLE device with a web browser.
* The BleuIO is Bluetooth low energy solution that can be used to create new BLE 5.0 applications in the fastest and easiest way. This device supports Windows 10, Linux and macOS.
Before we start
The article assumes you have some general knowledge of how Bluetooth Low Energy (BLE) work.
Since the Chrome Serial specification on Google Chrome is not finalized yet, you will have to go to enable the highlighted flag, and restart Chrome.
open chrome://flags/#enable-experimental-web-platform-features in chrome browser.
In this example, we’re going to use javascript + html (and some css for styling) to setup the BleuIO and quickly start scanning or advertising as an iBeacon or an Eddystone simply by pressing a button. For a quick setup, copy the following script and save it in your local directory. You can also get the source code from GITHUB PAGE.
Here we create a simple html page with a title, buttons and a field to display the output. We also add a textbox that will show up if the user doesn’t meet the requirements for Chrome Serial.
<!DOCTYPE html>
<html lang="en">
  <head>
    <title>Smart Sensor Devices Web Bluetooth Example</title>
    <meta charset="utf-8" />
    <meta name="ssd" content="beaconexample" />
    <meta http-equiv="X-UA-Compatible" content="IE=edge" />
    <meta name="viewport" content="width=device-width, initial-scale=1" />
    <link rel="shortcut icon" type="image/png" href="images/favicon.png" />    <script>
      // Redirect to HTTPS if HTTP is requested.
      if (window.location.protocol === "http:") {
        window.location.href = "https:" + window.location.href.substring(5);
      }
    </script>
    <link rel="stylesheet" href="style.css" />
    <link
      rel="stylesheet"
      href="https://stackpath.bootstrapcdn.com/bootstrap/4.5.2/css/bootstrap.min.css"
      integrity="sha384-JcKb8q3iqJ61gNV9KGb8thSsNjpSL0n8PARn9HuZOnIxN0hoP+VmmDGMN5t9UJ0Z"
      crossorigin="anonymous"
    />    <script src="script.js" defer></script>
  </head>
  <body>
    <div class="codesection">
      <div class="container">
        <h1>Web Bluetooth Example</h1>
        <main class="main">
          <div id="notSupported" class="hidden">
            Sorry, <b>Chrome Serial</b> is not supported on this device, make sure
            you're running Chrome 78 or later and have enabled the
            <code>#enable-experimental-web-platform-features</code> flag in
            <code>chrome://flags</code>
          </div>          <br />
          <button id="butConnect" type="button" class="btn btn-success">
            Connect
          </button>
          <br /><br />
          <button
            id="butIbeacon"
            type="button"
            disabled
            class="btn btn-warning"
          >
            Make iBeacon
          </button>
          <button id="butEddystone" type="button" disabled class="btn btn-info">
            Make Eddystone Beacon
          </button>
          <button id="butScan" type="button" disabled class="btn btn-primary">
            Scan BLE Devices
          </button>          <pre id="log" class="mt-5"></pre>
        </main>
      </div>
    </div>
    <div class="footer text-center mt-3">
      Powered by <a href="https://www.bleuio.com/" target="_blank">BleuIO</a> .
      A product of
      <a href="http://smartsensordevices.com/" target="_blank"
        >Smart Sensor Devices</a
      >
    </div>    <!-- end container -->
    <!-- JS, Popper.js, and jQuery -->
    <script
      src="https://code.jquery.com/jquery-3.5.1.slim.min.js"
      integrity="sha384-DfXdz2htPH0lsSSs5nCTpuj/zy4C+OGpamoFVy38MVBnE+IbbVYUew+OrCXaRkfj"
      crossorigin="anonymous"
    ></script>
    <script
      src="https://cdn.jsdelivr.net/npm/popper.js@1.16.1/dist/umd/popper.min.js"
      integrity="sha384-9/reFTGAW83EW2RDu2S0VKaIzap3H66lZH81PoYlFhbGU+6BZp6G7niu735Sk7lN"
      crossorigin="anonymous"
    ></script>
    <script
      src="https://stackpath.bootstrapcdn.com/bootstrap/4.5.2/js/bootstrap.min.js"
      integrity="sha384-B4gt1jrGC7Jh4AgTPSdUtOBvfO8shuf57BaghqFfPlYxofvL8/KUEfYiJOMMV+rV"
      crossorigin="anonymous"
    ></script>
  </body>
</html>
script.js
Here we is were we handle the functionality. We hook up our buttons with click-listeners and write the functions we need.
By running:
port = await navigator.serial.requestPort();
from the serial api we can get list of avalible com ports. Then we connect to that port and start listening for input from the dongle.
The “make beacon” button functions are setup with a static version of the iBeacon and Eddystone but you can just as easily hook up an input field and plug in the value in the ‘writeCmd()’ function in a similar fashion of that of the iBeacon and Eddystone examples.
In the ‘readLoop()’ function we just print out everything we get from the dongle to the ‘log’ element. But you could just as well listen for the response message after a command that signals that the action has been successful or not (like OK, ADVERTISING or ERROR etc.) and handle that and print what you like as response.
"use strict";let port; let reader; let inputDone; let outputDone; let inputStream; let outputStream; let isIbeaconAdv = false; let isEddystonesAdv = false; let isScanning = false;const log = document.getElementById("log"); const butIbeacon = document.getElementById("butIbeacon"); const butEddystone = document.getElementById("butEddystone"); const butConnect = document.getElementById("butConnect"); const butScan = document.getElementById("butScan");document.addEventListener("DOMContentLoaded", () => { butIbeacon.addEventListener("click", clickIbeacon); butEddystone.addEventListener("click", clickEddystone); butScan.addEventListener("click", clickScan); butConnect.addEventListener("click", clickConnect); const notSupported = document.getElementById("notSupported"); notSupported.classList.toggle("disabled", "serial" in navigator); });/** * @name connect * Opens a Chrome Serial connection to a serial device such as a Smart USB Dongle 2.0 and sets up the input and * output stream. */ async function connect() { // - Request a port and open a connection. port = await navigator.serial.requestPort(); // - Wait for the port to open. await port.open({ baudrate: 9600 }); const encoder = new TextEncoderStream(); outputDone = encoder.readable.pipeTo(port.writable); outputStream = encoder.writable; let decoder = new TextDecoderStream(); inputDone = port.readable.pipeTo(decoder.writable); inputStream = decoder.readable.pipeThrough( new TransformStream(new LineBreakTransformer()) ); reader = inputStream.getReader(); readLoop().catch((error) => { toggleUIConnected(false); port = null; log.textContent = "Dongle Disconnected!"; }); }/** * @name disconnect * Closes the Chrome Serial connection. */ async function disconnect() { // Close the input stream (reader). if (reader) { await reader.cancel(); await inputDone.catch(() => {}); reader = null; inputDone = null; } // Close the output stream. if (outputStream) { await outputStream.getWriter().close(); await outputDone; outputStream = null; outputDone = null; } // Close the port. await port.close(); port = null; log.textContent = "Dongle Disconnected!"; }/** * @name clickConnect * Click handler for the connect/disconnect button. * Checks if port != null * If true: Checks if any beacons is advertising or scans are running and stops the advertsing or scan if so. Then runs disconnect() and set toggleUIConnected to false. * if false: Runs connect() then set toggleUIConnected to true. */ async function clickConnect() { log.textContent = ""; if (port) { if (isEddystonesAdv || isIbeaconAdv) { writeCmd("AT+ADVSTOP"); butIbeacon.textContent = "Make iBeacon"; butEddystone.textContent = "Make Eddystone Beacon"; isIbeaconAdv = false; isEddystonesAdv = false; } // If disconnected while scanning the dongle will restart if (isScanning) { writeCmd("\x03"); butScan.textContent = "Scan BLE Devices"; isScanning = false; } await disconnect(); toggleUIConnected(false); return; } await connect(); toggleUIConnected(true); }/** * @name clickIbeacon * Click handler for the iBeacon button. * Checks if an iBeacon is already running by checking the boolean isIbeaconAdv. * If isIbeaconAdv = true: Stops advertising, changes the button text and shows the Eddystone button. Finally sets isEddystoneAdv = false. * If isIbeaconAdv = false: Sets the advertising data to setup an iBeacon with a UUID and starts advertising. * Also changes button text and hides the Eddystone button. Finally sets isIbeaconAdv = true. */ function clickIbeacon() { console.log("IBEACON BUTTON PRESSED"); if (isIbeaconAdv) { writeCmd("AT+ADVSTOP"); butEddystone; butIbeacon.textContent = "Make iBeacon"; butEddystone.removeAttribute("disabled"); butScan.removeAttribute("disabled"); isIbeaconAdv = false; return; } writeCmd("AT+ADVDATAI=5f2dd896-b886-4549-ae01-e41acd7a354a0203010400"); setTimeout(() => { writeCmd("AT+ADVSTART=0;200;3000;0;"); }, 500); // Waiting half a bit to make sure each command will get through separately. butIbeacon.textContent = "Stop Beacon"; butEddystone.setAttribute("disabled", "true"); butScan.setAttribute("disabled", "true"); isIbeaconAdv = true; }/** * @name clickEddystone * Click handler for the Eddystone Beacon button. * Checks if an Eddystone beacon is already running by checking the boolean isEddystoneAdv. * If isEddystoneAdv = true: Stops advertising, changes the button text and shows the iBeacon button. Finally sets isEddystoneAdv = false. * If isEddystoneAdv = false: Sets the advertising data to setup an Eddystone beacon with a link to google.com and starts advertising. * Also changes button text and hides the iBeacon button. Finally sets isEddystoneAdv = true. */ function clickEddystone() { console.log("EDDYSTONE BUTTON PRESSED"); if (isEddystonesAdv) { writeCmd("AT+ADVSTOP"); butEddystone.textContent = "Make Eddystone Beacon"; butIbeacon.removeAttribute("disabled"); butScan.removeAttribute("disabled"); isEddystonesAdv = false; return; } writeCmd("AT+ADVDATA=03:03:aa:fe 0d:16:aa:fe:10:00:03:67:6f:6f:67:6c:65:07"); setTimeout(() => { writeCmd("AT+ADVSTART=0;200;3000;0;"); }, 500); // Waiting half a bit to make sure each command will get through separately.//butIbeacon.classList.toggle("disabled", true); butIbeacon.setAttribute("disabled", "true"); butScan.setAttribute("disabled", "true"); //butScan.classList.toggle("disabled", true); butEddystone.textContent = "Stop Beacon"; isEddystonesAdv = true; }/** * @name clickScan * Click handler for the Scan button. * Checks if a scan is already running by checking the boolean isScanning. * If isScanning = true: Stops scanning and goes back to peripheral mode, changes the button text and shows the beacon buttons. Finally sets isScanning = false. * If isScanning = false: Goes into Central mode and starts scanning for ble devices. Also changes button text and hides the beacon buttons. Finally sets isScanning = true. */ function clickScan() { console.log("SCAN BUTTON PRESSED"); if (isScanning) { writeCmd("\x03"); // Ctrl+C to stop the scan setTimeout(() => { writeCmd("AT+PERIPHERAL"); // Set the dongle in Peripheral mode needed for advertising. }, 500); // Waiting half a bit to make sure each command will get through separately. isScanning = false; butScan.textContent = "Scan BLE Devices"; butIbeacon.removeAttribute("disabled"); butEddystone.removeAttribute("disabled"); return; } writeCmd("AT+CENTRAL"); // Set the dongle in Central mode needed for scanning. setTimeout(() => { writeCmd("AT+GAPSCAN"); }, 500); // Waiting half a bit to make sure each command will get through separately. butScan.textContent = "Stop Scanning..."; butIbeacon.setAttribute("disabled", "true"); butEddystone.setAttribute("disabled", "true"); isScanning = true; }/** * @name readLoop * Reads data from the input stream and displays it on screen. */ async function readLoop() { while (true) { const { value, done } = await reader.read(); if (value) { log.textContent += value + "\n"; } if (done) { console.log("[readLoop] DONE", done); reader.releaseLock(); break; } } }/** * @name writeCmd * Gets a writer from the output stream and send the command to the Smart USB Dongle 2.0. * @param {string} cmd command to send to the Smart USB Dongle 2.0 */ function writeCmd(cmd) { // Write to output stream const writer = outputStream.getWriter(); console.log("[SEND]", cmd); writer.write(cmd); // Ignores sending carriage return if sending Ctrl+C if (cmd !== "\x03") { writer.write("\r"); // Important to send a carriage return after a command } writer.releaseLock(); }/** * @name LineBreakTransformer * TransformStream to parse the stream into lines. */ class LineBreakTransformer { constructor() { // A container for holding stream data until a new line. this.container = ""; } transform(chunk, controller) { // Handle incoming chunk this.container += chunk; const lines = this.container.split("\r\n"); this.container = lines.pop(); lines.forEach((line) => controller.enqueue(line)); } flush(controller) { // Flush the stream. controller.enqueue(this.container); } }/** * @name toggleUIConnected * Toggles the butIbeacon & butEddystone buttons visable/hidden depending on if dongle is connected or not. * Also changes the text on butConnect depending on the action it actually will preform in the current state. * @param {boolean} connected true if connected, false if disconnected. */ function toggleUIConnected(connected) { let lbl = "Connect"; if (connected) { lbl = "Disconnect"; butIbeacon.removeAttribute("disabled"); butEddystone.removeAttribute("disabled"); butScan.removeAttribute("disabled"); } butIbeacon.classList.toggle("disabled", !connected); butEddystone.classList.toggle("disabled", !connected); butScan.classList.toggle("disabled", !connected); butConnect.textContent = lbl; }
As the coronavirus pandemic continues, we’ve seen several social distancing, and contact tracing solution came in the market to stop the spread. Employers and businesses will want new devices to help keep social distancing when people return to work. In this case, Bluetooth technologies can be very useful.
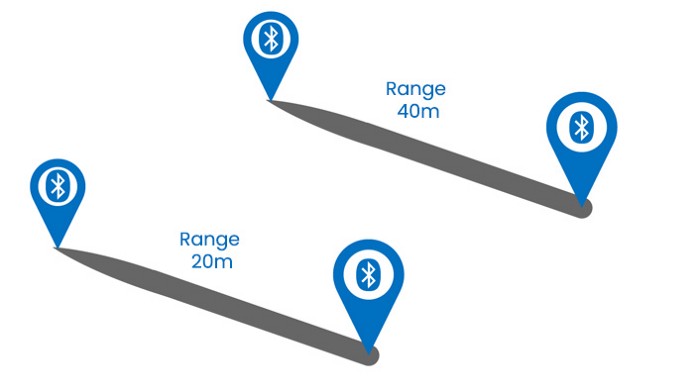
When a Bluetooth device connects to another Bluetooth enabled device, it measures the signal strength as RSSI ( received signal strength indicator). The connection strength depends on the distance between the devices — The connection will be strong if two devices are nearby. As the device move apart, the connection weakens.
It is also possible to scan for nearby devices and read the RSSI value without establishing a connection, this makes it very suitable for looking after nearby devises as majority of people carries a smartphone with Bluetooth on.
BLE Measures Distance in 3 ways
Following are the three primary approaches to measure distance using BLE:
BLE RSSI (received signal strength indicator) Alone
This solution uses (Bluetooth Low Energy) BLE Received Signal Strength Indication (RSSI) to measure the distance between the receiver and the transmitter (scanner and advertising device) .
It is possible to increase accuracy by repeatedly scan the RSSI values and create an average over a fixed determined period.
BLE with Ultra-wideband (UWB)
Another likely option is the combination of BLE with Ultra-wideband (UWB). UWB is a low energy radiofrequency technology that can transmit short-range, high bandwidth messages over the radio spectrum. UWB is best suited for location tracking, data collection and short-range indoor application. Combining UWB with RSSI helps get highly accurate measurements, but it has a higher BOM (bill of materials) cost due to the UWB chip.
BLE Based Proprietary Distance Measurement Technologies
BLE-based proprietary technologies can add distance measurement capabilities which makes it more accurate. It can combine Bluetooth LE data packets with constant tone frequency exchanges in order to generate the strong signals needed for more precise ranging. This technology can also be more accurate than RSSI alone and BLE with Ultra-wideband.
Developers can use smartphones Bluetooth technology that is already installed in the devices to perform contact tracing, but this approach has some problems related to privacy. Therefore, a BLE device that does not require any information from users is the right solution. For instance, BleuIO can be used to measure the distance without having to worry about privacy and security. The BleuIO is Bluetooth low energy solution that can be used to create new BLE 5.0 applications in the fastest and easiest way. Just use the AT Commands available on the device. Details about the AT commands will be found on getting started guide which will help anyone make a fast peripheral or central application (or both), on an incredibly low power platform without having to develop a single line of embedded code.
A Mobile Phone with Bluetooth and an App such as BLE Scanner, LightBlue or DSPS from Dialog Semiconductor.
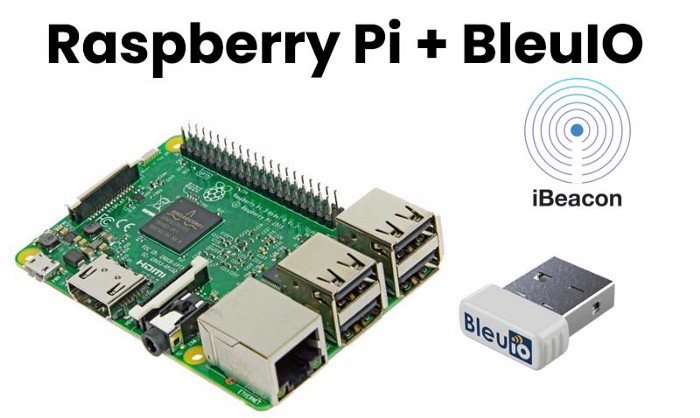
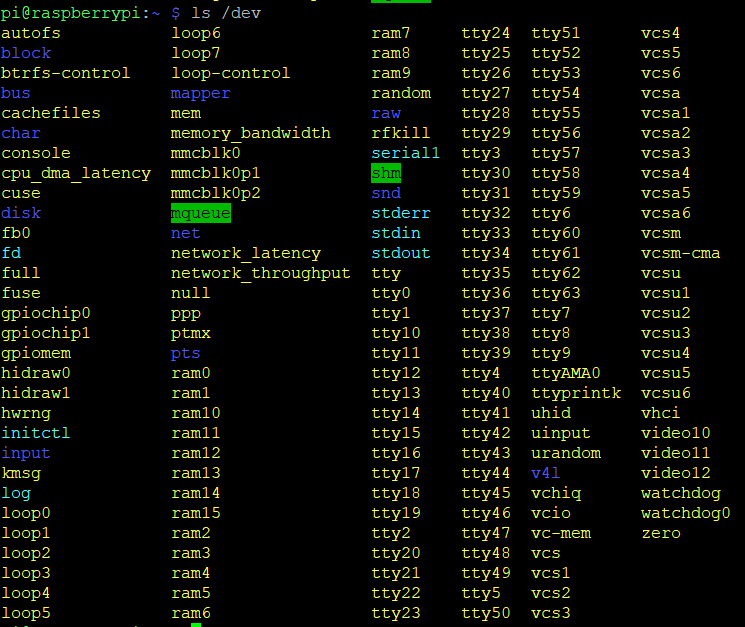
Connect the BleuIO dongle to your Raspberry Pi.
To identify which device name the dongle is connected to, you will need to run:
ls /dev
You might need to do it twice, once before you connect the dongle and once after to be able to identify which one is the device name. When starting up, the dongle will open up a COM port for the bootloader for 10 seconds to allow you to update the firmware (or flash your own application). You can update the firmware from here. Afterwards it will close that port and open a new port for the Smart USB Dongle 2.0 application which is the one we’re interested in here. You can run:
lsusb
It should list a device with the ID: 2dcf:6001 when the bootloader is active but change to 2dcf:6002 after 10 seconds when the application is running.
NOTE: The device name may vary and may not be the same as in the picture above.
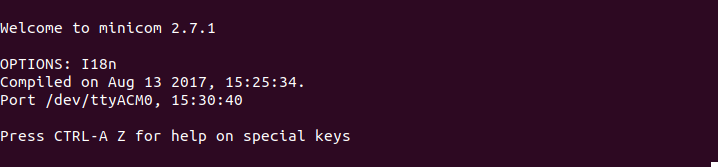
You will need a serial communication program to communicate with the dongle. For this tutorial we will be using Minicom. You can get Minicom by running:
sudo apt-get install minicom
Now, to start using the dongle run the following command if, for example, your dongle is connected to the device name ttyACM0:
minicom -b 9600 -o -D /dev/ttyACM0
Now try typing an AT-Command. For example
AT
If you get an OK response that means the dongle is working.
To use these scripts you will need to have Python installed. Both Python2 and Python3 should work but the scripts are made with Python3 in mind. But there are comments where the script need to be edited to work with Python2. You will also need to install the module pySerial. The easiest way to install it is through pip (which you should already have after installing Python) by running:
Python2:
pip install pyserial
Python3:
python3 -m pip install pyserial
After connecting, you can use the following sample python script to set up your own iBeacon.
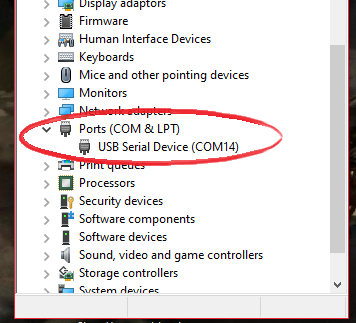
import serial
import timeconnecting_to_dongle = 0
print("Connecting to dongle...")
# Trying to connect to dongle until connected. Make sure the port and baudrate is the same as your dongle.
# You can check in the device manager to see what port then right-click and choose properties then the Port Settings
# tab to see the other settings
while connecting_to_dongle == 0:
    try:
        console = serial.Serial(
                port='COM14',
                baudrate=57600,
                parity="N",
                stopbits=1,
                bytesize=8,
                timeout=0
                )
        if console.is_open.__bool__():
            connecting_to_dongle = 1
    except:
        print("Dongle not connected. Please reconnect Dongle.")
        time.sleep(5)
print("\n\nConnected to Dongle.\n")
print("\n Welcome to the iBeacon example!\n\n")
new_input = 1
while 1 and console.is_open.__bool__():
    # get keyboard input once
    if (new_input == 1):
        # Python 2 users
        # input = raw_input("Enter the UUID... ")
        new_input = input("Enter the UUID (x) string with Major (j), Minor (n) and TX (t) (format:"
                          "xxxxxxxx-xxxx-xxxx-xxxx-xxxxxxxxxxxxjjjjnnnntt): ")
        time.sleep(0.1)
        # sends the commands to the dongle. Important to send the \r as that is the return-key.
        console.write(str.encode("AT+ADVDATAI="))
        console.write(new_input.encode())
        console.write('\r'.encode())
        time.sleep(0.1)
        console.write(str.encode("AT+ADVSTART=0;200;3000;0;"))
        console.write('\r'.encode())
        out = ''
        # let's wait one second before reading output (let's give device time to answer)
        time.sleep(1)
    while console.inWaiting() > 0:
        out += console.read(console.inWaiting()).decode()
    else:
        if not out.isspace():
            # We make sure it doesn't print the same message over and over again by setting [out] to blankspace
            # after printing once and check for blankspace before print again
            print(">>" + out)
            out = "  "
Save this script into a file called ibeacon.py or you can name anything you like.
Now open the file using a command prompt by typing
python ibeacon.py
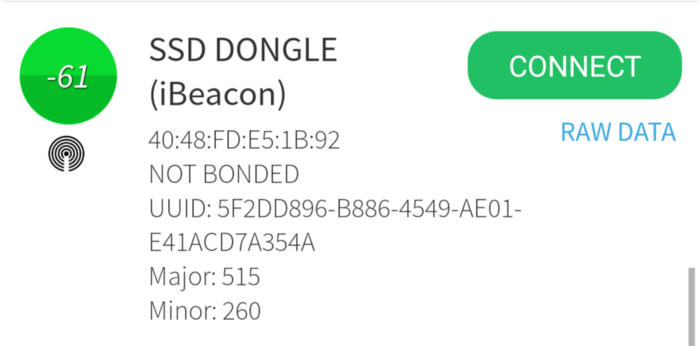
When you start the Python script, you should be able to see your iBeacon using a scanner App designed for Bluetooth Low Energy (BLE). Examples of scanner App can be BLE Scanner from Bluepixel Technologies.
Here you can see , your device has started advertising.
iBeacon technology allows Mobile Apps to understand their position on a micro-local scale, and deliver content to users based on location. It is a Bluetooth Low Energy technology.
BLE Advertising uses a one-way communication method. Beacons that want to be discovered can Advertise self-contained packets of data in set intervals. Smartphones collect these packets, which can be used for various applications to trigger things like push messages, prompts or app actions.
Beacons ideal for indoor location tracking because a standard BLE has a broadcast range of up to 100 meters.
iBeacon are defined by the Apple company including following parameters: UUID, Major and Minor
You can build your own beacon by defining your own parameter values.
What is UUID?
UUID stands for Universally Unique Identifier. It contains 32 hexadecimal digits, split into 5 groups, like this:
5f2dd896-b886–4549-ae01-e41acd7a354a0203010400
The UUID is a standard identifying system which allows a ‘unique’ number to be generated for a beacon network.
The purpose of the UUID is to identify iBeacons in your network, from all other possible beacons in networks not in your control.
What are Major and Minor values?
Major and Minor values are numbers assigned to your iBeacons, in order to identify individual iBeacon within your UUID network.
Minor and Major are unsigned integer values between 0 and 65535.
The iBeacon standard requires both a Major and Minor value to be assigned.
Connect the BleuIO to your computer. It opens a virtual serial port (COM port) that you can use to send commands to and from the Bluetooth USB Adapter.
Control Bluetooth USB Adapter using predefined commands that you can find on the website. click here
After connecting, you can use the following sample python script to set up your own iBeacon.
To use this scripts you will need to have Python installed. Both Python2 and Python3 should work but the scripts are made with Python3 in mind. But there are comments where the script need to be edited to work with Python2. You will also need to install the module pySerial. The easiest way to install it is through pip (which you should already have after installing Python) by running:
Python2:
pip install pyserial
Python3:
python3 -m pip install pyserial
Following is a sample python script for iBeacon. You can also get the source file from Github page.
 import serial

 import time

 connecting_to_dongle = 0

 print(“Connecting to dongle…”)

 # Trying to connect to dongle until connected. Make sure the port and baudrate is the same as your dongle.

 # You can check in the device manager to see what port then right-click and choose properties then the Port Settings

 # tab to see the other settings

 <strong>while</strong> connecting_to_dongle == 0:

 <strong>try</strong>:

 console = serial.Serial(

 port=’COM14′,

 baudrate=57600,

 parity=”N”,

 stopbits=1,

 bytesize=8,

 timeout=0

 )

 <strong>if</strong> console.is_open.__bool__():

 connecting_to_dongle = 1

 except:

 print(“Dongle not connected. Please reconnect Dongle.”)

 time.sleep(5)

 print(“\n\nConnected to Dongle.\n”)

 print(“\n Welcome to the iBeacon example!\n\n”)

 new_input = 1

 <strong>while</strong> 1 and console.is_open.__bool__():

 # get keyboard input once

 <strong>if</strong> (new_input == 1):

 # Python 2 users

 # input = raw_input(“Enter the UUID… “)

 new_input = input(“Enter the UUID (x) string with Major (j), Minor (n) and TX (t) (format:”

 “xxxxxxxx-xxxx-xxxx-xxxx-xxxxxxxxxxxxjjjjnnnntt): “)

 time.sleep(0.1)

 # sends the commands to the dongle. Important to send the \r as that is the return-key.

 console.write(str.encode(“AT+ADVDATAI=”))

 console.write(new_input.encode())

 console.write(‘\r’.encode())

 time.sleep(0.1)

 console.write(str.encode(“AT+ADVSTART=0;200;3000;0;”))

 console.write(‘\r’.encode())

 out = ‘’

 # let’s wait one second before reading output (let’s give device time to answer)

 time.sleep(1)

 <strong>while</strong> console.inWaiting() > 0:

 out += console.read(console.inWaiting()).decode()

 <strong>else</strong>:

 <strong>if</strong> not out.isspace():

 # We make sure it doesn’t print the same message over and over again by setting [out] to blankspace

 # after printing once and check for blankspace before print again

 print(“>>” + out)

 out = “ “
Save this script into a file called ibeacon.py or you can name anything you like.
Now open the file using a command prompt by typing
python ibeacon.py
When you start the Python script, you should be able to see your iBeacon using a scanner App designed for Bluetooth Low Energy (BLE). Examples of scanner App can be BLE Scanner from Bluepixel Technologies.
Here you can see is your device has started advertising.
Now you can have your own iBeacon in no time. There are many other applications you can develop yourself. It’s a simple and excellent way to learn to program Bluetooth quickly.