BLE Connectivity Test Tool using BleuIO

This article takes a deep dive into the capabilities of BleuIO, exploring how it can simplify BLE application testing, especially in complex environments like IoT, health, automotive, and smart home applications. Whether you are a seasoned developer or a newcomer, BleuIO provides a reliable, versatile tool to jumpstart your BLE projects. We’ll also cover an example project, the BLE Connectivity Test Tool, to illustrate BleuIO’s ease of use and the possibilities it opens up for developers.

Example Project: Building a BLE Connectivity Test Tool

To demonstrate the practicality and ease of using BleuIO, let’s look at a sample project: a BLE Connectivity Test Tool. This tool allows developers to test the connection stability of a BLE device, such as the HibouAir air quality monitor, by performing repeated connection and disconnection attempts. This example showcases how easy it is to set up a real-world testing scenario with BleuIO, perfect for those looking to explore connectivity applications.

This BLE Connectivity Test Tool will:

Scan for the HibouAir Device: Use BleuIO to locate the device based on its BLE address.

Initiate Connections: Repeatedly connect and disconnect from the HibouAir device, tracking the success and failure of each attempt.

Log Results: Display a summary at the end, indicating successful connections and any errors encountered.

Code Overview

The Python script below uses the official BleuIO Python library, which simplifies interaction with BLE devices. It uses AT commands to set the dongle in central mode, initiate connections, and disconnect after a set duration.

import time
from datetime import datetime
from bleuio_lib.bleuio_funcs import BleuIO

# Initialize the BleuIO dongle
dongle = BleuIO()

# Device address of HibouAir (replace with your actual address if different)
device_address = "[1]D1:79:29:DB:CB:CC"

# Number of connection attempts
test_count = 5
# Duration to stay connected in seconds
connect_duration = 2
# Delay between connection attempts
delay_between_tests = 5

# Counters for tracking connection results
successful_connections = 0
successful_disconnections = 0
connection_failures = 0

# Register scan callback to handle scanned device responses
def my_scan_callback(scan_input):
    print("\n\nScan Result: " + str(scan_input))

# Register event callback to handle connection events with timestamps
def my_evt_callback(evt_input):
    cbTime = datetime.now()
    currentTime = cbTime.strftime("%H:%M:%S")
    print("\n\n[" + str(currentTime) + "] Event: " + str(evt_input))

# Set up the callback functions
dongle.register_evt_cb(my_evt_callback)
dongle.register_scan_cb(my_scan_callback)

# Set the BLE role to central to initiate connections
dongle.at_central()

# Start the connection test
print("Starting BLE Connectivity Test with HibouAir device...\n")
for i in range(test_count):
    print(f"\nAttempt {i+1}/{test_count}")
    
    # Connect to the device
    connect_response = dongle.at_gapconnect(device_address)
    if connect_response.Ack.get("err") == 0:  # Check if the connection was successful
        print("Connection successful!")
        successful_connections += 1
        time.sleep(connect_duration)  # Stay connected for the specified duration

        # Disconnect
        disconnect_response = dongle.at_gapdisconnect()
        if disconnect_response.Ack.get("err") == 0:
            print("Disconnected successfully.")
            successful_disconnections += 1
        else:
            print("Error during disconnect:", disconnect_response.Ack.get("errMsg"))
            connection_failures += 1
    else:
        print("Connection failed:", connect_response.Ack.get("errMsg"))
        connection_failures += 1
    
    # Wait before the next attempt
    time.sleep(delay_between_tests)


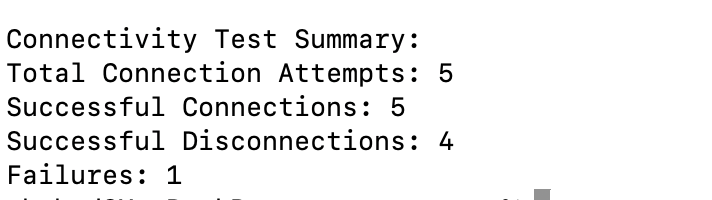
# Display test results summary
print("\nConnectivity Test Summary:")
print(f"Total Connection Attempts: {test_count}")
print(f"Successful Connections: {successful_connections}")
print(f"Successful Disconnections: {successful_disconnections}")
print(f"Failures: {connection_failures}")

This tool’s simplicity shows how BleuIO can be used in the development and testing process, making it a preferred choice for developers who want to avoid BLE’s traditional complexities.

Output

Real-World Applications of BleuIO

IoT Device Testing: From smart home devices to industrial sensors, BleuIO is invaluable for testing the connectivity and data transmission of IoT devices.

Wearable Tech Development: For developers working on BLE-enabled wearables like fitness trackers or health monitors, BleuIO provides a straightforward way to test device connectivity.

Educational and Prototyping Tool: BleuIO’s ease of use makes it an excellent educational tool for introducing BLE concepts to students and rapid prototyping for startups.

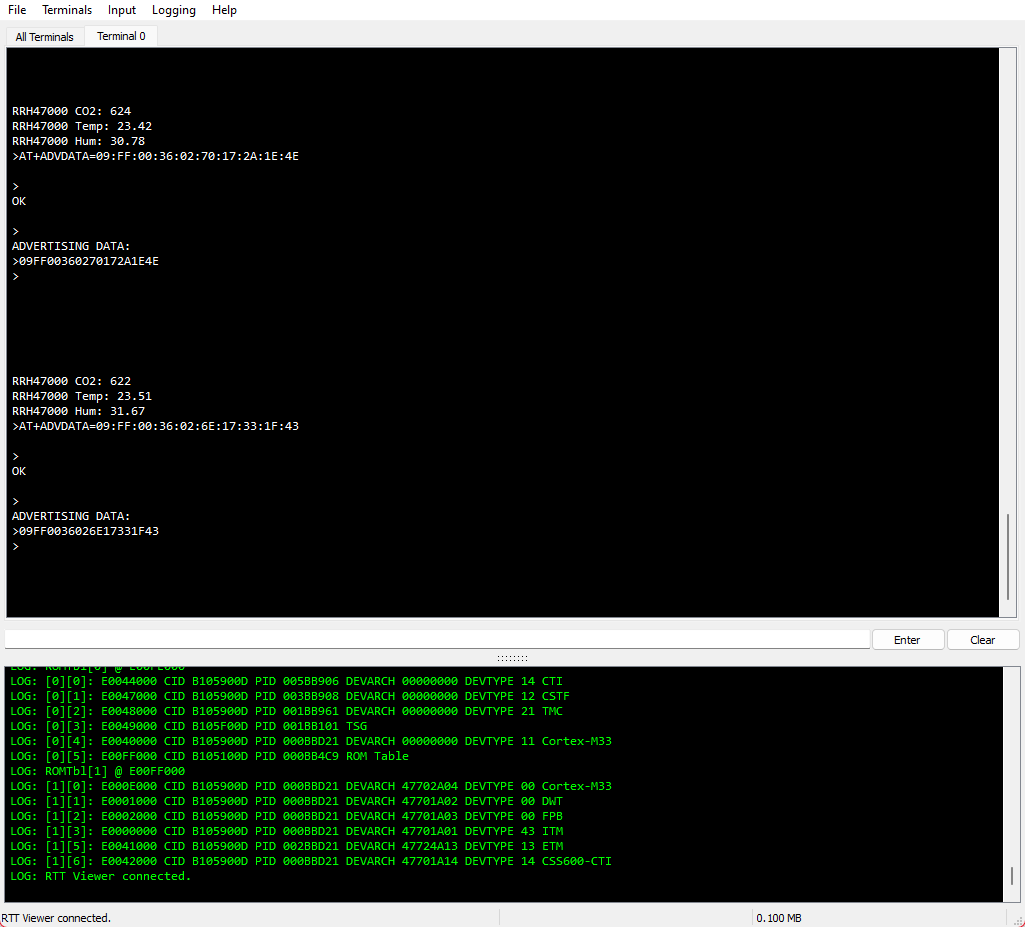
Environmental Monitoring: As demonstrated with the HibouAir air quality monitor, BleuIO facilitates connectivity testing in applications involving environmental data, like CO2 monitoring, temperature, and humidity.

Why BleuIO for BLE Development?

Developing BLE applications often requires specialized hardware and software expertise. Traditional BLE development involves understanding intricate details of Bluetooth stacks, profiles, and data protocols. BleuIO alleviates this by offering a straightforward command structure that abstracts the technical details, allowing developers to quickly build and test applications.

In addition, BleuIO’s compact design makes it suitable for portable applications and rapid prototyping. From sensor connectivity to device tracking and monitoring, BleuIO proves to be a versatile asset for a range of BLE applications.

BleuIO offers an all-in-one solution for BLE development, bridging the gap between beginner-friendly usability and powerful functionality. With support for multiple platforms, easy integration with popular programming languages, and straightforward AT command access, BleuIO empowers developers to quickly and efficiently test, prototype, and deploy BLE applications.

By using tools like the BLE Connectivity Test Tool, developers can focus on creating innovative applications without needing to dive deep into the complexities of BLE. BleuIO enables developers to bring their ideas to life, from IoT to healthcare and beyond. Start your BLE development journey with BleuIO today and see the difference in ease and efficiency it brings to your projects.

Share this post on :

Real-Time CO2 Monitoring with Renesas EK-RA4M2, RRH47000 CO2 Sensor, and BleuIO Pro Dongle

Introduction
This project demonstrates how to integrate the Renesas EK-RA4M2 development board with the Renesas CO2 Sensor (RRH47000) and the new BleuIO Pro Dongle (SSD025) by Smart Sensor Devices, built on the Renesas Bluetooth Low Energy SoC DA14695. In this setup, the dongle advertises sensor data from the CO2 sensor, including CO2 concentration, humidity, and temperature.

The sensor data is displayed using the RTT Viewer.

Requirements

Setup

  1. Connect a Micro USB device cable (Type-A male to Micro-B male) between J10 (Debug1) on the EK-RA4M2 and a computer’s USB port.
  2. Plug in the BleuIO Dongle using a USB OTG Cable (Type-A female to Micro-B male) and connect it to J11 (USB Full Speed).
  3. Ensure that Jumper J12 is placed on pins 1-2.
  4. Remove Jumper J15 pins.

Setting up PMOD1
The RRH47000 sensor connects via PMOD1. Since the sensor requires 5V, and PMOD by default provides 3.3V, some modifications are necessary:

  • For 5V the PMOD1 Config trace cut jumper E17 must be Short and E16 be Open.
    For I2C SCL E18 need to be Short and E14 need to be Open.
    For I2C SDA E19 need to be Short and E15 need to be Open.
  • The PMOD1 config can be found on the back of the RA4M2:

Importing the Project

  • Open e² studio IDE
  • Choose a workspace and click ‘Launch’
  • Download or clone the example project. Place the folder ‘bleuio_ra4m2_co2_monitor_example’ in workspace.
  • Choose Import Project
  • Select ‘Existing Projects into Workspace’ under the ‘General’ tab:
  • Click the ‘Browse…’ button and open folder where the ‘bleuio_ra4m2_co2_monitor_example’ project folder is located:
  • Finally select the project and click ‘Finish’. You have now imported the the project!

    Running the Example

    Build the project by clicking the building icon:

    Use Debug to download and run the project. The first time you need to configure the debug settings. Click down arrow to the right of the Debug icon and select ‘Debug Configurations…’


    Under ‘Renesas GDB Hardware Debugging’ select ‘bleuio_ra4m2_co2_monitor_example.elf’ and click ‘Debug’.


    The debug is now configured and the ‘Debug’ icon can be used next time to run the project.

    Open RTTViewer. Connect and use these settings:

    Connection to J-Link: USB

    Specify Target Device: R7FA4M2AD

    Target Interface & Speed: SWD 4000kHz

    RTT Control Block: Address 0x200009ac

    On the debugger screen in e² studio click the ‘Resume’ icon twice to run the project.

    • The application is now running. When starting up you should notice all LEDs lighting up for one second then only the red LED will be on. It will turn off as soon as the BleuIO is configured and the green LED will turn on when advertising start.
    • You should now see the output on the RTTViewer. 

    Scanning the Dongle
    To view the advertised data, use an app like nRF Connect.

    Decoding the Advertising Message
    The advertising data format is as follows:

    • 020106: Default advertising flag for connectable devices.
    • 09FF3600026E173E1D27: Manufacturer-specific data.
      • 09: Message size.
      • FF: Manufacturer Specific Data flag.
      • 3600: Renesas Manufacturer ID (little-endian).
      • 026E: CO2 value in hex (622 in decimal).
      • 173E: Temperature value, split into two bytes (23.62°C).
      • 1D27: Humidity value, split into two bytes (29.39%).

    This example serves as a foundational guide for integrating the Renesas EK-RA4M2 development board with a CO2 sensor and the BleuIO Pro Dongle for real-time monitoring. With its flexible setup, you can extend this project to suit your specific applications, such as real-time air quality monitoring, smart building systems, or other IoT-based environmental solutions. By leveraging the capabilities of the BleuIO Pro and Renesas platform, you can create robust, scalable solutions for your next Bluetooth Low Energy (BLE) project.

    Share this post on :

    Simplifying BLE Application Development for C++ Developers with the BleuIO C++ Library

    BleuIO BLE USB dongle was designed with developers in mind, offering a simple yet powerful way to create BLE applications using AT commands. Now, we’ve taken this a step further by creating a C++ library that makes it even easier for C++ developers to integrate BleuIO into their BLE projects.

    In this article, we’ll introduce the BleuIO C++ library and how it simplifies BLE development for C++ developers. Whether you’re building IoT devices, smart home solutions, or any application requiring BLE communication, our library streamlines the process, allowing you to focus on your application logic.

    What is BleuIO?

    BleuIO is a Bluetooth Low Energy USB dongle that enables BLE communication through simple AT commands. It acts as a bridge between your application and Bluetooth devices, making it easier to scan, connect, and communicate with other BLE devices. The dongle supports all major operating systems, including Windows, macOS, and Linux, and is compatible with multiple programming languages, including C++.

    With its AT command interface, BleuIO abstracts the complexity of BLE communication, making it accessible even to those with limited knowledge of BLE protocols. Developers can send and receive BLE commands without diving deep into low-level BLE stack programming.

    Introducing the C++ Library for BleuIO

    To further simplify BLE development, we’ve developed a dedicated C++ library that integrates with BleuIO’s AT command interface. This library allows C++ developers to quickly start building BLE applications using BleuIO without needing to manually manage serial communication or handle raw AT commands.

    The library takes care of the low-level communication, so you can focus on higher-level logic. With just a few lines of code, you can send commands to the dongle, scan for devices, and establish BLE connections.

    Why Use the BleuIO C++ Library?

    The BleuIO C++ library provides a number of benefits for developers:

    Ease of Use: No need to write low-level serial port communication code. The library handles sending AT commands and reading responses, allowing you to focus on building your BLE application.

    Cross-Platform: The library is compatible with all major operating systems, including macOS, Linux, and Windows. C++ developers can seamlessly integrate BleuIO into their projects regardless of the platform.

    Faster Development: By using AT commands through the C++ library, you significantly reduce the time required to implement BLE communication in your application. The library enables quick scanning for devices, connecting to peripherals, and exchanging data.

    Highly Customizable: While the library handles serial communication and command parsing, you still retain control over how you use the AT commands. You can extend and adapt the library to fit the specific needs of your BLE project.

    How to Install the Library

    We’ve made the library available on Homebrew (for macOS and Linux) and provided easy installation steps:

    Installation via Homebrew

    Install Homebrew (if you don’t have it installed):

       /bin/bash -c "$(curl -fsSL https://raw.githubusercontent.com/Homebrew/install/HEAD/install.sh)"

    Add the BleuIO C++ library tap:

       brew tap smart-sensor-devices-ab/homebrew-bleuio-library

    Install the library:

       brew install bleuio-library

    Example: Scanning for BLE Devices Using BleuIO

    Let’s take a look at how you can use the BleuIO C++ library to scan for nearby BLE devices. Below is a simple example that demonstrates how to send the AT+GAPSCAN command to the dongle and retrieve a list of nearby BLE devices.

    #include <iostream>
    #include "BleuIO.h"
    
    int main() {
        // Initialize BleuIO dongle connected to /dev/ttyUSB0 (adjust the port for your system)
        BleuIO dongle("/dev/ttyUSB0");
    
        // Put the dongle in central role
        std::string response = dongle.send_command("AT+CENTRAL");
        // Send command to scan for nearby BLE devices for 3 seconds
        response = dongle.send_command("AT+GAPSCAN=3");
    
        // Print the response from the dongle
        std::cout << "Response: \n" << response << std::endl;
    
        return 0;
    }

    Using the Library in Your C++ Project

    Once installed, you can include the library in your project and start using it immediately. The typical workflow involves creating an instance of the BleuIO class, sending AT commands, and handling the responses.

    To compile your program, you can use the following commands depending on your system:

    macOS (Intel)

    g++ -o my_bleuio_app main.cpp -I/usr/local/include -L/usr/local/lib -lBleuIO -lserialport

    macOS (Apple Silicon)

    g++ -o my_bleuio_app main.cpp -I/opt/homebrew/include -L/opt/homebrew/lib -lBleuIO -lserialport

    Linux

    g++ -o my_bleuio_app main.cpp -I/home/linuxbrew/.linuxbrew/include -L/home/linuxbrew/.linuxbrew/lib -lBleuIO -lserialport

    After compiling, run your application:

    ./my_bleuio_app

    The BleuIO C++ library makes it easier than ever for C++ developers to integrate BLE communication into their projects using the BleuIO USB dongle. With the power of AT commands and the simplicity of the library, you can quickly prototype and build Bluetooth-enabled applications without the complexity of managing BLE protocols manually.

    Whether you’re working on IoT, smart home devices, or any project requiring Bluetooth communication, the BleuIO C++ library helps you get started faster, with fewer lines of code, and more focus on your application logic.

    We encourage you to try out the library and join the growing community of developers building BLE applications with BleuIO.

    Share this post on :