Indoor Positioning Systems based on BLE Beacons

A beacon is a Bluetooth Low Energy (BLE) transmitter, a “Thing” that is often talked about on the Internet of Things. The information can be received by devices with a Bluetooth connection (smartphones, computers, tablets or industrial gateways among others).

One of the biggest advantages of this wireless communication protocol, BLE, is its low energy consumption, which gives these beacons a long battery life.

Who uses beacons?

Beacons have so far and primarily been used in retail to attract customers to a loyal behaviour, by collecting points or by sending them a promotional offer, the customer experience can be improved. This type of connected object has been used for many years in a varied number of industries and the industry is really starting to adopt the technology. 
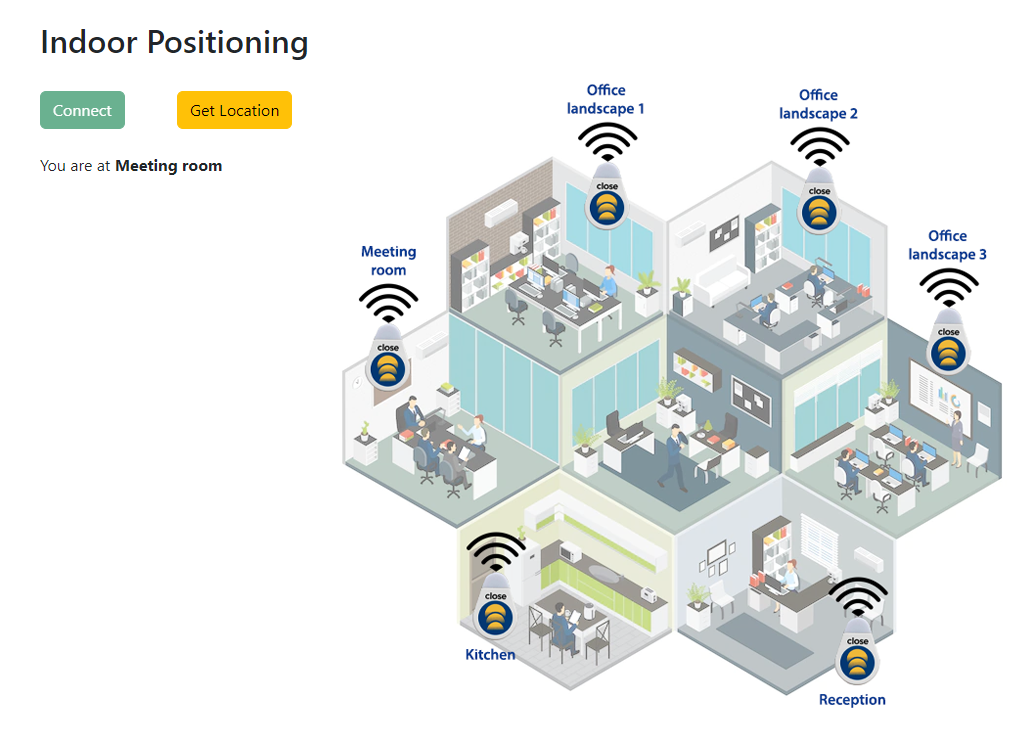
Indoor positioning

There are many use cases for Bluetooth Beacons. This article discusses the indoor positioning system. 

There are many reasons an individual or organisation would be interested in indoor positioning. From improving the ease of navigation, finding what you’re looking for, delivering/receiving targeted location-based information, improving accessibility, accruing valuable data insights and much more.

Bluetooth Low Energy (BLE) signals from battery-driven beacons are at the soul of indoor location technology. It’s one of the most recognised technologies that has appeared for indoor positioning and has become industry-standard available recently. It uses BLE beacons (or iBeacons) that are affordable, small, has a long battery life, and do not need an external energy source. The device (smartphone/ watch etc.) detects the signal from the beacon and can approximately calculate the distance to the beacon, therefore calculating a user’s indoor location.

A script on BLE beacons based indoor positioning system

Many manufacturers make compatible BLE Beacons because BLE is an open industry standard. Manufacturers do vary in terms of quality, battery life, signal stability, and how they package the beacons. For this Indoor positioning example project, we are going to use Close Beacon to determine users location.

Instructions

  • At first, we place Close Beacon in different rooms and note their mac address. 
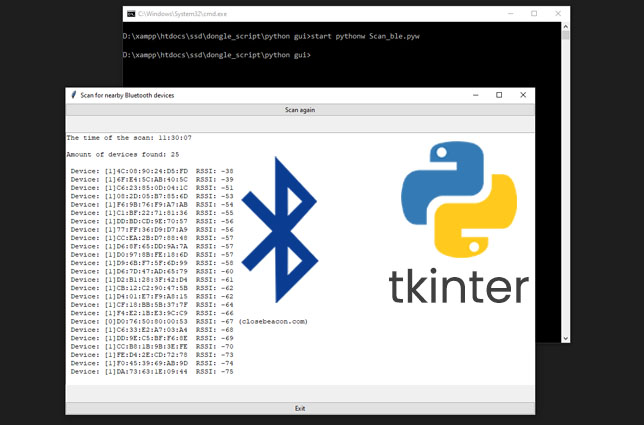
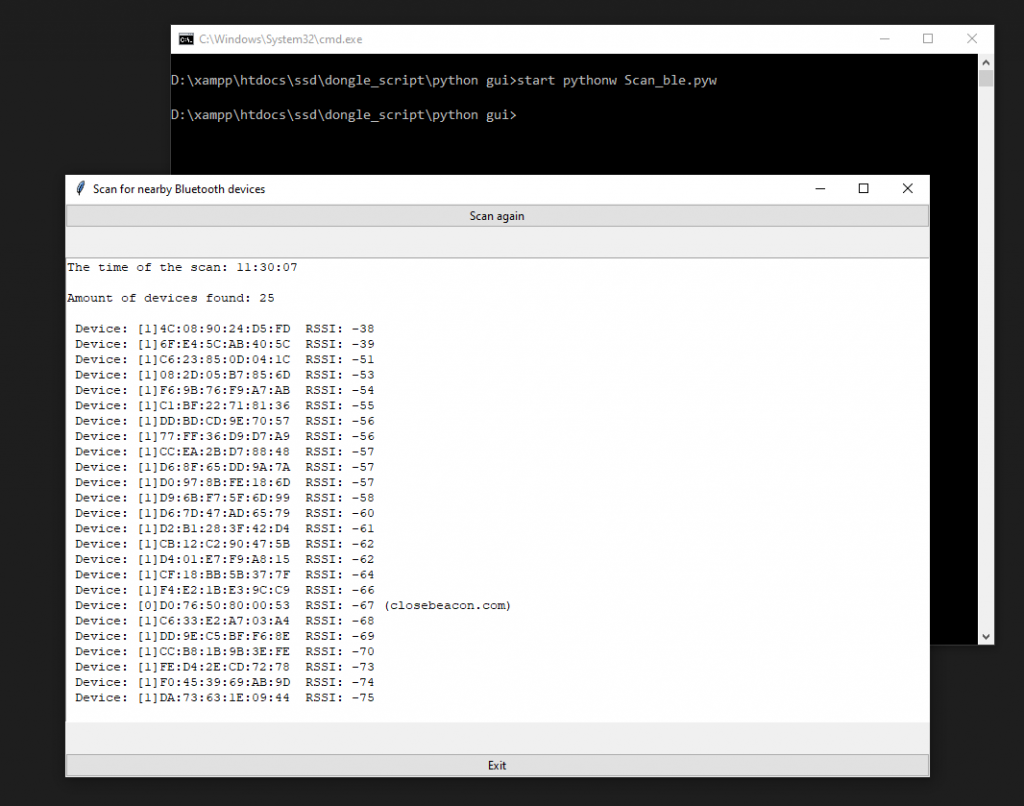
  • When we do a GAP SCAN, we will notice the close beacons on the list along with other devices. 
  • We filter out the close beacons and sort them by RSSI. 
  • We pick the first device from the list and match it with the MAC address
  • Finally, we print out the name of the location of Close Beacon.

Requirements

Steps

  • First, we connect the BleuIO USB dongle to our computer.
  • Get the BleuIO JavaScript library from NPM.
  • Create a simple Html file that contains buttons to connect to the dongle using a serial port and show the response on the screen.
<!DOCTYPE html>
<html lang="en">
  <head>
    <meta charset="utf-8" />
    <meta name="viewport" content="width=device-width, initial-scale=1" />
    <title>Indoor positioning</title>
    <link
      href="https://cdn.jsdelivr.net/npm/bootstrap@5.2.0-beta1/dist/css/bootstrap.min.css"
      rel="stylesheet"
      integrity="sha384-0evHe/X+R7YkIZDRvuzKMRqM+OrBnVFBL6DOitfPri4tjfHxaWutUpFmBp4vmVor"
      crossorigin="anonymous"
    />
  </head>
  <body>
    <div class="container mt-5">
      <h2>Indoor Positioning</h2>

      <br />
      <div class="row">
        <div class="col-md-6">
          <button id="connect" class="btn btn-success">Connect</button>
          <button id="checkLocation" class="btn btn-warning ms-5" disabled>
            Get Location
          </button>
          <br />
          <br />
          <div id="loading" style="display: none">
            <img src="./loading.a13f9403.gif" alt="" width="20" /> Finding your
            location
          </div>
          <div id="theLocation"></div>
        </div>
        <div class="col-md-6">
          <img src="indoor positioning example bluetooth beacon.jpg" alt="" />
        </div>
      </div>

      <script src="./script.js"></script>
    </div>
  </body>
</html>
  • Create a js file that communicates with the dongle and processes the response to determine the user’s current location.
import * as my_dongle from 'bleuio'
document.getElementById('connect').addEventListener('click', function(){
  my_dongle.at_connect()
  document.getElementById('checkLocation').removeAttribute("disabled");

})
//List of Close Beacons and their name based on mac address
let beaconArray={
  "Conference Room":"[D0:76:50:80:00:3A]",
  "Entrance":"[D0:76:50:80:00:97]",
  "SSD lab":"[D0:76:50:80:0B:9D]",
  "IAD lab":"[D0:76:50:80:0F:49]",
  "Office":"[D0:76:50:80:02:30]",
}
document.getElementById('checkLocation').addEventListener('click', function(){ 
  document.getElementById("loading").style.display = "block";
  document.getElementById('connect').setAttribute("disabled","");
// put the dongle on central role ,so that we can scan
  my_dongle.at_central().then(()=>{
    //enable rssi for the scan response
    my_dongle.at_showrssi(1).then(()=>{
      //filter advertised data , so it only shows close beacon on the response
      my_dongle.at_findscandata('9636C6F7',6).then((data)=>{
        //convert array string to array of object with key value
        const formated = data.map((item) => {
          if(item.length>30){
            const splitted= item.split(' ');
            let mac=splitted[2]
            let rssi=splitted[1]
            return { mac,rssi};
          }
        });
         //sort based on rssi value       
        formated.sort((a, b) => parseInt(b.rssi) > parseInt(a.rssi) && 1 || -1)
        // get the name of the close beacon by mac address
        let locationName=Object.keys(beaconArray).find(key => beaconArray[key] === formated[0]['mac']);
        document.getElementById("loading").style.display = "none";
        // print out the location
        document.getElementById("theLocation").innerHTML = "You are at <strong>"+locationName+"</strong";       
      })
    }) 
  })
})

Source code 

Source code is available on Github

https://github.com/smart-sensor-devices-ab/indoor_positioning.git

Output

Share this post on :

Python GUI Bluetooth Programming With Tkinter

Python has a lot of GUI frameworks, but Tkinter is the only framework that’s built into the Python standard library. Tkinter has several strengths. It’s cross-platform, so the same code works on Windows, macOS, and Linux. Visual elements are rendered using native operating system elements, so applications built with Tkinter look like they belong on the platform where they’re run.

Tkinter is lightweight and relatively painless to use compared to other frameworks. This makes it a compelling choice for building GUI applications in Python, especially for applications where a modern sheen is unnecessary, and the top priority is to quickly build something functional and cross-platform.

In this article, we will try to create a simple Python GUI application that can scan for nearby Bluetooth devices using Pyserial and shows the list on the screen.

Requirments 

Instructions

  • Connect the BleuIO to your computer. The script uses pyserial to connect to the Bluetooth USB dongle BleuIO.
  • Update the script and write the correct COM port (line 25), where the dongle is connected. 
  • After connecting to the dongle, we put the dongle into the central role using AT+CENTRAL so that it can scan for nearby Bluetooth devices. 
  • Then we do a simple Gap scan using AT+GAPSCAN=3 command to scan for nearby Bluetooth devices for 3 seconds.
  • After that, we read the output from the serial port and filter the device to get the unique number of devices.
  • Then we add a timestamp when the scan was completed. 
  • Finally, we sort the result by RSSI value before printing it out on screen.
  • ‘Scan again’ button will do the whole process again.

Here is the final script file. 

# Gjort av William 
# 2022-06-16 
# Smart Sensors Devices AB
# 
# libraries that is necessary for tkinter to work
import tkinter as tk
from tkinter import  ttk

# this is imported for the dongle and also for the "time.sleep()" commands
import serial
import time

# this is the library that is uesd to check the current time 
import datetime
now = datetime.datetime.now()

# this is what creates the main window
main_window = tk.Tk()

#changes the titel of the window
main_window.title('Scan for nearby Bluetooth devices')


# sets your port for the dongle
your_com_port = "COM18"  
connecting_to_dongle = True

#changes the size of the screens window
window_width = 900
window_height = 500

# get the screen dimension
screen_width = main_window.winfo_screenwidth()
screen_height = main_window.winfo_screenheight()
# find the center point
center_x = int(screen_width/2 - window_width / 2)
center_y = int(screen_height/2 - window_height / 2)
# set the position of the window to the center of the screen
main_window.geometry(f'{window_width}x{window_height}+{center_x}+{center_y}')

# apply the grid layout
main_window.grid_columnconfigure(1, weight=1)
main_window.grid_rowconfigure(1, weight=1)


# create the text widget
text = tk.Text(main_window, height=30, width=30)
text.grid(row=1, column=1, sticky=tk.EW)


# this is the part of the code that communicates whit the dongle
print("Connecting to dongle...")
while connecting_to_dongle:
    try:
        console = serial.Serial(
            port=your_com_port,
            baudrate=57600,
            parity="N",
            stopbits=1,
            bytesize=8,
            timeout=0,
        )
        if console.is_open.__bool__():
            connecting_to_dongle = False
    except:
        print("Dongle not connected. Please reconnect Dongle.")
        time.sleep(5)
print("Connected to Dongle.")

console.write(str.encode("AT+CENTRAL"))
console.write("\r".encode())
print("Putting dongle in Central role.")
time.sleep(0.1)

console.write(str.encode("AT+GAPSCAN=3"))
console.write("\r".encode())
time.sleep(0.1)
print("Looking for nearby Bluetooth devices ...")
dongle_output2 = console.read(console.in_waiting)
time.sleep(3)
print("Scan Complete!")
filtered = []

for dev in dongle_output2.decode().splitlines():
    if len(dev)>20:
        filtered.append(dev.split(maxsplit=1)[1])

seen = set()
out = []
for elem in filtered:
    prefix = elem.split(' ')[1]
    if prefix not in seen:
        seen.add(prefix)
        out.append(elem)

# sort list 
out.sort(key=lambda x:int(x.split()[3]), reverse=True)

# writes out the amount of bluetooth devices found on the main screen
text.insert('0.5', 'Amount of devices found: ' + str(len(out)) + '\n\n')

# funktion to get the current time
def get_time():
    return now.strftime('%H:%M:%S')

# prints out the time of the scan on the main screen
text.insert('1.0','The time of the scan: ' + str(get_time()) + '\n\n')

# writes out the results on the main screen
for i in range(0,len(out)):
    position = f'{i+5}.{len(out[i])}'
    tempStr = out[i] + "\n"
    text.insert(position,f' {tempStr}')

# is supposed to delet everyting on the list
out.clear()

#the funktion for the scan button
def button_clicked():
    # enables the programe to change the results on the main screen to the new ones after the user presses the scan button
    text['state'] = 'normal'
    # update the current time.
    now = datetime.datetime.now()
    # funktion to get the current time
    def get_time():
        return now.strftime('%H:%M:%S')
    # this simply puts a emty row betwen the results and the rest of the output on kommandotolken
    print()
    # this delets the previous output that is on the main screen
    text.delete('0.0', tk.END)

    # this is the part of the code that communicates whit the dongle 
    console.write(str.encode("AT+GAPSCAN=3"))
    console.write("\r".encode())
    time.sleep(0.1)
    
    dongle_output2 = console.read(console.in_waiting)
    time.sleep(3)
    filtered = []

    for dev in dongle_output2.decode().splitlines():
        if len(dev)>20:
            filtered.append(dev.split(maxsplit=1)[1])

    seen = set()
    out = []
    for elem in filtered:
        prefix = elem.split(' ')[1]
        if prefix not in seen:
            seen.add(prefix)
            out.append(elem)

    # sort list 
    out.sort(key=lambda x:int(x.split()[3]), reverse=True)

    
    #writes out the time of the scan on the main screen
    text.insert('1.0','The time of the scan: ' + str(get_time()) + '\n\n')

     # writes out the amount of bluetooth devices found on the main screen
    text.insert('0.0', 'Amount of devices found: ' + str(len(out)) + '\n\n')

    # writes out the results on the main screen
    for i in range(0,len(out)):
        position = f'{i+5}.{len(out[i])}'
        tempStr = out[i] + "\n" 
        text.insert(position,f' {tempStr}')

    # makes it so that you cant edite the results on the main screen
    text['state'] = 'disabled'

#what calls the function for the scan button. also fixes what the user will see as the buttons name.
main_button = ttk.Button(
    main_window,
    text='Scan again',
    command=lambda: button_clicked()
)
# creat the scan button 
main_button.grid(row=0, column=1, sticky=tk.EW)

# just an exit button.
exit_button = ttk.Button(
    main_window,
    text='Exit',
    command=lambda: main_window.quit()
)
# this determens were the exit button is located 
exit_button.grid(row=2, column=1, sticky=tk.EW)

# makes it so that you cant edite the results on the main screen
text['state'] = 'disabled'

# keeps the main window open
main_window.mainloop()

time.sleep(1)
console.close()

Source code is available at https://github.com/smart-sensor-devices-ab/python_gui_tkinter_bluetooth.git

Run the script

To run the script we use start

pythonw Scan_ble.pyw

Note : Scan_ble.pyw is the file name

Output

After running the script, we see a total 25 devices found nearby. We can scan again using the ‘Scan again’ button

Share this post on :