Using BleuIO with Waveshare RP2350A USB Mini Based On Raspberry Pi RP2350A
July 30, 2025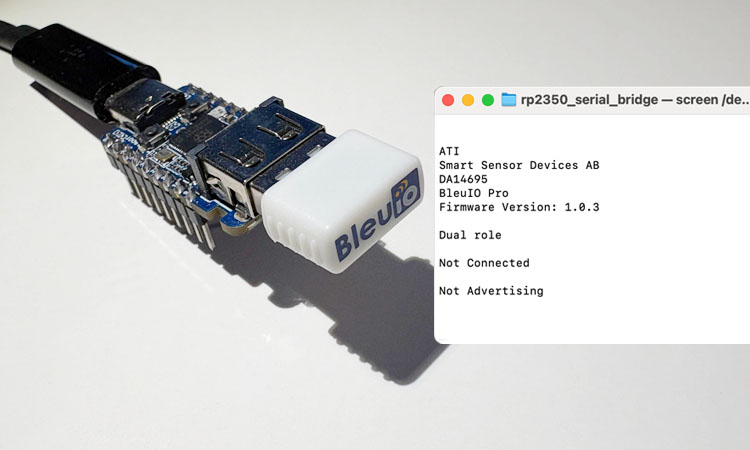
In this tutorial, we demonstrate how to connect the BleuIO Bluetooth Low Energy dongle to the Waveshare RP2350A USB Mini development board to create a dual-mode USB serial bridge. This example highlights the process of communicating with BleuIO using AT commands via USB host mode. It serves as a great starting point for anyone looking to build their own BLE application using this compact and powerful board.
About the Waveshare RP2350A USB Mini
The Waveshare RP2350A USB Mini is a development board built around the Raspberry Pi RP2350 microcontroller. It features a dual-core architecture, combining ARM Cortex-M33 and RISC-V Hazard3 cores, running at up to 150 MHz. The chip includes 520KB of SRAM and 2MB of onboard flash, making it suitable for advanced embedded applications.
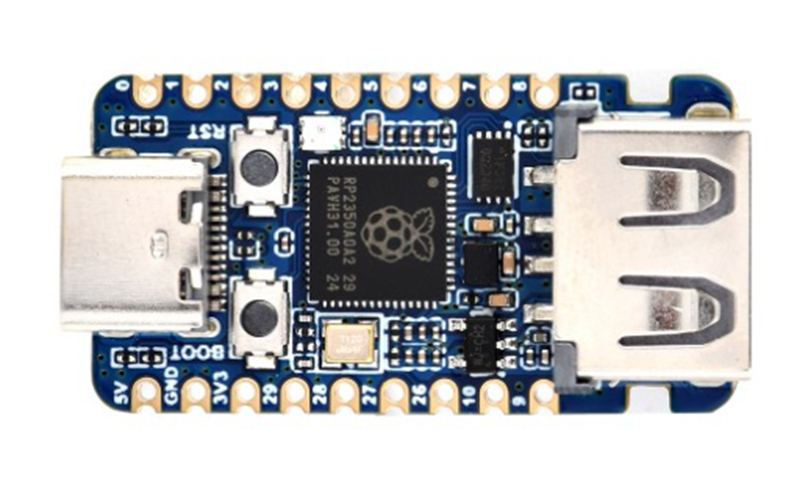
What sets this board apart is its USB-A connector with support for USB host mode, allowing it to communicate directly with USB peripherals like the BleuIO dongle. This makes it an ideal host controller for Bluetooth Low Energy (BLE) applications.
Project Overview
This project demonstrates a dual-mode USB serial bridge implemented on the RP2350A board. The bridge allows the board to simultaneously function as:
- A USB host using PIO-USB on GPIO 12/13, connected to a device like BleuIO.
- A USB device, appearing as a virtual COM port when connected to a PC.
Data is transparently forwarded between the host and device interfaces, allowing you to communicate with BleuIO from a terminal on your PC.
This example project is useful for anyone looking to build a standalone USB host application using BleuIO. You can use the source code as a base and expand it into a more complex BLE project by sending and receiving AT commands directly from the RP2350A board.
Use Case
Imagine a scenario where you want to build a small, embedded BLE sensor gateway. Using the RP2350A as a USB host and BleuIO as the BLE interface, you can develop a powerful BLE solution without needing a full-sized computer. This approach is ideal for prototyping custom BLE applications, sensor data acquisition, or even building a mini BLE scanner.
Hardware Requirements
- Waveshare RP2350A USB Mini
- BleuIO – Bluetooth Low Energy USB dongle
- UART adapter for debugging (connected to GP0 and GP1)
Software Requirements
- Pico SDK
- ARM GNU toolchain (
arm-none-eabi-gcc) - CMake 3.13 or newer
- VS Code with Pico support (recommended)
Host Mode (PIO-USB on GPIO 12/13)
In host mode, the RP2350 board uses PIO-USB to emulate USB host functionality on GPIO pins 12 (D+) and 13 (D-). You can connect any CDC-compatible device, such as a USB-to-serial adapter or the BleuIO dongle, to these pins.
Once connected, the application automatically detects and configures the device. All incoming and outgoing serial data is forwarded and can be monitored through the debug UART interface.
Device Mode (Native USB Port)
When the RP2350A’s native USB port is connected to your PC, it appears as a virtual serial port. This allows you to communicate with the BLE dongle (connected via host mode) using a terminal application like PuTTY or Tera Term.
This enables full-duplex communication, letting you send AT commands to BleuIO and receive responses directly from your PC.
Debug Output (UART on GP0/GP1)
To observe internal debug messages, connect a UART adapter to GPIO 0 (TX) and GPIO 1 (RX) with a baud rate of 115200. This output includes information such as device enumeration, data flow, and potential errors—essential for troubleshooting and development.
Building the Project
To build the firmware, you can either use the provided build script or follow a manual setup.
You can find the complete source code for this project on GitHub:
GitHub Repository: bleuio-rp2350
Method 1: Using the build script
cd rp2350_serial_bridge
./build.sh
Method 2: Manual build with CMake
mkdir build && cd build
cmake .. -DCMAKE_BUILD_TYPE=Release
make -j4
After building, a rp2350_serial_bridge.uf2 file will be generated.
Flashing the Firmware
- Hold the BOOTSEL button on the RP2350 board and connect it to your PC via USB.
- The board will mount as a USB mass storage device.
- Copy the generated
rp2350_serial_bridge.uf2file to this drive. - The board will reboot and start running the dual-mode USB bridge application.
You can now insert the BleuIO dongle into the USB-A port of the RP2350A board and begin communication from your PC.
Code Structure
main.c– Main entry point of the application.serial_host_bridge.c/h– Handles the USB CDC host implementation.tusb_config.h– TinyUSB configuration file.CMakeLists.txt– Build configuration for CMake.
Getting Started with Your Own BLE App
This project is just a starting point. It demonstrates how to set up USB host/device mode and communicate with a CDC-based USB dongle like BleuIO. From here, you can extend the code to parse responses, interact with BLE devices, or trigger actions based on received data.
By combining the flexible RP2350A platform with BleuIO, developers can create their own powerful standalone BLE applications for IoT, sensors, or industrial control—without relying on a full computer.
Source Code
You can find the complete source code for this project on GitHub:
GitHub Repository: bleuio-rp2350