C# desktop application to connect to BLE devices using BleuIO
January 10, 2022
Bluetooth Low Energy (BLE) is a low power wireless technology used for connecting devices with each other. It is a popular communication method especially in the era of Internet of Things. Several devices around the house have a build-in buetooth transceiver and most of them provide really useful capabilitites to automate jobs. For that reason it is really interesting to create desktop application using C# that connects to the devices around the house and manage them.
In this example we are going to create a simple C# windows form application to communicate with BleuIO using SerialPort. This script can be used to create Bluetooth Low Energy application using C# with BleuIO.
Let’s start
As a first step lets create a new project in visual studio and select C# windows form application from the list.

Choose a suitable name for your project.
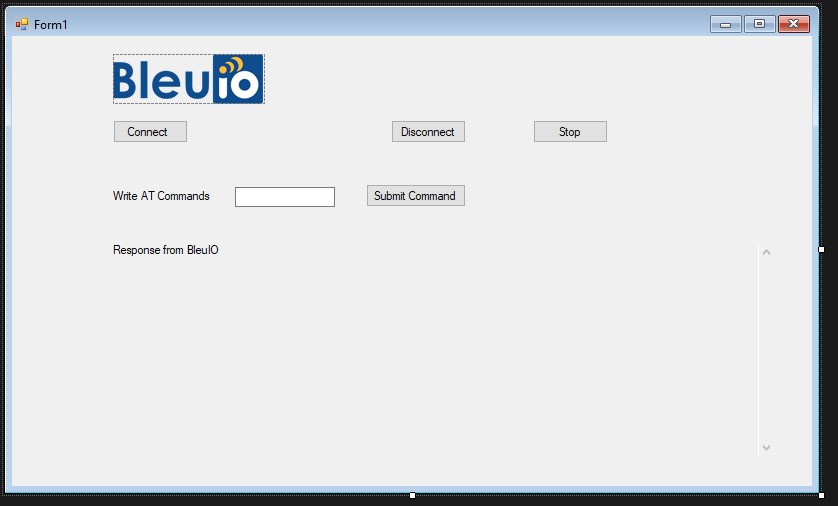
Once the project is created, we will see a blank form screen where we will add buttons and labels to communicate with BleuIO graphically.
We will have buttons that connects and disconnects from BleuIO. An input field that takes AT commands from the user and sends it to BleuIO using SerialPort. And a text area will display the response from BleuIO to the screen.
The form will look like this
The .cs file associated to this will have the following code.
Source code is available at https://github.com/smart-sensor-devices-ab/bluetooth_low_energy_csharp_WFA.git
using System;
using System.IO.Ports;
using System.Linq;
using System.Text;
using System.Windows.Forms;

namespace WindowsFormsApp1
{

    public partial class Form1 : Form
    {
        SerialPort mySerialPort = new SerialPort("COM18", 57600, Parity.None, 8, StopBits.One);
        public Form1()
        {
            InitializeComponent();
            mySerialPort.DataReceived += new SerialDataReceivedEventHandler(mySerialPort_DataReceived);
            mySerialPort.Open();

        }

        private void button1_Click(object sender, EventArgs e)
        {


            lbl_test.Text = "Connected";
        }

        //print response from the dongle
        private void mySerialPort_DataReceived(object sender, SerialDataReceivedEventArgs e)
        {
            SerialPort sp = (SerialPort)sender;
            string s = sp.ReadExisting();
            output_data.Invoke(new EventHandler(delegate { output_data.Text +=  s + "\r\n"; }));

            //lbl_output.Invoke(this.myDelegate, new Object[] { s });
        }


        private void tb_cmd_TextChanged(object sender, EventArgs e)
        {

        }

        private void submit_cmd_Click(object sender, EventArgs e)
        {
            output_data.Text = "";
            byte[] bytes = Encoding.UTF8.GetBytes(tb_cmd.Text);
            var inputByte = new byte[] { 13 };
            bytes = bytes.Concat(inputByte).ToArray();
            mySerialPort.Write(bytes, 0, bytes.Length);
        }

        private void btn_disconnect_Click(object sender, EventArgs e)
        {
            mySerialPort.Close();
            Environment.Exit(0);
        }

        private void Form1_Load(object sender, EventArgs e)
        {

        }

        private void btn_stop_Click(object sender, EventArgs e)
        {
            byte[] bytes = Encoding.UTF8.GetBytes("\u0003");
            var inputByte = new byte[] { 13 };
            bytes = bytes.Concat(inputByte).ToArray();
            mySerialPort.Write(bytes, 0, bytes.Length);
        }

        private void output_data_TextChanged(object sender, EventArgs e)
        {

        }

        private void pictureBox1_Click(object sender, EventArgs e)
        {

        }
    }
}
As you can notice I wrote COM18 to connect to serial port because BleuIO device on my computer is connected to COM18.
You can check your COM port from device manager.
Lets run the project and click on connect button.
Once we are connected to BleuIO, we will be able to write AT commands using the input filed.
List of AT commands are available at https://www.bleuio.com/getting_started/docs/commands/
There is a stop button that write control+c to dongle and cancels current execution.
Here is a demo of this sample app.