Turn an RP2040 or RP2350 Board into a HibouAir Gateway with BleuIO
August 6, 2026
In this tutorial, we will look at how the BleuIO USB dongle can add Bluetooth Low Energy communication to an RP2040 or RP2350 development board.
The project uses the open-source Pico I/O Bridge firmware. It allows a supported development board to work as a USB host for BleuIO. BleuIO scans nearby HibouAir sensors, and the board displays the latest sensor data through a simple browser interface.
The board also creates a small USB network connection with the computer. This means the dashboard can be opened directly in a web browser without installing a desktop application or connecting the board to Wi-Fi. The firmware is written in Rust and exposes its interfaces through a local .local address.
This project is a useful example of how BleuIO can provide BLE communication to development boards that do not have built-in Bluetooth. The board handles USB hosting and networking, while BleuIO handles Bluetooth scanning.
Requirements
You will need:
- BleuIO USB dongle
- One or more HibouAir sensors
- A supported board with a USB host connection:
- A USB data cable for connecting the board to your computer
- A computer with a modern web browser
- The Pico I/O Bridge firmware
What Does This Project Do?
The project creates a simple connection between HibouAir sensors, BleuIO and your computer.
1. HibouAir broadcasts sensor data
HibouAir sensors regularly broadcast their measurements using Bluetooth Low Energy advertising packets.
Depending on the HibouAir model, these broadcasts can contain parameters such as: Temperature, Humidity, Pressure, CO2, VOC, Noise, PM1.0, PM2.5, PM10, Ambient light
Because the project reads BLE advertising data, the HibouAir sensors do not need to be paired with the development board.
2. BleuIO receives the BLE advertisements
BleuIO is connected to the USB-A host port of the development board.
After BleuIO is detected, the firmware manages the scanning process automatically. BleuIO searches for nearby HibouAir advertisements and sends the received data to the board.
This is an important part of the project: the RP2040 or RP2350 board does not need its own Bluetooth radio. BleuIO provides the Bluetooth Low Energy functionality through USB.
3. The board decodes the HibouAir data
The firmware reads the BLE scan results from BleuIO and decodes the HibouAir manufacturer data.
It identifies the HibouAir sensor ID and sensor type before extracting the measurements supported by that particular model.
The firmware keeps the latest readings for up to eight HibouAir sensors in memory. When no sensor filter has been configured, sensors are discovered automatically.
4. The results appear in a web browser
The development board appears on the computer as a small USB Ethernet device. It provides its own local IP network and advertises a unique .local hostname.
The browser dashboard shows: BleuIO connection status, USB transfer status, Number of HibouAir sensors discovered, HibouAir sensor IDs, Sensor types, Latest measurements, Time since the last advertisement, Number of reports received
The dashboard updates automatically while BleuIO continues scanning.
How to Run the Project
The complete project is available on GitHub:
Pico I/O Bridge GitHub repository
There are two ways to run it:
- Flash a pre-built firmware file.
- Build the firmware from the Rust source code.
Using a pre-built firmware file is the easiest method.
Method 1: Use the Pre-Built Firmware
Step 1: Download the firmware
Open the project’s release page:
Pico I/O Bridge v0.2.0 release
The release contains pre-built UF2 firmware files for the supported board profiles, together with a checksum file.
Download the UF2 file that matches your board.
For this project, select the firmware for either:
Adafruit Feather RP2040 USB Hostor:
Waveshare RP2350 USB-ADo not flash firmware intended for a different board model.
Step 2: Put the board into bootloader mode
Disconnect the board from the computer.
Put the board into its normal UF2 or BOOTSEL flashing mode. The exact button combination depends on the board, so follow the normal bootloader procedure for your development board.
When the board enters bootloader mode, it should appear on the computer as a removable USB drive.
Step 3: Flash the UF2 file
Copy the downloaded UF2 file to the board’s removable drive.
The board should restart automatically after the file has been copied.
Wait a few seconds for the firmware to start and for the USB network connection to become available.
Step 4: Connect BleuIO
Insert the BleuIO USB dongle into the USB-A host port of the development board.
The physical connection should look like this:
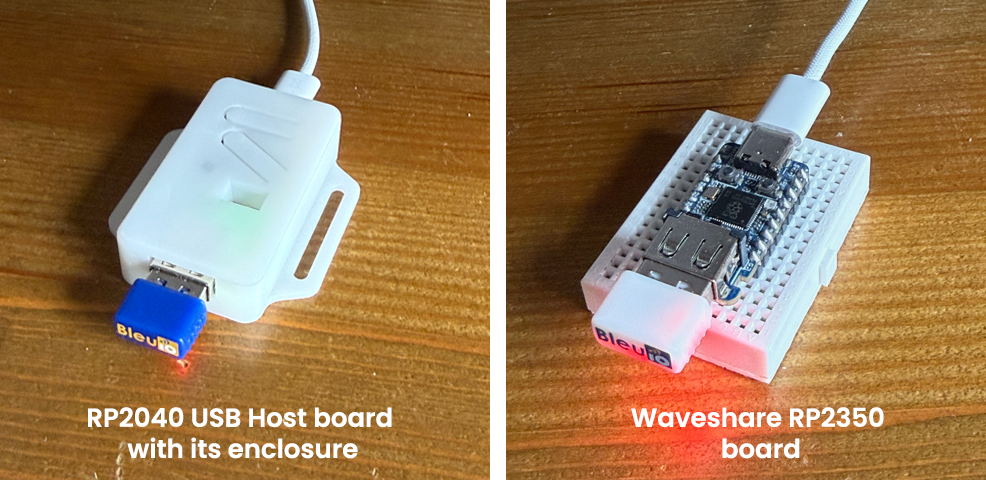
Do not connect BleuIO directly to the computer for this setup. It needs to be connected to the USB host port on the development board.
Step 5: Power the HibouAir sensors
Make sure your HibouAir sensors are powered on and located within Bluetooth range of BleuIO.
No Bluetooth pairing process is required. The sensors simply need to be broadcasting their normal BLE advertisement data.
Step 6: Find the board hostname
Each board creates a unique .local hostname.
For the Adafruit Feather RP2040 USB Host, it will follow this format:
pico-io-usb-host-xxxxxx.localFor the Waveshare RP2350 USB-A, it will follow this format:
pico-io-waveshare-rp2350-xxxxxx.localReplace xxxxxx with the unique identifier assigned to your board.
On macOS, the board can also be discovered through the built-in dns-sd utility:
dns-sd -B _http._tcpThe project advertises its web interface through mDNS and DNS Service Discovery.
On Windows, the optional mDNS Discovery utility can be used to view available mDNS and DNS-SD services.
Step 7: Open the web interface
Open a browser and enter the board hostname.
For example:
http://pico-io-usb-host-244c29.local/usb-host.htmlUse your board’s actual hostname rather than the example above.
The USB-host-enabled profiles expose the USB status page at:
/usb-host.htmlThe web interface and the USB-host API are included whenever the firmware is built with the pio-usb-host feature.
Step 8: Wait for BleuIO to become ready
After opening the page, check the USB section.
You should see a status similar to:
BleuIO ReadyYou should also see:
BleuIO HibouAir scanner readyOnce BleuIO is ready, the managed HibouAir scan begins automatically.
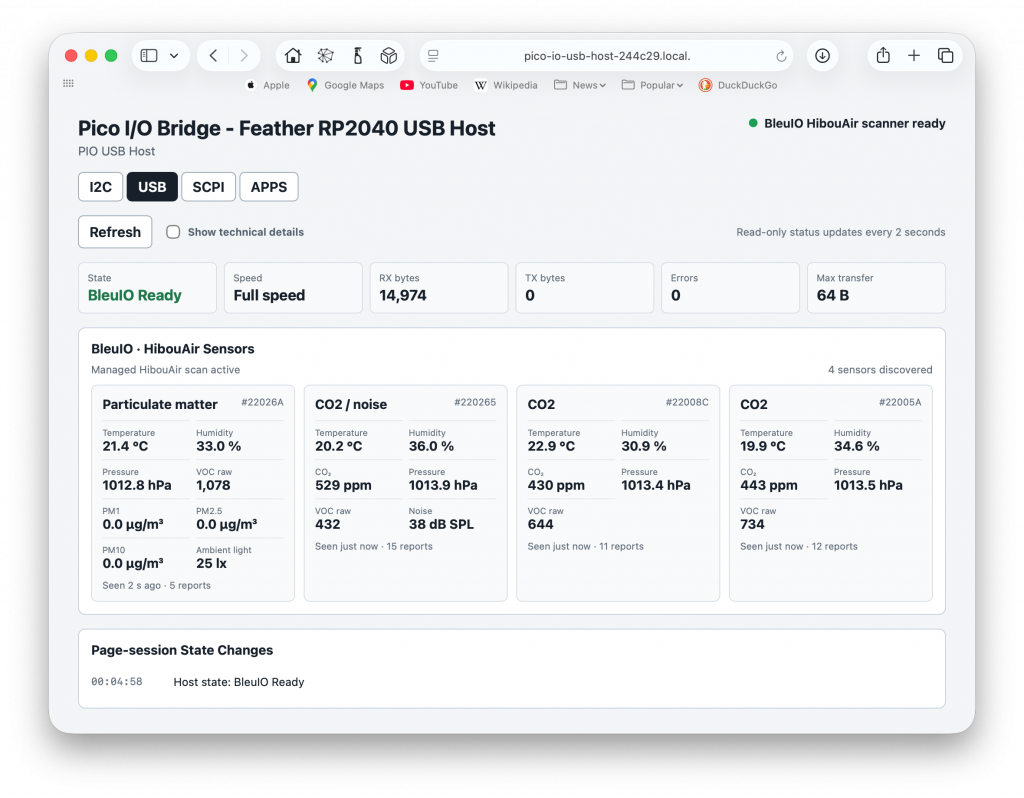
Nearby HibouAir sensors should start appearing as individual cards. The first results may take a few seconds, depending on the sensors’ advertisement intervals.
Expected Output
The page should show each discovered HibouAir sensor with its sensor ID, sensor model and latest measurements.
Method 2: Build the Firmware from Source
Developers can also clone the complete project and build the firmware using Rust.
Clone the repository:
git clone https://github.com/ulso/pico-io-bridge.git
cd pico-io-bridge
Build for the Adafruit Feather RP2040 USB Host
cargo build --locked --release \
  --no-default-features \
  --features board-adafruit-rp2040-usb-host
Build for the Waveshare RP2350 USB-A
cargo build --locked --release \
  --target thumbv8m.main-none-eabihf \
  --no-default-features \
  --features board-waveshare-rp2350-usb-a
The RP2040 and RP2350 profiles use different Rust target configurations, so it is important to use the command intended for your board.
With the board in BOOTSEL mode, the project can also be built and flashed using the appropriate cargo run command. The repository contains the full toolchain and flashing details for developers who want to modify the firmware.
The complete source code, build instructions and examples are available in the Pico I/O Bridge GitHub repository. Additional project screenshots can be found in the Pico I/O Bridge Wiki.